This article was co-authored by Mia Danilowicz. Mia Danilowicz is a Master Tailor who works onset and on the red carpet in Los Angeles, California. With over a decade of experience, Mia specializes in bridal and gown couturier fittings, garment reconstruction, and custom design. Mia has worked at the Oscars, Grammys, SAG Awards, and Golden Globes. Her clients include a long list of entertainment and fashion industry headliners, major fashion magazines, luxury consumer brands, and popular media. Mia was trained at the Fashion Institute of Design and Merchandising and received her AA in Fashion Design and BS in Business Management.
wikiHow marks an article as reader-approved once it receives enough positive feedback. In this case, 86% of readers who voted found the article helpful, earning it our reader-approved status.
This article has been viewed 430,566 times.
Tatting is an old thread weaving technique that you can use to create lace. If you have never tatted before, then getting started can seem intimidating. However, there are a few simple techniques that will help you to get started with confidence. You will need to have the right materials, wind your shuttle, learn how to hold the shuttle and thread, and practice making double stitches.
Steps
Gathering Your Materials
-
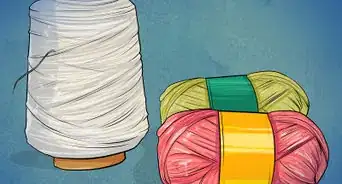
1Choose your thread. Before you can begin tatting, you will need to find a thread that you’d like to work with. Size 10 cotton crochet thread is a great choice for beginners because it is not too fine and it will not snag as easily as other threads. However, you can go with another kind of thread that appeals to you if you prefer.[1]
- Keep in mind that a small number on a thread size means it is actually wider than another thread with a larger number thread size. For example, a size 10 thread will be larger than a size 40 thread.
- Stick to a size 10 or 20 thread when you are just starting out. This will be easier to see. As your skills improve, you can move to finer threads, such as a size 50.[2]
-
2Select a shuttle. You also need a shuttle to tat. A shuttle is a spool with two pointed ends that are open, but that only allow the thread to pass through when you tug on it. This will help you to control the thread as you tat.
- Shuttles can be a little difficult to find. Check your local craft supply stores or buy a tatting shuttle online.
- The most common and budget friendly type of shuttle is a simple plastic one, which is a great choice if you are a beginner. You can also find shuttles that are made of wood or bone, but they are more expensive and the only benefit of these is that they may feel nicer in your hand while you are working. However, these shuttles work the same way as the less expensive plastic ones.[3]
Advertisement -
3Get a pair of scissors. You will need to cut the thread regularly while tatting. Make sure that you have a sharp pair of scissors handy.
-
4Be prepared to use your hands a lot. The only other tool you use for tatting is your hands. Both of your hands will be engaged when you are tatting. You may want to remove your jewelry to keep it from snagging on the thread.


Winding the Shuttle
-
1Insert the thread through the hole in the center of the shuttle. The shuttle has a small hole in the center of it which you will use to start threading your shuttle. Insert the thread through the hole and pull it out by a couple of inches (about 5cm) on the other side. Then, place one finger over the hole to hold the thread in place.[4]
-
2Wrap the thread around the center of the shuttle. With your finger still on the thread, begin to wind the thread around the spool. Do this a few times to secure the thread, and then remove your finger and keep wrapping. Wind the thread around and around the spool until the thread is nearly even with the outside of the shuttle.[5]
- Do not wind the thread so much that it extends out past the edge of the shuttle.
-
3Cut the thread to disconnect it from your spool. When you have finished winding the shuttle, cut the thread to separate it from the thread spool.[6]
- Your shuttle is now ready to use for tatting!


Positioning the Shuttle and Thread
-
1Unwind about 18 inches (46 cm) of thread. To position your thread, you will need to have about 18 inches (46 cm) of thread available. Unwind this amount from your shuttle to get started.
-
2Hold the shuttle in your right hand. Grasp the shuttle at its center with the thumb and index finger of your right hand. It is important to hold the shuttle this way so that the thread can flow freely and unwind as you work.[7]
- Do not hold the shuttle by the sides or tips because this may prevent you from unwinding the thread.
-
3Grasp the thread. Next, you will need to grasp the end of the thread. Press the end of the thread between the thumb and index finger of your left hand. It is important to grip the thread in this way so that your other fingers will be free to move the thread around as needed.[8]
-
4Spread out your fingers. Once you have a piece of thread pressed firmly between your thumb and index finger, spread out your other three fingers as if you are forming an “OK” sign. Then, loop the thread around these fingers to form a loop and press the other end of the thread between your index finger and thumb to secure the loop.[9]
- Your shuttle, thread, and hands are now positioned to begin tatting.


Doing a Double Stitch
-
1Insert the shuttle through the loop. When you are just starting out with tatting, you will need to learn how to do double stiches. This is a very basic stitch that only requires a couple of different movements. The first movement is to insert the shuttle through the loop you have created. Pass the shuttle right through the center of the loop.[10]
- Double stitches are usually abbreviated as “ds” in tatting patterns.
-
2Bring the shuttle back over and through the new loop. Next, you will need to bring the shuttle up on the other side of the loop and then bring it over the top of the loop. As you do so, come downwards slightly with the shuttle and bring it through the new loop. Then, pull the thread to tighten the knot you just created.[11]
-
3Bring the shuttle over the loop. The next part of the double stitch is just the opposite of the first part. Instead of coming through the loop, bring the shuttle over the top of the loop.[12]
-
4Pull it out through the loop and the new loop. Next, bring the shuttle down and through the large loop. Then, bring the shuttle up slightly to come through the new loop you created. Pull the thread to tighten the knot.[13]
- This completes one double stitch! Make several of these for practice when you are just starting out in tatting.


Continuing Your New Hobby
-
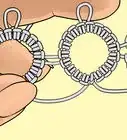
1Make a chain of double stitches. Once you know how to double stitch, you can use this important tatting skill to create basic tatting designs. To make a chain, you will be working double stitches onto a piece of thread instead of into a circle. You will need to hold a second piece of thread next to your circle to work in a chain. The stitches you work onto the thread will become your chain.
-
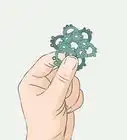
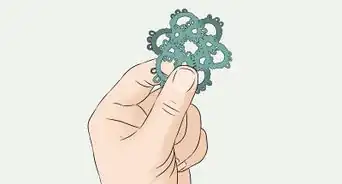
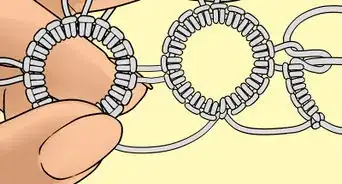
2Learn how to make rings. Rings are another basic skill in tatting. You can easily make a ring once you know how to double stitch. To make a ring, all you have to do is keep making double stitches around your circle. When the circle reaches the desired size, you can pull the tail to tighten it.
-
3Include some picots. To make a picot, begin making a double stitch, but pinch a portion of the thread before you pull the thread to tighten the stitch. This will leave a loop extending from the double stitch. You can make your picots as small or as large as you like.
-
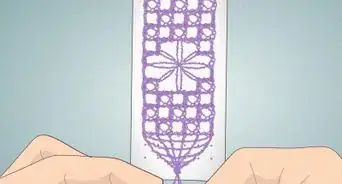
4Choose your first project. Once you have mastered the basic skills of tatting, try choosing a beginner level project to work on. You can pick up a book of tatting patterns to start with, or look for a beginner level pattern online.
- After making a lace, you can attach it to a piece of cloth of your choice. You will need a thinner sewing machine needle to work.
- Use a poly blend thread stronger than cotton.
- Make sure your machine is set on the sewing setting to work on lace.
-
5Practice often and be patient. Tatting is a precise, slow art form. Any project you choose will take some time to make and you may make some mistakes along the way. Be patient and practice your new hobby for a little while every day.
- Try pulling out your tatting while you are waiting for the bus, taking a break at work or school, or during your spare time at home. With time and practice, you will notice your skills getting better every day.


Community Q&A
-
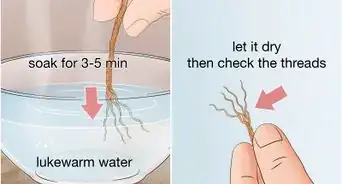
QuestionWhen the pattern says to stiffen the work at the end, what do they mean and with what?
 Community AnswerYou can do this by soaking your work in water or in a 50/50 mixture of white glue and water, and then letting it dry overnight. When the tatted item is dry, it will be stiff. If you do not want your project to be stiff, then you can skip this finishing step.
 -
QuestionIs it possible to tat without the shuttle?
 Community AnswerYes, an alternative would be using a long, thin metal needle that you would wrap the thread around.
 -
QuestionHow do I do a flip stitch?
 Holly PacierCommunity AnswerA flip or flipped stitch is the same as a double stitch, the only stitch you use in tatting. It's called this because you "flip" the loop of thread from the shuttle thread to the working thread using the technique illustrated above. You do not see this term in needle tatting because the stitch is formed with the working thread without any need to use a shuttle, and therefore, no "flip" will take place.
Things You’ll Need
- Shuttle
- Thread
- Scissors

References
- ↑ https://www.youtube.com/watch
- ↑ http://www.tattedtreasures.com/2013/03/choosing-thread-sizes/
- ↑ http://www.tattedtreasures.com/2013/05/choosing-the-right-shuttle/
- ↑ https://www.youtube.com/watch
- ↑ https://www.youtube.com/watch
- ↑ https://www.youtube.com/watch
- ↑ https://www.youtube.com/watch
- ↑ https://www.youtube.com/watch
- ↑ https://www.youtube.com/watch
About This Article

To begin tatting, try doing a double stitch by holding the shuttle in your right hand with 18 inches of thread sticking out of it. Grab the end of that thread with the thumb and index finger of your left hand, and spread your other three fingers to form a loop with the thread. Next, send the shuttle through that loop, back over the top of it, and then through the new loop you’ve created. Then, bring the shuttle over that loop and pull it through the one you just made and the old one. Scroll down to learn how use double stitches to make patterns.