X
wikiHow is a “wiki,” similar to Wikipedia, which means that many of our articles are co-written by multiple authors. To create this article, volunteer authors worked to edit and improve it over time.
The wikiHow Tech Team also followed the article's instructions and verified that they work.
This article has been viewed 130,682 times.
Learn more...
In Adobe Photoshop, the Warp tool allows you to quickly manipulate and deform images via a grid-like system of control points. In addition to images, shapes and paths can also be warped. To activate the Warp tool, select the layer/image/etc. you want to manipulate, then click Edit > Transform > Warp.[1]
Steps
Method 1
Method 1 of 3:
Activating the Warp Tool
-
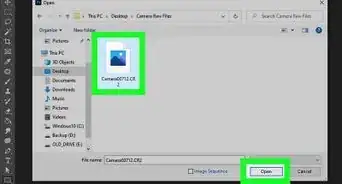
1Open a new document in Photoshop. Load an image that you would like to warp.
-
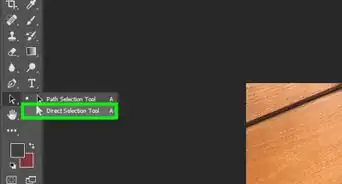
2Select the layer that you would like to warp. Click the layer that you want to warp in the Layers panel.
- If the layer is locked, as it usually is on JPG and PNG images, click the Lock icon to unlock it. Alternatively, drag the layer onto the New Layer icon to create a duplicate, editable layer. The Warp tool does not work on the background.
Advertisement -
3If desired, select a subsection of the layer. At this point, you can use one of the selection tools (such as the Lasso Tool or the Rectangular Marquee Tool in the Toolbox) to select the area you want to warp. Use these exactly as you normally would to select the portion of the layer you want.
- To keep your work more manageable, consider making a new layer from your selection (Ctrl+J).
- Note: If you select nothing, everything in the layer warps by default.
-
4Select Edit > Transform > Warp. This should put a grid-like mesh over the layer or selection.
- At this point, you can start warping the image. Click here or scroll down to the section below to learn how to warp.
-
5Alternatively, activate the Transform tool with Ctrl+T. At the right end of the options toolbar, you should see a button that looks like a curved grid over a curved arrow. Press this button to switch between the free transform and warp modes.
- With the Transform tool active, you can also just right click on the selection and select "Warp" to get the same effect.


Advertisement
Method 2
Method 2 of 3:
Warping the Image
-
1Click and drag the areas of the grid to manipulate the image. When you select an image for warping, a gridded mesh should automatically appear over it. Clicking and dragging any part of this mesh will cause the image underneath to deform in the direction you drag it. This can take a little getting used to, so you may want to practice before you save your work.
- You can click any of the control points (the dots highlighted on the edge of the grid), one of the intersections of the grid lines, or an area inside the grid — any will work.
-
2Use the control point handles to get the curves just right. When you bend or curve your image with the warp tool, you will see short line segments with dots at the end appear in the grid. Clicking and dragging these "handles" allows you to fine-tune the curves in your warped image.
-
3Use the pop-up menu to warp to a specific shape. You don't have to warp your image by free-hand — you can also warp it to one of several preset shapes. To do this, once your image is selected for warping, look for the Warp pop-up menu in the Options bar. Here, you can choose a warp style that fits your needs.[2]
-
4Use the Warp options to further manipulate your image. In the Warp pop-up in the Options bar, there are several more options that can help you modify the warped image. These are:[3]
- Change Warp Orientation: The button looks like a curved grid next to a down arrow and a right arrow. This turns the warped section between vertical and horizontal orientations.[4]
- Change Reference Point: The button looks like a black square surrounded by a border of white squares.
- Define Warp Numerically: Enter numbers in the Bend X and Y boxes to set precisely how much to warp the image.
-
5Finalize your edits. When you're satisfied with your image, confirm the changes you've made. There are two ways to do this:
- Simply hit the ↵ Enter key (⏎ Return on Macs).
- Click the check mark button in the Options bar.
- To cancel your work, press Esc or click the cancel button next to the check mark button.


Advertisement
Method 3
Method 3 of 3:
Using the Puppet Warp Tool
-
1Select an image to puppet warp. In Photoshop, the Puppet Warp tool is a quick, freehand way of manipulating an image related to the Warp tool. To use it, follow these steps:
- Create a layer with the image you want to warp.
- Make sure the layer is selected in the Layers panel.
- Select Edit > Puppet Warp from the menu bar.
-
2Lay down points on the image. When the image is selected for puppet warping, clicking will add "pins" (signified by small dots). Dragging one pin after it's placed will warp that portion of the image. All of the other pins will "lock" the area around them in place, preventing it from being distorted.
- Because of the way the pins work, it's usually a good idea to put a few pins in crucial locations on the image you want to warp. For instance, if you're using the Puppet Warp tool to move the position of someone's arm, you might put a pin on her hand, another on her elbow, and a third on her shoulder. This way, when you move any of the three, the rest of the arm won't deform by much.
-
3Drag the points to manipulate the image. Once you've placed your array of pins, you can click and drag any pin individually to move it. This will warp the image accordingly, pushing or pulling the area around the pin as you move it. Puppet warping can take some time to master, but it's a quick, convenient way to make adjustments once you know how to use it.
- With a point selected, you can use the arrow keys to make very minor adjustments.
- Note that you can ⇧ Shift+click to select multiple points at once.
-
4Use the Pin Depth feature to move parts of the image behind itself. If you want to warp the image so that part of it goes behind another part, first, select the pin(s) on the screen you want to adjust. Then, use the "up" and "down" buttons next to "Pin Depth:" in the Options bar to move the selected portion in front or behind the rest.
-
5Use the Puppet Warp options to edit the image. The following selections in the Options bar can be used to modify the way that the Puppet Warp tool works:
- Mode: Adjusts how drastic the changes you make are. "Distort" makes your image especially elastic while "Rigid" makes your changes more minor.[5]
- Expansion: Allows you to expand or contract the outer edge of the mess formed by your pins.
- Density: Allows you to change the spacing of mesh points. More points gives you greater precision, but can tax your computer. Fewer points make your changes quicker but less precise.
-
6Confirm your changes as normal. When you're satisfied with your work, press ↵ Enter to apply your changes. Alternatively, click the check mark button in the Options bar.
- As noted above, Esc or the cancel button in the Options bar will undo your work.


Advertisement


-Step-10.webp)
References
- ↑ https://helpx.adobe.com/photoshop/using/warp-images-shapes-paths.html
- ↑ https://helpx.adobe.com/photoshop/using/warp-images-shapes-paths.html
- ↑ https://helpx.adobe.com/photoshop/using/warp-images-shapes-paths.html
- ↑ https://helpx.adobe.com/photoshop/using/transforming-objects.html
- ↑ http://digital-photography-school.com/introduction-to-puppet-warp-in-photoshop/
- ↑ https://helpx.adobe.com/photoshop/topics.html
About This Article
Advertisement