wikiHow is a “wiki,” similar to Wikipedia, which means that many of our articles are co-written by multiple authors. To create this article, volunteer authors worked to edit and improve it over time.
This article has been viewed 102,211 times.
Learn more...
Let's face facts: kids are messy, and car seats often pay the price. When your little one spits up, spills food, or otherwise makes a mess, you’ll want to remove the seat and wash it thoroughly. For the most part, the process involves some "elbow grease" and remembering how to disassemble and reassemble the seat. However, please note that harness straps and buckles require special care for safety reasons.
Steps
Preparing for a Thorough Cleaning
-
1Choose a good time to wash the seat. Unless you happen to have a backup car seat, it is important to start the cleaning process when you are sure you will not need it for awhile. Assuming the seat isn't so dirty as to need immediate attention, wait until you feel comfortable doing without the seat for at least several hours. An ideal time might be after your infant has been put to bed for the night.
- If, however, you're dealing with vomit, a blown-out diaper, or some other big mess, immediate "triage" cleaning is the best way to salvage the seat.[1]
-
2Wipe away any major messes. Using baby wipes or damp rags or paper towels, wipe and scoop away any loose, sloppy, sticky, chunky, etc. debris. (We'll leave the details of the types of messes you can face to the imagination.)[2]
- Clearing away this gunk will make the remaining cleaning portion easier to manage.
Advertisement -
3Remove the infant seat. Untie all the straps, and uninstall the seat. Doing so will allow you to wash the seat thoroughly without climbing into the car and getting everything wet. You’ll also be able to easily reach all the parts of the infant seat.
- Take note of the de-installation to help you with the re-installation. Take pictures if necessary.
-
4Shake, brush, or vacuum the surface. Brush crumbs and debris off the car seat. Give the seat a shake to remove any hidden crumbs or other debris that has accumulated.
- If you have a vacuum cleaner with a small attachment, use it to remove any additional debris that may be stuck in partition walls and corners.
-
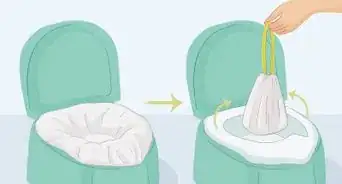
5Remove the cover and straps. Most infant car seats have removable fabric covers. If you have your manual handy, consult it. If not, you can generally start from the top, unfastening clips, snaps, and buttons until you reach the bottom of the seat.
- Once you have taken the cover off, you should also take off the straps. Try to memorize their location (or take a picture) so that you know how to put them back into place (this is especially important if you do not have your manual).
- For safety reasons, harness straps (and buckles, to a lesser extent) require special and gentle cleaning. See the relevant section of this article for more information, and always consult your owner's manual.[3]


Washing the Cover and Base
-
1Spot-clean obvious stains on the fabric cover. Once the cloth cover is removed, you can easily rub a mild detergent into any visible spots or stains. Rub in a circular motion to get these places as clean as possible.[4]
- If your car seat does not have a removable cover, do your best to deal with spots using a sponge and some soap. Scrub until the spots fade.
-
2Launder the fabric cover. Check your manual or the cover label for specific instructions, but in general, it’s best to wash on the gentle cycle. Use a mild detergent; remember that your child’s skin will be in contact with it. Make sure the cover gets completely rinsed.
- Generally speaking, cotton covers can be washed at up to 60 degrees Celsius (140 degrees Fahrenheit). If your cover is made of synthetic fibers or dark colors, though, stick to washing at up to 40 degrees Celsius (104 degrees Fahrenheit).
- If you cannot remove the cover to run it through the washing machine, you’ll have to wash the whole thing by hand. Use a sponge and a mild detergent to clean the entire cover.
-
3Clean the plastic base. Once you’ve washed the cover, continue to wash the plastic and metal parts of the seat. Use a damp cloth or sponge along with a mild detergent and water. Rub away all the dirt and grime, then rinse well under running water. Spray with disinfectant if desired.[5]
- This is the part of the cleaning when you can vent some of your frustrations. As long as you're not using an abrasive cleaner or scrubber (like steel wool), feel free to really get in there and scrub away. Use a garden hose to spray everything down if desired.
- As a general rule, it's best to tilt the seat in various directions after rinsing. This prevents water from accumulating in any of the parts.
-
4Clean straps and buckles as per manufacturer's instructions. Machine laundering or harsh cleaners or scrubbing can degrade the strength of the straps, causing a safety hazard.[6]
- Follow the manual's instructions carefully, and see the relevant section of this article for tips on cleaning straps and buckles.


Washing the Straps and Buckles
-
1Follow the manufacturer's instructions. Most if not all car seat manufacturers recommend that harness straps not be placed in a washing machine or hand cleaned with harsh detergents. Surface cleaning with a soft cloth, lukewarm water, and a gentle soap if necessary are the typical recommendations.[7]
- While such delicate care may seem odd for these strong, protective straps that are meant to stand up to car accidents, the concern lies in the fact that vigorous washing and/or harsh chemicals can weaken the tensile strength of the strap material. This can occur even when the strap still looks strong. But such weakening would make a failure much more possible in an accident.
-
2Wipe down harness straps gently with water. Focus on wiping away surface stains, and forget about attempting deep cleaning. Use only a mild soap, like hand soap, if necessary.
- If the straps are so disgustingly soiled that you can't stand to keep using them, or look worn or damaged in any way, immediately replace them. Contact the seat manufacturer to see if replacement straps are available. This should be able to save you from having to buy a whole new seat.[8]
-
3Dunk the buckle in warm water. Whether plastic or metal, the buckles should be able to hold up to more vigorous cleaning than the straps. However, they are still essential components that should face minimal wear and tear to ensure they work when it really counts.
- Simply dangle the buckle on the strap and dip it into a bucket of lukewarm water, then slosh it around a bit to loosen any gunk inside the mechanism. Clean the surface with a soft cloth and water (and mild soap if needed).[9]
-
4Let straps and buckles air dry. Fresh air, sunshine, and time are the best ways to remove odors from harness straps. If that's not possible, at least let them air dry thoroughly before re-installation.[10]
- Never place harness straps in the dryer, or use a hot blow dryer on them. Extreme heat could also possibly damage the tensile strength.
- Make sure the inside of the buckle is thoroughly dry as well, to prevent any rusting or corrosion.


Drying and Reassembling the Seat
-
1Dry the parts thoroughly. If your cover is removable, either run it through the dryer, if the label permits it, or hang it to air dry.[11]
- Lay the plastic surface out to air dry. Once you have rinsed the plastic and metal parts of the seat, you can simply leave it sitting someplace to air dry. Wiping it with a dry cloth will expedite the process, but in general, it’s best to allow several hours or a day for it to dry completely.
- As noted, always only air dry harness straps and buckles.
-
2Combat odors with time and sunshine. If you cannot remove the cover, you can leave the entire seat, cover and all, in a sunny place to dry. If you don't have sunshine, it will just take more time.[12]
- You can use odor-eliminating sprays on the base and fabric cover if desired. Remember, however, that your child's skin will be in close contact with the cover, so be mindful of the materials in your chosen spray.
- Don't spray down the harness straps. Just rely on air as the odor eliminator.
-
3Replace the cover. Once it has dried completely, reattach the fabric cover to the seat base. Refer to the instruction manual if necessary.[13]
- You basically need to reverse the process you used to remove the cover, so if you took mental or physical notes, or a picture, video, or sketch, you should be in good shape.
-
4Reattach the straps. Pull the strap back through the holes correctly, in the right order, to properly install the seat and make sure that it is safe for your child. Again, refer to the instruction manual if necessary.[14]
- Make sure that the straps do not twist when you thread them through the seat. Twists in the straps can cause them to wear out faster, and they may rub uncomfortably against your baby's skin. Even worse, if the straps are severely twisted, they may not hold your infant securely in a collision.
- If you have any concern about your re-installation, take your seat to a fire department or other site where free car seat safety checks are done. Someone there will be happy to ensure a safe installation.
- Likewise, if you have any concerns about the integrity of any components, especially straps and buckles, replace them or the entire seat. Your child's safety is always a worthwhile investment.


Community Q&A
-
QuestionDoesn't machine washing it remove fire retardants on the fabric?
 XoxoDuckieCommunity AnswerDon't wash it in a machine. Hand-wash it with a damp cloth.
Warnings
- Always rely on manufacturers' instructions first, especially in regards to cleaning and installing straps and buckles.⧼thumbs_response⧽


References
- ↑ http://csftl.org/clean-my-car-seat/
- ↑ http://csftl.org/clean-my-car-seat/
- ↑ http://csftl.org/clean-my-car-seat/
- ↑ http://www.overstock.com/guides/how-to-clean-a-car-seat
- ↑ http://www.overstock.com/guides/how-to-clean-a-car-seat
- ↑ http://csftl.org/clean-my-car-seat/
- ↑ http://csftl.org/clean-my-car-seat/
- ↑ http://csftl.org/clean-my-car-seat/
- ↑ http://csftl.org/clean-my-car-seat/
About This Article
To wash an infant car seat, you’ll need to disassemble the parts and wash each individual piece. Start by vacuuming the car seat and wiping away any major messes with a damp rag so it’s easier to clean. Then, remove the fabric covers and straps and hand wash these. Once you’ve washed the cover, you can use a damp cloth with a mild detergent to wipe down the plastic base. Use a wet rag to wipe down the straps and buckles or soak them in a bucket of warm water. Just don’t put these in a washing machine since they can be easily damaged. Finally, make sure to let everything dry completely before putting the seat back together. For advice on reattaching the straps on your car seat, read on!