This article was co-authored by wikiHow staff writer, Rain Kengly. Rain Kengly is a wikiHow Technology Writer. As a storytelling enthusiast with a penchant for technology, they hope to create long-lasting connections with readers from all around the globe. Rain graduated from San Francisco State University with a BA in Cinema.
This article has been viewed 2,771 times.
Learn more...
Do you want to place a caption under an image with Google Docs? With the Drawing feature, you can easily link an image with a text caption that can be moved as one object. You can also use a table or write directly under the image itself using Inline text. When using the mobile app, you'll only be able to use Inline text to put a caption underneath a photo. This wikiHow will show you how to add captions to images in Google Docs using your Windows or Mac computer and your iPhone or Android device.
Things You Should Know
- Insert an image with "Insert" → "Drawing" → "New". Use the Text Box tool to create a box, then enter your text. Click "Save and Close".
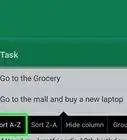
- When using a table, create a 1x2 table. Insert an image in the top half and your text in the lower half.
- For Inline text, click your image and select "Inline text". Click the area below to enter your caption.
Steps
Using a Text Box
-
1Open a new document in Google Docs. Do this by clicking the + icon on the Google Docs homepage.[1]
- You can use Google Chrome, Safari, Mozilla Firefox, or another browser.
- If you aren't already logged in, click Sign in to do so now or create an account.
-
2Click Insert in the top toolbar. This will be between View and Format.Advertisement
-
3Click Drawing, then New. You must insert the image using Google's Drawing tool to add a Text Box caption.
- You can also click Drive if you want to upload an image from Google Drive.
-
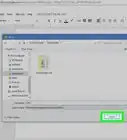
4Click the image icon. This is the square with two mountains inside. A new window will open.
-
5Upload your image. You can drag-and-drop an image from your computer into the field or click Choose an image to upload to browse your files.
- You can also insert an image by URL, from your albums, or search.
- Once uploaded, your image should appear in the Drawing tool window.
-
6Click the Text Box icon. This is the T inside of a box with four squares at the corners.
- Your cursor will change into a +.
-
7Create your Text Box. Click the area underneath the image and drag towards the right to create a text box. You can adjust the size after.
- Use the eight squares along the sides of the Text Box to adjust its size and length.
-
8Align your Text Box. Google Docs will indicate the left, middle, and right side of the image by a red line.
- Drag your Text Box until you see the red line in the middle of the image and text field.
-
9Enter your text. This is the text that will be your image's caption. If you have a long caption, it will stay within the Text Box.
- If you need to edit your text style, select all your text by dragging and highlighting. You can also use CTRL + A (Windows) or CMD + A (Mac).
- Change the font by clicking the down arrow and selecting a new one. Change the size by clicking the - or + icon.
- If you want the text to appear in the middle, click ••• in the top-right corner of the Drawing window. Click the Align icon, then Center.
-
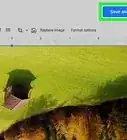
10Click Save and Close. This is the blue button in the top-right of the window.
- The image and caption will be linked together.
- You can move the image or rotate the image freely.


Using a Table
-
1Open a new document in Google Docs. Do this by clicking the + icon on the Google Docs homepage.
-
2Click where you want your image to be. You can always add text before or after the table.
-
3Click Insert in the top toolbar. This will be between View and Format.
-
4Click Table, then make 1x2 table. Do this by highlighting two cubes—one on top of the other.
- You'll see 1x2 below the squares.
-
5Insert your image into the first field. You can drag-and-drop your image into Google Docs from your desktop.
- You can also click Insert → Image and select your preferred upload method.
-
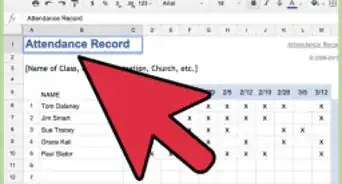
6Enter your text. This is the text that will be your image's caption. If you have a long caption, it will stay within the table field.
- If you need to edit your text style, select all your text by dragging and highlighting.
- Change the font by clicking the down arrow and selecting a new one. Change the size by clicking the - or + icon.
- If you want the text to appear in the middle, click the Center Align icon. This looks like centered lines of text.
-
7Remove the borders. Right-click the table and select Table properties.
- Tap the Color section to expand the drop-down menu.
- Set Table border to 0 pt.


Using Inline Text
-
1Open a new document in Google Docs. Do this by clicking the + icon on the Google Docs homepage.
- This method will not link text to your image, so you'll need to move both separately.
-
2Insert your image. You can drag-and-drop your image into Google Docs from your desktop.
- You can also click Insert → Image and select your preferred upload method.
-
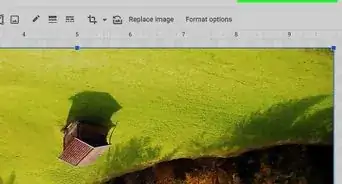
3Click the image. Options will appear below the image, on the left side.
-
4Select the "In-line text" icon. This should be the first icon, on the left.
-
5Click the space below the image. This will allow you to type underneath the image.
-
6Enter your text. This is the text that will be your image's caption. If you have a long caption, it will follow the rules of your document's margins. Click the blue arrows on the top ruler to adjust the margins.
- Use the toolbar to change your font style and size.
- If you want the text to appear in the middle, click the Center Align icon. This looks like centered lines of text.


Using the Mobile App
-
1Open a new document in the Google Docs app. Do this by tapping the + icon on the Google Docs homepage, then tapping New document.
- Google Docs is available for iOS in the App Store and for Android in the Google Play Store.
- If you aren't already signed in, tap Sign in to do so now, or create an account.
- This method will not link text to your image, so you'll need to move both separately.
-
2Insert an image. Tap the + at the top, then tap Image. You can choose to upload From photos or From camera.
- Select your photo, then tap Add.
-
3Tap the image, then tap the "Text wrap" icon. This is the icon to the left of the Photos icon.
-
4Select Inline. This will allow you to type underneath the image.
-
5Tap the space underneath the image. You may need to tap the right of the image then Return to insert a new line.
-
6Enter your text. This is the text that will be your image's caption. If you have a long caption, it will follow the rules of your document's margins.
- Use the A icon to change your font style and size.
- If you want the text to appear in the middle, tap the Center Align icon. This should be on the right side of the toolbar located above your keyboard.


About This Article