This article was co-authored by wikiHow Staff. Our trained team of editors and researchers validate articles for accuracy and comprehensiveness. wikiHow's Content Management Team carefully monitors the work from our editorial staff to ensure that each article is backed by trusted research and meets our high quality standards.
There are 18 references cited in this article, which can be found at the bottom of the page.
This article has been viewed 129,747 times.
Learn more...
Gluing two different materials together can be tricky, especially if one of them is plastic. Since plastics don’t stick to other substances very easily, you'll need to use a glue that can form a sturdy bond with wooden surfaces. Fortunately, there are several different adhesives that will work for this purpose, and they’re all fairly common or easy to get ahold of. Depending on your needs, super glue, hot glue, epoxy, or contact cement all go on easy, hold fast, and require little expertise to apply.
Steps
Using Super Glue
-
1Buy a tube of high-strength super glue. Super glue typically comes in small tubes, so it will work best for small projects and repairs. For a hold that will last, invest in a heavy-duty adhesive like Loctite or Gorilla Glue rather than a bargain glue. One of these products will give you more lasting results than ordinary types of glue.[1]
- If you’re working on something that requires a lot of assembling, stock up on multiple tubes. It never hurts to have a little extra super glue on hand.
- Some types of porous wood may absorb regular super glue before it bonds with the plastic. If you're working with a porous wood, look for a gel-based super glue.[2]
-
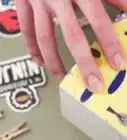
2Sand the plastic surface lightly. Go over the broadest area of the plastic piece with a square of high-grit sandpaper before you get gluing. Sanding the plastic will make it more porous and increase its overall surface area, allowing it to bond to the wood more easily.
- Use only a few smooth, delicate strokes to avoid roughing up the plastic too much.
- If there's a chance you might damage the piece you're sanding, it may be better to skip this step.
Advertisement -
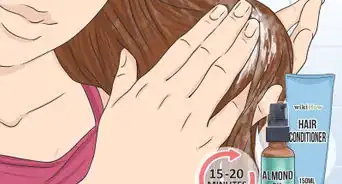
3Clean the wooden piece with a damp cloth. A quick wipedown will remove dust and dirt that might interfere with the hold. Allow the wood to air dry, the wipe it down lightly with rubbing alcohol. This removes excess dust and oils, and helps pull out any remaining moisture.[3]
- To avoid oversaturating the wood, wring the excess water out of the cloth after wetting it.
- Applying the glue while the wood is still damp may weaken its ability to hold.
-
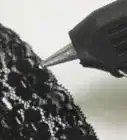
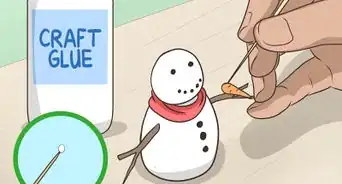
4Add the glue to both surfaces. Squeeze the tube slowly to control the flow of the glue. Super glues are designed to be extra grippy, so only use as much as needed—a little bit goes a long way. Depending on the size and shape of the surface you’re gluing, it may be better to use stripes, dots or even swirls.
- For small or irregularly shaped objects, try applying the glue with a toothpick.[4]
-
5Press the surfaces together. Guide the smaller piece into place on the larger piece. Once you’ve put them together, keep constant pressure on them until the glue has dried enough to hold securely. Find a flat, stable surface to set the pieces as they finish drying.
- Practice a couple dry runs beforehand to make sure you fit both pieces together precisely.
-
6Give the glue time to set. Most super glues will begin drying within seconds, but it may take as long as two hours for them to harden completely. During this time, avoid handling the glued objects as much as possible.[5]
- Keep the objects somewhere cool and dry while they dry. Moisture can interfere with the glue’s ability to set up properly.
- Use acetone to dissolve super glue after it’s dried.[6]


Using Hot Glue
-
1Plug in and turn on the glue gun. Use the outlet closest to your work area so you can work comfortably. If your glue gun has a separate power switch, make sure it’s set to the “On” position. Give the glue gun a couple minutes to heat up before loading it.[7]
- Be careful when working with an active glue gun—only grip the handle and body of the gun, never the tip.[8]
-
2Load a glue stick into the backside of the gun. Once inside, the heating elements will begin to melt the glue. This may take several minutes.
- Choose high temperature glue sticks. These provide the strongest bond for plastics, and you won’t have to worry about the glue melting in warm weather or hot working conditions.[9]
- To check to see if you’re ready to begin gluing, squeeze the trigger lightly and look for melted glue strings to emerge.
- Wipe off the tip of your glue gun with a thick rag before you start working with your wood. This keeps contaminants off your project and controls glue strings as you work.
-
3Apply the glue to one or both surfaces. Press the trigger on the gun to release the glue. Concentrate the glue on the broadest, flattest areas of the objects you’re joining. Use the gun’s tapered tip to direct the glue more precisely, and don’t use more than you have to.[10]
- Hot glue can burn if it come into contact with your skin. Work next to the sink or keep a cup of cold water nearby in case you happen to get any on you by accident.[11]
-
4Fit the objects together. Move the smaller piece into position over the larger one, making sure they’re properly spaced and aligned. Hold the pieces together firmly for 30 seconds to a minute while the glue begins to set.
- Test fit the pieces beforehand so you don’t make a mistake.
- When working with hot glue, you’ll need to work quickly to get your pieces together before the adhesive begins to dry.
-
5Let the glue dry overnight. Hot glue dries fast, but it can take a while to fully set. For best results, leave your pieces to sit for at least 8-10 hours. By the time you check back in the morning, the glue should be for maximum hold.[12]
- A quick blast with a hair dryer can cause stray glue strings to vanish.[13]
- Should you need to separate the glued surfaces for any reason, a hair dryer on a high heat setting can also be used to melt the dried glue.


Using Epoxy
-
1Purchase an epoxy applicator kit. Epoxies are most commonly sold as a two-part system, which consist of a couple separate components: a resin and a hardener. These components have to be combined in order to be effective.[14]
- Though not as common, one-part epoxies are also available, and can be applied straight out of the package.
- You can find basic epoxy kits at hardware stores, art supply shops and pharmacies, and in the home improvement aisle of most supercenters.
-
2Mix the resin and hardener. Squeeze a small glob of each component onto a smooth, disposable surface, like a paper plate. Swirl the two substances together using a toothpick, coffee stirrer or similar utensil. Once combined, they’ll form one super-strong adhesive.[15]
- Pull on a pair of gloves before you get to work.
-
3Apply the epoxy. Spread a thin layer of adhesive onto the surfaces you need to glue. You can do this with the same toothpick or coffee stirrer you used to mix it, though you may have better results using something like a cotton swab that offers you more control over where it ends up.[16]
- Brush an even coating over the entire surface, being careful not to leave any large gaps uncovered.
- For a superior hold, apply a small amount of epoxy to both pieces rather than globbing it all onto one.
-
4Position the pieces as needed. Take your time configuring your work surfaces. Epoxy dries fairly slowly compared to other types of adhesives, so you won’t need to rush to get everything in place.[17]
- Clamping the pieces together or resting a heavy object on top can help the epoxy form a more solid bond.
-
5Leave the epoxy to harden overnight. Find an out of the way place to let the adhesive set up. It should dry to the touch within about 5 minutes, but it may take as long as 20 hours for it to cure completely. Try not to touch either piece too much in the meantime, if you can help it.[18]


Using Contact Cement
-
1Use the proper safety gear. Always wear gloves and eye protection when working with contact cement. It might even be a good idea to don a respirator if you have sensitive airways. Since it contains potent chemicals, you'll want to limit direct exposure to the adhesive as much as possible.[21]
- Short-sleeved or snug-fitting clothing is a must. You don't want to accidentally drag a sleeve through industry-grade adhesive!
- Contact cement is most often used in construction and industrial projects. Due to its involved application process, it isn’t the best choice for arts and crafts or minor repair jobs. Instead, it's useful for activities like applying Formica to countertops.[22]
-
2Work in a well-ventilated space. Contact cement emits flammable fumes which may be unsafe to breathe. Set up your materials outside, if possible. If you’re confined to an indoor workshop, open a door or crack a couple of windows and keep a fan running to allow the fumes to escape.[23]
- If your project is taking a while, take frequent breaks to limit your exposure to fumes.
-
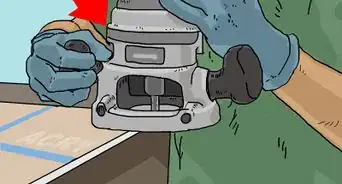
3Roll or brush the contact cement onto both pieces. Spread a thin coat across the entire surface, being cautious evenly cover the edges, but not to let the cement overlap them. Contact cement only sticks to itself, so it will be necessary to apply it to both pieces. When the adhesive is sticky to the touch but doesn't rub off on your fingers, it will be ready for joining.[24]
- Use the smallest amount of adhesive possible.
- Before you start brushing on the contact cement, clean both surfaces thoroughly. Contaminants on your project surface can affect your bond and create an uneven surface.
-
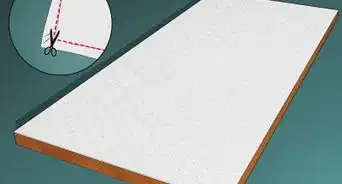
4Use spacers to help align your materials. Arrange a series of dowels or scrap wood across the bottom piece and set the other piece on top. This will allow you to make minute adjustments. Once you’ve got the pieces where you want them, slide the spacers out one by one.[25]
- Spacers will come in handy when joining pieces with precise edges, such as countertops or laminate and substrate.[26]
- The cement won’t bond to the spacers because they don’t have any adhesive on them.
-
5Apply direct pressure to the joined pieces. Go over the top piece with a roller, or tap it lightly all over with a rubber mallet or similar object. This will complete the bonding process and help form a stronger connection—no extended drying time required.[27]
- If you don’t have any other tools on hand, you can use a piece of lumber wrapped in a towel to flatten the top piece and work out bubbles and other inconsistencies.[28]
-
6Correct mistakes with a clothes iron. The heat of the iron will reactivate the cement, making it pliable again. Run the iron over the area that needs fixing for a few seconds until the pieces begin to lose their hold. Then, adjust them carefully by hand and leave them to dry.[29]
- Keep the iron on a low-medium setting to avoid damaging either surface.
- Clean up accidental drips, streaks, and smudges using lacquer thinner.


Community Q&A
-
QuestionI need to glue a game controller to wood, and it will need to be strong enough to hold up during game play. Any ideas?
 T. ChinsenTop AnswererE6000 is an industrial-strength glue used for securing gems or stones into a setting (like a ring). Both surfaces need to be clean before applying the glue. Follow instructions on the package for usage and cleanup.
Warnings
- Chemical adhesives may be toxic if ingested.⧼thumbs_response⧽
- If you happen to get adhesive on or around your eyes, nose or mouth, flush the orifice with cool water, then contact your local Poison Control center for treatment.⧼thumbs_response⧽
Things You'll Need
- Super glue
- Hot glue gun
- High-temperature glue sticks
- One or two-part epoxy system
- Disposable surface (for mixing)
- Toothpick or wooden coffee stirrer (for application)
- Industry-grade contact cement
- Paintbrush or roller
- Wooden dowels or scrap wood
- Rubber roller
- Hairdryer (optional)
- Clothes iron (optional)
- Acetone (optional)
References
- ↑ https://www.consumerreports.org/cro/glues/buying-guide
- ↑ https://www.youtube.com/watch?v=Esvb64fUQ10
- ↑ https://www.hunker.com/13401514/how-to-glue-plastic-to-wood
- ↑ https://www.consumerreports.org/cro/glues/buying-guide
- ↑ https://www.hunker.com/13401514/how-to-glue-plastic-to-wood
- ↑ https://www.youtube.com/watch?v=9EAo1f328lc
- ↑ https://www.youtube.com/watch?v=Zj71LcW_sWI
- ↑ http://safety.ucanr.edu/files/3260.pdf
- ↑ https://www.hunker.com/13401514/how-to-glue-plastic-to-wood
- ↑ https://www.youtube.com/watch?v=Zj71LcW_sWI
- ↑ http://makezine.com/2016/03/09/hot-glue/
- ↑ http://blog.consumercrafts.com/craft-basics-main/how-to-hot-glue-tips/
- ↑ http://www.craftaholicsanonymous.net/how-to-get-rid-of-hot-glue-strings
- ↑ https://www.todayshomeowner.com/homeowners-guide-to-glues/
- ↑ https://www.epoxy.com/Do%20Not%20Do%20with%20Epoxy.aspx
- ↑ https://www.youtube.com/watch?v=dyo97JZuCL8&t=175s
- ↑ https://www.hunker.com/13401514/how-to-glue-plastic-to-wood
- ↑ https://www.todayshomeowner.com/homeowners-guide-to-glues/
- ↑ https://www.hunker.com/13401514/how-to-glue-plastic-to-wood
- ↑ https://www.youtube.com/watch?v=dyo97JZuCL8&t=175s
- ↑ https://www.safework.sa.gov.au/workplaces/chemicals-substances-and-explosives/adhesives-and-sealants
- ↑ https://www.youtube.com/watch?v=uObZY3YI6AM
- ↑ https://www.property24.com/articles/safety-tips-for-using-contact-adhesive/20341
- ↑ https://www.hunker.com/13401514/how-to-glue-plastic-to-wood
- ↑ https://www.rockler.com/learn/how-to-apply-plastic-laminate
- ↑ http://www.popularmechanics.com/home/interior-projects/how-to/a25138/how-to-glue-anything/
- ↑ https://www.hunker.com/13401514/how-to-glue-plastic-to-wood
- ↑ https://www.rockler.com/learn/how-to-apply-plastic-laminate
- ↑ https://www.joneakes.com/jons-fixit-database/2165-Working-with-Contact-Cement
About This Article

To adhere plastic to wood, try using heavy-duty super glue, like Loctite or Gorilla glue. You'll just need to sand the plastic with high-grit sandpaper to help the glue stick to it better, apply the glue to the plastic and wood, and press the two surfaces together. After a couple of hours, the super glue should be set! You can also use hot glue instead of super glue. Another option is to use an epoxy applicator kit, which comes with a resin and a hardener. Once you have the kit, simply mix a little of each glue together with a toothpick. Then, apply a thin layer to your item with a brush or cotton swab and press the 2 items together. Most epoxies will dry completely after several hours, but follow the instructions on the back of the kit to be sure. For more advice, like how to use contact cement, read on!