This article was co-authored by wikiHow staff writer, Christopher M. Osborne, PhD. Christopher Osborne has been a wikiHow Content Creator since 2015. He is also a historian who holds a PhD from The University of Notre Dame and has taught at universities in and around Pittsburgh, PA. His scholarly publications and presentations focus on his research interests in early American history, but Chris also enjoys the challenges and rewards of writing wikiHow articles on a wide range of subjects.
There are 7 references cited in this article, which can be found at the bottom of the page.
This article has been viewed 89,462 times.
Learn more...
Building a longbow from scratch isn’t quite so simple as finding a long piece of wood and attaching a string to it. That said, it isn’t beyond the skills of the average DIYer, and it can be a very rewarding project. If you take the time to choose, shape, string, and finish your bow properly, you can build yourself a functioning longbow that might last for years.
Steps
Shaping Your Bow
-
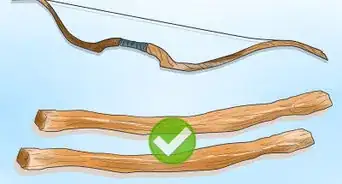
1Buy or find a long, straight, knot-free hardwood stave. Your stave—the piece of wood that will become the bow—needs to be sturdy yet somewhat flexible, and have few if any twists and knots. It should be about 5–6 ft (1.5–1.8 m) long and 1.5–2 in (3.8–5.1 cm) in diameter.[1]
- You can buy a piece of hardwood at a home improvement store, or build a more rustic longbow by using a tree branch. Fallen branches often work just as well or even better than fresh-cut branches. Look for a fallen branch that has dried out somewhat but isn't brittle.
- Some of the best bow woods include yew, ash, and hickory. That said, pretty much any hardwood, including maple and oak, will do the job. Softwoods like pine and cedar aren't good candidates.
-
2Scrape off any bark on the stave with a knife or other sharp tool. A pocket knife or wood carving knife works well here, but pretty much any type of sharp blade will do. Use short, shallow strokes to scrape away the bark. Try not to remove the wood beneath the bark at this point, though.[2]
- It’s not essential to remove the bark, but it makes it easier to get a better look at how the wood flexes and make adjustments as needed. It also improves the appearance of your DIY bow!
-
3Press the stave while it’s upright to find its natural curve. Hold the stave upright, with a loose grip on the top and the bottom set against your foot. Gently press outward against the center of the stave. The stave will rotate and its natural curve will point away from you.[3]
- This maneuver identifies the inside and outside—also called the “belly” and “back”—of the bow. The “belly” will be closest to your body when you draw the bow.
- You may be making some cuts to the inside of the stave, but the outside must be left untouched. Any cuts made to the outside will severely affect the longevity and structural integrity of the bow.
-
4Mark the handhold at the center of the stave. Find the middle of the stave, using a tape measure if available, or by making your best guess. Measure or estimate 3 in (7.6 cm) in both directions along the stave from the center point, and mark these with a permanent marker or a shallow notch with your knife.[4]
- This center section is the handhold—the spot where you’ll hold the bow while drawing it. Like the outside of the stave, leave the handhold untouched to preserve the structural integrity of the bow.
-
5Bend the stave again and take a closer look at the curve. Hold the stave upright with your hand and against your foot once again. This time, though, apply a bit more pressure to flex the wood further—the center should push outward by at least 3–4 in (7.6–10.2 cm). Look closely at the curve of the stave and identify any spots where the wood isn’t flexing as easily.[5]
-
6Shave wood from the inside of the bow to adjust the curve. Using the blade of your knife or other sharp tool, shave away a few layers of bark and wood from one of the spots where the wood isn’t flexing properly. By removing wood, you will increase the flexibility of the stiff areas. Keep shaving away wood and testing the flexibility of the bow until it bends in a uniform shape, both above and below the handhold.[6]
- Cut wood only from the inside of the curve. Leave the outside of the bow untouched.
- The handhold and tips should remain relatively straight compared to the rest of the bow.
- The amount of carving required will vary greatly depending on how thick the stave is.


Stringing the Bow
-
1Cut notches on the inside and outside of each bow tip. These notches will hold the bow string in place. Make the notches on the outside curve no more than 0.25 in (0.64 cm) deep, and the notches on the inside no more than 0.5 in (1.3 cm) deep.[7]
- Cut the notches about 0.5–1 in (1.3–2.5 cm) in from the tips of the bow.
-
2Tie your chosen bow string around the notches you cut. The bow string should be about 8 in (20 cm) shorter than the stave. Tie one end around the notches at the bottom of the stave, then tie a slipknot at the other end of the bow string. Flex the bow until you can get the slipknot over the notches at the top of the bow.[8]
- Once in place, there should be a gap of about 5–6 in (13–15 cm) between the bow string and the handhold. Choose a different length of bow string if the gap is substantially smaller or larger than this.
- Purchase a bow string, or use any string or cord material that is strong and durable, and that stretches only slightly under tension. Good options include nylon paracord, a long shoestring, or even twisted-together plant fibers if you really want to get back to nature!
- Do not pull back on the string yet—the bow is not complete and could break.
-
3Hang the bow horizontally so it’s positioned above you. Your aim is to rest the bow on the center handhold, above your head height but within your reach, with the string perpendicular to the ground. If you’re at home, you can, for instance, hang the handhold from a bicycle hook screwed into a roof rafter or ceiling joist. In the woods, find a sturdy, low-hanging tree limb that you can feed the bow over until it’s nearly against the trunk.[9]
-
4Pull down on the bowstring and fine-tune the bend of the bow. Pull the string down about 3–4 in (7.6–10.2 cm) and look at the curve of the bow. Visually identify spots that aren’t bending freely, release the string, and use your knife to shave away wood from the inside of the bow in these areas. Pull the string again and repeat the process until the bow curves evenly.[10]
- Don’t stop yet, though! Pull the string down 5–6 in (13–15 cm) and shave wood from the bow as needed. Repeat the process at 7–8 in (18–20 cm) and 9–10 in (23–25 cm) as well.


Finishing Your Bow
-
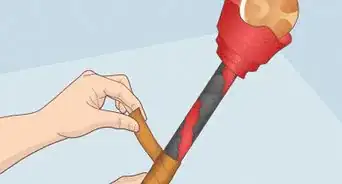
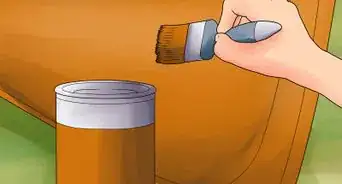
1Apply a coat of a protective oil to keep the wood from drying out. Linseed oil and tung oil are good options here. Apply an even coat of your chosen oil with a natural bristle paint brush, then wipe away the excess with a rag. Allow the oil to dry for at least 4 hours, and possibly overnight.[11]
- Throw the oil-soaked rag in a bucket of water and leave it there while the bow dries. Then, hang the rag out to dry and throw it in the trash once it’s no longer damp. This eliminates the chance of the oil-soaked rag catching on fire.
- Applying a protective oil is an optional step, but it will help your bow last longer and look better.
-
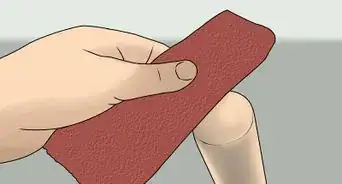
2Rub the dried finish with fine sandpaper, then apply more oil if desired. Once the coat of oil is completely dry, lightly rub the entire bow with fine-grit (360 or higher grit) sandpaper. If you want to apply a second coat of oil, wipe down the sanded bow with a tack cloth, then apply the second coat in the same manner as the first.[12]
-
3Try out your new bow. At this point, the bow is ready to be used. Nock an arrow, get into firing position, draw the bowstring, zero in on your practice target, and let it fly!
- If you want to go completely DIY, try making your own arrows as well.
- Do not test fire the bow without an arrow, as this can damage the bow and cause it to break.
- Make safety your first priority when using your longbow. Never aim an arrow anywhere close to another person.


Community Q&A
-
QuestionWhat is the length of a longbow?
 Jean Luc SiriusCommunity AnswerA longbow is usually about your own height; usually between 5–6 ft (1.5–1.8 m).
 -
QuestionCan you use this for hunting?Jean Luc SiriusCommunity AnswerYes, you can. Depending of the power of your bow (draw weight and such), you can hunt from rabbits to venison. However, you should check your local hunting laws, be careful, and never aim at people.
-
QuestionIs it legal to shoot people with it?Jean Luc SiriusCommunity AnswerNo, except maybe in self-defense, and in that case aim at extremities, not at the main body.
Warnings
- A longbow can be a deadly weapon. If you’re hunting, never point it at something you don’t intend to kill.⧼thumbs_response⧽
Things You’ll Need
- Wood stave
- Knife or carving tool
- Bow string
- Overhead hanging location
- Protective oil
- Paint brush
- Rags
- Bucket of water
- Fine grit sandpaper
- Tack cloth
- Arrow


References
- ↑ https://www.wildernesscollege.com/bow-making-instructions.html
- ↑ https://www.woodworkersjournal.com/stripping-branches-walking-sticks/
- ↑ https://www.skilledsurvival.com/how-to-make-a-longbow/
- ↑ https://www.wildernesscollege.com/bow-making-instructions.html
- ↑ https://www.popularmechanics.com/home/how-to-plans/how-to/a17108/make-a-bow-and-arrow-by-hand/
- ↑ https://www.popularmechanics.com/home/how-to-plans/how-to/a17108/make-a-bow-and-arrow-by-hand/
- ↑ http://www.bio.brandeis.edu/fieldbio/Survival/Pages/bowandarrow.html
- ↑ http://www.bio.brandeis.edu/fieldbio/Survival/Pages/bowandarrow.html
- ↑ https://www.outdoorlife.com/blogs/survivalist/survival-skills-how-carve-traditional-bow/
About This Article