This article was co-authored by wikiHow Staff. Our trained team of editors and researchers validate articles for accuracy and comprehensiveness. wikiHow's Content Management Team carefully monitors the work from our editorial staff to ensure that each article is backed by trusted research and meets our high quality standards.
There are 18 references cited in this article, which can be found at the bottom of the page.
This article has been viewed 53,712 times.
Learn more...
A protein skimmer is a device used to remove organic compounds like food particles, solid waste, and other pollutants from aquariums and fish tanks. You can build your own DIY counter-current skimmer at home using ordinary PVC pipe, a wooden airstone, and some rubber suction cups. Once installed, the skimmer will release small air bubbles into your aquarium that will pull loose particles out of the water and deposit them in the built-in collection cup.
Steps
Fashioning the Collection Cup
-
1Cut two 16 fl oz (470 mL) plastic water bottles in half. Peel the labels off of both bottles, then remove the lids and empty their contents into the sink (or drink them so you’re not wasting water). Use a pair of scissors to snip the top off of one of the empty bottles where it begins to taper. Do the same to the second bottle, then cut off the bottom end so that it forms a tube.[1]
- Do your best not to crush or mangle the bottles while you’re cutting them.
- You’ll be fitting the water bottles together to create a makeshift collection cup. If you want your collection cup to hold more debris, simply cut the tube piece slightly longer.
-
2Fit the upper half of the first bottle into the lower half of the second. Turn the top piece upside down and slide the neck directly into the tube. Continue pushing the piece in until the bottom edges of both pieces are aligned, or until it won’t go any further. Together, these two bottle pieces will serve as your collection cup.[2]
- When you activate your finished skimmer, stray proteins in the water of your aquarium will be trapped by bubbles generated by your air pump, pulled up through the chamber of your skimmer, and forced out through the mouth of the top bottle piece, where they’ll accumulate on the inside of the tube piece.[3]
Advertisement -
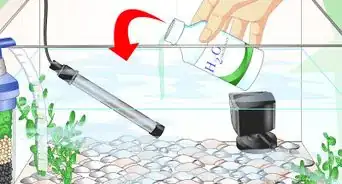
3Glue the two bottle pieces together using aquarium silicone. Squeeze a dime-sized glob of silicone onto the seam where the edges of the two bottle pieces connect. Use the pad of your finger or another tool, such as a folded paper towel, to spread the silicone into a thin layer.[4]
- Don’t forget to wash your hands thoroughly with soap and hot water when you’re done to scrub away any traces of silicone.


-
1
- Aquarium silicone is a high-strength type of adhesive that’s designed specifically for bonding underwater. You can pick up a small bottle of aquarium silicone at any pet shop or aquarium supply store for around $3-5.[6]
Tip: Make sure that entire seam is coated evenly all the way around. In order for your skimmer to work properly, it’s important that your collection cup be watertight.
-
2Allow the silicone to cure for at least 24 hours. Aquarium silicone usually dries in a matter of minutes. However, it will take closer to a full day for the material to harden completely. At this point, it will be able to provide a waterproof seal.
- Some aquarium silicone formulas may take up to a full week to cure. Make sure you read the specs on the product you’re using to determine whether it fits the timeframe you've set for your project.[7]

Assembling the Skimmer Chamber
-
1Cut a piece of PVC pipe 1–3 inches (2.5–7.6 cm) shorter than your tank. To make a skimmer for a standard-sized fish tank that holds 40 gallons (150 L) or less, thin-walled PVC with a 2 in (5.1 cm) diameter will work best. Use a pipe cutter or hacksaw to trim the PVC down to the necessary specifications.[8]
-
2Drill two parallel holes on one side of the PVC. Set your holes 2–3 inches (5.1–7.6 cm) inward from the ends of the pipe. Mark the position of each hole with a pencil, doing your best to line them up as precisely as possible. Bore a clean, straight hole through each marking at a 90-degree angle.[11]
- You’ll be fitting these holes with suction cups to mount your finished skimmer to the wall of your fish tank. Select a drill bit slightly smaller than the nubs on the backside of the suction cups, using the specific cups you bought for reference.
- Be careful not to accidentally drill through the opposite side of the pipe—doing so will render your skimmer inoperable.
-
3Make a third hole 1–2 inches (2.5–5.1 cm) from the end of the other side. Turn your PVC pipe around and rotate it 180-degrees. Drill an additional hole just above the end of the blank side. This hole will serve as the air intake for your protein skimmer.[12]
- Later, you’ll use the air intake hole to thread the hose of your airstone, which is a device used to generate tiny bubbles in the water of an aquarium.
-
4Insert rubber suction cups into the two parallel holes. Align the suction cup nubs with the holes, then press down on them firmly until they’re fully seated. They should fit snugly and stay put, provided you used an appropriately-sized drill bit.[13]
- Any type of suction cup should do the trick, since your skimmer will be both lightweight and suspended underwater. 22 mm (0.87 in) cups are a fairly standard size.
- If you’re worried that your suction cups might pull free of your skimmer or interfere with their airflow, you can seal the edges using your leftover aquarium silicone.
-
5Thread the hose of your airstone through the air intake. Guide the hose into the open end of the pipe and out through the drilled hole. Continue feeding the hose through until the airstone itself rests inside the pipe. The rest of the hose should extend outside the pipe.[14]
- Keep in mind that the airstone you use needs to be 2 inches (5.1 cm) or shorter in order to fit inside the PVC tube.[15]
Tip: If possible, use an airstone made from limewood or basswood. These materials produce ultra-fine bubbles, which will make your skimmer more efficient.[16]


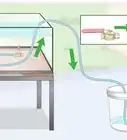
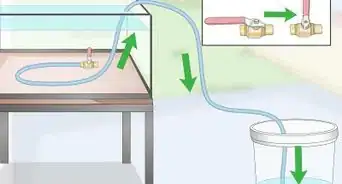
Installing the Skimmer
-
1Connect your airstone to your submersible aquarium pump. Be sure to switch off your pump before attaching the airstone. The end of the hose opposite the stone should just slide onto the corresponding pump fitting. Some models may need to be secured via a separate valve or latch.[17]
- Read through the instruction manual for the specific model you’re using to ensure that your airstone is hooked up correctly.
-
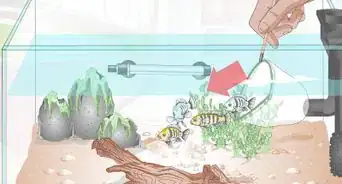
2Slide your collection cup over the top of the pipe. Once you’ve put the collection cup in place, your homemade skimmer will officially be complete. All that’s left to do is add it to your tank![18]
- A 16 fl oz (470 mL) bottle should just fit over a section of 2 in (5.1 cm) PVC pipe.
-
3Adjust the placement of the skimmer inside your tank for optimal airflow. Lower the bottom of the skimmer (the end with the air intake hole) into the tank, then turn the pump back on. As you do, you’ll notice a cascade of bubbles escaping from the mouth of the bottle. Raise or lower the pump a few times until the bubbles begin to appear steadily.[19]
- You can also play around with the position of the collection cup instead if you want to go ahead and mount the skimmer, since it’s not fixed.[20]
Tip: Ideal placement can vary depending on the size, volume, and surface pressure of your aquarium. Just make sure the collection cup remains above water level at all times.
-
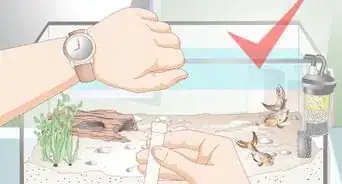
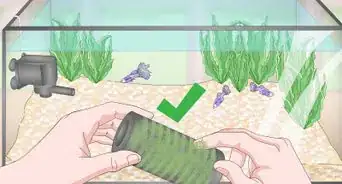
4Mount your skimmer to your tank using the attached suction cups. When you’re satisfied with the placement of your skimmer, press the suction cups into the wall of the tank to hold it in place. Use your other hand to brace yourself against the outside of the tank to prevent it from tipping or shifting.
- The suction cups will make it easy to remove and reposition your skimmer, if necessary.
-
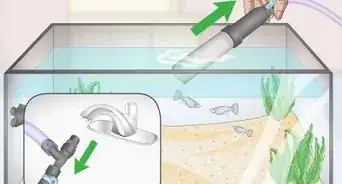
5Remove and rinse out your collection cup as needed. After a few days, you’ll likely notice the water inside the collection cup become cloudy. This means its time to empty it. Slide the cup off the top of the skimmer and pour the dirty water down the drain. Then, wash it out thoroughly with clean water and slide it back on top of the skimmer chamber.[21]
- If your collection cup is in need of a more thorough cleaning, soak it in a 10-1 mixture of distilled white vinegar and water. The acid will help dissolve algae, mineral deposits, and other stuck-on grime.[22]
- The exact frequency of your cleanings will be determined by the volume of your tank and the amount of aquatic life it contains.


Community Q&A
-
QuestionCan I remove the skimmer after cycling?
 CaeiiaTop AnswererNo; it removes organic waste and helps keep the water clean, which is important in marine setups.
Things You’ll Need
Fashioning the Collection Cup
- Two 16 fl oz (470 mL) plastic water bottles
- Aquarium silicone
- Scissors
Assembling the Skimmer Chamber
- Thin-walled PVC pipe with a 2 in (5.1 cm) diameter
- Pipe cutter or hacksaw
- Cordless drill
- Rubber suction cups
- Wooden airstone and hose (preferably limewood or basswood)
- Nylon string (optional)
Installing the Skimmer
- Submersible aquarium pump
- Clean water


References
- ↑ https://www.youtube.com/watch?v=223-24zhjoc&feature=youtu.be&t=138
- ↑ https://www.youtube.com/watch?v=223-24zhjoc&feature=youtu.be&t=145
- ↑ http://www.hawkfish.org/snailman/skimmer101.htm
- ↑ https://www.aquarium-pond-answers.com/2007/03/aquarium-silicone.html
- ↑ https://aquariumhunter.com/best-protein-skimmers-reviews
- ↑ https://fishlab.com/aquarium-safe-silicone/
- ↑ https://fishlab.com/aquarium-safe-silicone/
- ↑ https://makezine.com/projects/skill-builder-pvc-pipe/
- ↑ https://www.todayshomeowner.com/video/cutting-plastic-pipe-with-string/
- ↑ http://www.hawkfish.org/snailman/skimmer101.htm
- ↑ https://www.youtube.com/watch?v=223-24zhjoc&feature=youtu.be&t=159
- ↑ https://www.youtube.com/watch?v=223-24zhjoc&feature=youtu.be&t=166
- ↑ https://www.youtube.com/watch?v=223-24zhjoc&feature=youtu.be&t=170
- ↑ https://www.youtube.com/watch?v=223-24zhjoc&feature=youtu.be&t=174
- ↑ http://www.hawkfish.org/snailman/skimmer101.htm
- ↑ http://www.hawkfish.org/snailman/skimmer101.htm
- ↑ https://www.tropicalfishcareguides.com/fish-tank-air-pump/
- ↑ https://www.youtube.com/watch?v=223-24zhjoc&feature=youtu.be&t=185
- ↑ http://reefkeeping.com/issues/2002-06/fm/feature/index.php
- ↑ https://www.youtube.com/watch?v=223-24zhjoc&feature=youtu.be&t=200
- ↑ https://www.youtube.com/watch?v=223-24zhjoc&feature=youtu.be&t=219
- ↑ https://reefbuilders.com/2017/01/16/how-to-clean-a-protein-skimmer/
About This Article

To build a protein skimmer, start by cutting a plastic water bottle in half and gluing the upper half upside down in the lower half using aquarium silicone. Then, cut a piece of PVC pipe so it's 1-3 inches shorter than your tank, and drill 2 parallel holes on one side of the pipe and 1 hole near the end of the other side. Next, insert suction cups into the parallel holes, and thread the hose of your airstone through the other hole. Finally, connect your airstone to your submersible pump, and slide the plastic bottle over the pipe. To learn how to position the skimmer in your tank, scroll down!