This article was co-authored by Mark Spelman and by wikiHow staff writer, Hannah Madden. Mark Spelman is a General Contractor based in Austin, Texas. With over 30 years of construction experience, Mark specializes in constructing interiors, project management, and project estimation. He has been a construction professional since 1987.
There are 15 references cited in this article, which can be found at the bottom of the page.
wikiHow marks an article as reader-approved once it receives enough positive feedback. In this case, 100% of readers who voted found the article helpful, earning it our reader-approved status.
This article has been viewed 257,491 times.
Wood paneling was big in the 70s and 80s, but it’s not so popular anymore. If you’re tired of your old wood paneling but you don’t want to deal with ripping it out, don’t worry! With a little DIY action, you can easily cover your wood paneling with paint, wallpaper, or drywall to make your room look brand new.
Steps
Painting Wood Panels
-
1Clean the paneling with a cloth and TSP. Put on rubber gloves and an N95 mask to protect yourself while cleaning. Pour a little bit of TSP cleaner onto a sponge or a rag, then wipe down the wood panels with it. This cleaner will remove any dust and grime on your wood paneling to ensure your paint goes on smoothly.[1]
- TSP can cause irritation if you get it on your skin or in your eyes. Be sure to read all the safety information before using, and keep it out of the reach of children.
- If you don’t want to use TSP, you can use regular soap and water instead. However, it might not clean as thoroughly, and you may have to scrub a little harder to get rid of dirt and grime.
-
2Sand the paneling with 220-grit sandpaper. Making the wood panels smooth will help your paint job look much nicer. Grab a sheet of 220-grit sandpaper and either attach it to a block of wood or an electric sander. Go over all of your wood panels at least once, focusing on any areas that are rough or scratched.[2]
- If there are any moldings around the wood paneling, lightly scuff them with the sandpaper as well.
- If there’s any dust left over from the sanding you did earlier, vacuum that up or wipe it away with a damp rag before painting.
Advertisement -
3Add spackle to any deep grooves in the wall. If your wood panels are pretty thick or have big gaps in between them, you might want to cover those up before you paint (however, it is optional). If you want to, grab some spackle and a putty knife, then smooth the spackle into any gaps or holes in the paneling. Let the spackle dry, then sand it down so it’s flush with the wood panels around it.[3]
- Adding spackle will help disguise the wood panels more and make it look like a drywall wall.
-
4Cover the floor with a drop cloth. This will protect it from any paint drips as you continue on your DIY journey. Move all the furniture away from the wall and set a drop cloth on the floor just in case.[4]
-
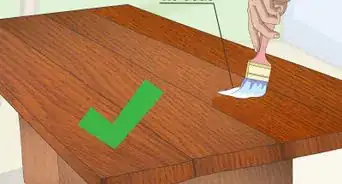
5Apply your primer and let it dry for 1 hour. If you’re covering solid wood panels, use a water-based primer. If you’re covering veneer, use a shellac-based one. Pour your primer into a paint dish, then use a roller to smooth it onto the wall, going up and down to follow the directions of the wood panels. Let the primer dry for at least 1 hour to cover up any imperfections before you use actual paint.[5]
- If your wood panels are dark, you may have to use 2 coats of primer for full coverage.
-
6Add 2 coats of paint on top of the primer. Pick out the paint of your choice and pour it into a painting dish. Use a clean paint roller to smooth the paint on top of the primer, going in the same direction as the panels, then let it dry for about 1 hour. Add another coat of paint for full, even coverage, then enjoy your new walls![6]
- To ensure even coverage, go for latex paint.


Covering with Wallpaper
-
1Clean the paneling to remove dust, dirt, and grime. Put on rubber gloves and a face mask to protect yourself from irritation. Use TSP and a cloth or a sponge to wipe down your walls, then let it air dry. This will remove any dust or grime on the walls and make your application much smoother.[7]
-
2Use a paint roller to smooth on a pre wallcovering primer. This primer will help fill in the gaps between panels and give your wall an overall smoother appearance. Pour the primer into a painting dish, then use a normal paint roller to smooth it on the walls. Pre wallcovering primer is slightly thicker than normal primer, so you will only need to use 1 coat for your entire wall. Let the primer dry for at least 1 hour.[8]
- You can find pre wallcovering primer at most hardware stores.
-
3Cut a strip of wall liner to the width of your wall. Measure your wall, then measure a strip of wall liner about 4 in (10 cm) longer than that. Cut your first piece of wall liner down to size so that it fits horizontally across your wall. This will help disguise the grooves in the panels so they aren’t as noticeable when you’re finished with the project.[9]
- Most wall liners are designed to have wallpaper plastered over them, but some are paintable. For most walls in good condition, a medium-grade (1200 rating) lining paper is a good choice.
- Patterned wall liners are available, but most are plain white.
-
4Wet the liner and let it sit for 5 minutes. If your liner is pre-pasted, you need to use water to activate the glue. Dip the wall liner into a bathtub full of water and then let it dry for about 5 minutes. It should feel tacky, but not soaking wet to the touch.[10]
- If your wall liner is not pre-pasted (it will tell you on the package), simply brush a thin layer of wallpaper paste onto one side of the wall liner.
-
5Smooth the liner onto the wall with a putty knife. Grab your strip of wall liner and start at one end of the wall (going from the bottom up is usually a good choice). Gently smooth it onto the wall with your hands, then follow up with a putty knife to get rid of any lumps or bumps.[11]
-
6Trim off any excess wall liner. Since you left yourself a little extra room on the ends, you’ll have some excess wall liner to trim off. Grab a box cutter and gently cut along the seam of the liner to remove any excess.[12]
- If your wall has any outlets or light switches, use the box cutter to cut around those as well.
-
7Continue attaching wall liner until the whole wall is covered. Overlap the wall liner by about 1 in (2.5 cm) to ensure there aren’t any gaps when you’re done. Use the same technique of using a putty knife to smooth out lumps, and trim off any excess when you’re finished. If you have any awkward spots or hard-to-reach areas, feel free to cut your wall liner down to size and paste it onto empty areas.[13]
- Most wall liners need 24 to 48 hours to dry.
-
8Apply wallpaper over the wall liner. Once your wall liner is dry, it’s time for the fun part! Pick out your wallpaper of choice, then cut a strip to match the length of your wall. Use a paint roller to apply wallpaper paste to the back, then smooth it onto the wall, going from the top down. Use a putty knife to smooth out any lumps or bumps, then trim off the excess. Once your first sheet is down, continue adding wallpaper until your entire wall is covered.[14]
- Most wall liner is made for wallpaper to sit on top of it, but you can also get wall liner that’s made for paint.


Covering with Drywall
-
1Tear out any trim or baseboards. You’ll want to start with a smooth wall that doesn’t have any lumps. If there is any molding, trim, or baseboards, use a crowbar to pry them off the wall, then remove any stray nails with a hammer.[15]
-
2Purchase 3/8 in thick sheets of drywall to cover the walls. This thickness gives you enough coverage on the wall without sticking out too much. Measure the area that you’d like to cover, then head to your local hardware store and buy enough to cover it up.[16]
- This thickness is also much easier to work with and carry, especially if you’re working on your own.
-
3Use a stud finder to mark the studs in your wall. A stud finder will be able to pick out the solid, thick wood behind the paneling in your wall. Use that tool to find the studs, then mark them with a pencil so you know where they are.[17]
- It’s important to find the studs before attaching your drywall—otherwise, your wall won’t be very sturdy.
-
4Line up the drywall along the studs. Grab your drywall sheet and place it against the wall, noting where the studs are. Make sure that your drywall has contact points along at least 2 studs so that you can attach it securely.[18]
-
5Use a screw gun to drive drywall screws into the wall about 12 in (30 cm) apart. Drywall screws are designed to hold drywall securely and without sagging. Grab your electric screw gun and drive the screws into the wall, connecting the drywall to the studs. Go up and down each sheet of drywall, attaching screws every 12 in (30 cm) or so.[19]
- A screw gun is similar to a drill, but it’s made specifically for driving screws into walls.
- As you screw into the drywall, press it flat against the wall to ensure there aren’t any gaps.
- If you notice any gaps or places where the drywall isn’t attached very well, use drywall nails to tack it down to the wall.
-
6Fill in the screw holes with caulk for a smooth finish. Once all your drywall is attached, grab some caulk and a putty knife. Use the putty knife to smooth the caulk over the screw holes, then let it dry. When you’re finished, you’ll have a smooth, clean wall that you can then paint just like normal![20]
- You can also use wallpaper to cover up the drywall.


Things You’ll Need
Painting Wood Panels
- Cloth
- TSP
- Gloves, face mask, ventilation
- 220-grit sandpaper
- Primer
- Paint roller & paint brush
- Paint
Covering with Wall Liner
- Wall liner
- Paint roller
- Wallpaper or paint
- Putty knife
- Box cutter
Covering with Drywall
- 3/8 in thick drywall sheets
- Screw gun
- Drywall screws
- Stud finder
- Caulk
- Putty knife


References
- ↑ https://www.bobvila.com/articles/how-to-paint-wood-paneling/
- ↑ https://www.thisoldhouse.com/painting/22751313/how-to-paint-wood-paneling
- ↑ https://www.bobvila.com/articles/how-to-paint-wood-paneling/
- ↑ https://www.bobvila.com/articles/how-to-paint-wood-paneling/
- ↑ https://www.thisoldhouse.com/painting/22751313/how-to-paint-wood-paneling
- ↑ https://www.thisoldhouse.com/painting/22751313/how-to-paint-wood-paneling
- ↑ https://www.youtube.com/watch?t=132&v=tLhFAYMt52c&feature=youtu.be
- ↑ https://www.youtube.com/watch?t=141&v=tLhFAYMt52c&feature=youtu.be
- ↑ https://www.youtube.com/watch?t=28&v=bEN2loHrkMo&feature=youtu.be
- ↑ https://www.youtube.com/watch?t=175&v=tLhFAYMt52c&feature=youtu.be
- ↑ https://www.youtube.com/watch?t=58&v=bEN2loHrkMo&feature=youtu.be
- ↑ https://www.youtube.com/watch?t=249&v=tLhFAYMt52c&feature=youtu.be
- ↑ https://www.youtube.com/watch?t=78&v=bEN2loHrkMo&feature=youtu.be
- ↑ https://www.thisoldhouse.com/walls/21016439/the-best-techniques-for-hanging-wallpaper
- ↑ https://www.youtube.com/watch?t=83&v=3l6VDFyT-zM&feature=youtu.be
- ↑ https://www.youtube.com/watch?t=250&v=3l6VDFyT-zM&feature=youtu.be
- ↑ https://www.youtube.com/watch?v=Pe5nJxmhigE&t=1052s
- ↑ https://www.youtube.com/watch?v=Pe5nJxmhigE&t=1052s
- ↑ https://www.youtube.com/watch?t=154&v=3l6VDFyT-zM&feature=youtu.be
- ↑ https://www.thisoldhouse.com/walls/21015080/how-to-fix-a-hole-in-the-wall
About This Article

One of the easiest ways to cover wood paneling is to paint over it. First, clean the paneling with TSP. Follow the instructions on the package carefully and wear protective gear, such as heavy rubber gloves and an N95 mask. Sand the paneling down with 220-grit sandpaper and wipe the dust away with a damp rag. If the paneling has any deep grooves or gaps, fill them in with spackle, let it dry completely, and sand it down. Protect your floor with a drop cloth and paint the paneling with a primer. Use a water-based primer for natural wood and a shellac-based primer for veneer. After the primer dries, apply a coat of paint. Let it dry for 1 hour, then add a second coat. For tips from our contractor reviewer on how to cover paneling with a wall liner, read on!