This article was co-authored by wikiHow Staff. Our trained team of editors and researchers validate articles for accuracy and comprehensiveness. wikiHow's Content Management Team carefully monitors the work from our editorial staff to ensure that each article is backed by trusted research and meets our high quality standards.
This article has been viewed 49,698 times.
Learn more...
Covering a chair is a great way to update the look of a room. For a more permanent update, consider reupholstering your chair with new fabric; if you're interested in a quicker solution that can also be changed out easily, look into buying slipcovers. Whichever way you go, you'll soon have an updated look that you can be proud of!
Steps
Reupholstering a Chair
-
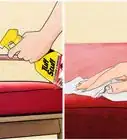
1Remove the staples and fabric from the chair with needle-nose pliers. Try your best to not rip the fabric so that you can use it as a pattern for the new fabric. Mark each piece of material with its location and direction; for example, write “back of chair” on the fabric from the back of the chair, and put a “T” at the top of the piece and a “B” at the bottom of the piece.[1]
- Some chairs, like dining room chairs, have removable seats that you can detach with a screwdriver. If this is the case for your chairs, go ahead and remove the seat entirely so it'll be easier to work with.
-
2Replace the chair's batting and foam if they're in poor condition. A chair generally has 4 layers: the base of the chair, a layer of foam, about 1⁄2 inch (1.3 cm) of batting, and the top layer of fabric. Depending on how old the chair is, the foam and/or batting may be stained, musty, or worn out. If this is the case, cut out matching sizes of new foam and/or batting. Set the foam in place on the chair seat; staple the batting in place around the edges.[2]
- If you're reupholstering a relatively new chair from the last 10 or 15 years, you probably won't need to replace the foam or batting. For a chair older than that, the materials may have started to deteriorate and will need to be replaced.
Advertisement -
3Use the old fabric as a guide to cut out the new fabric for your chair. Lay the new fabric down wrong-side up on a flat surface. Use the fabric you removed from the chair as a pattern to cut out the new pieces; just add about 2 to 3 inches (5.1 to 7.6 cm) around the edges of each piece so you have ample room to staple the fabric into place later on.[3]
- Don't forget to mark the new pieces of fabric so you know where they're supposed to go.
Tip: Use sewing pins to hold the fabric in place while you're cutting out the new pieces.
-
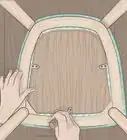
4Secure the new fabric to the base of the chair with a staple gun. Line up the fabric for the top of the chair seat and pull it taut so it isn't baggy. Stick a few sewing pins along the edges to hold the material in place, and use a staple gun to attach the fabric to the chair around the bottom of the frame. Put a staple in every 2 inches (5.1 cm) around the entire perimeter of the chair.[4]
- If the seat is round, create small pleats around the edges to make the fabric lay flat.
- To secure the corner, fold the material into a triangle so that it's flat against the seat and use 1 to 2 staples to pin it down.
-
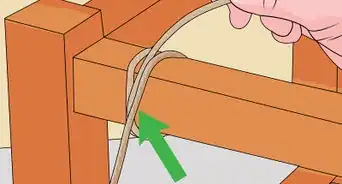
5Finish the underside of the chair by installing a dustcover. The dustcover will hide the edges of the fabric on the underside of the chair. Cut out the dustcover so it just fits the bottom frame and doesn't exceed the perimeter. Staple the material every 1 to 2 inches (2.5 to 5.1 cm) around all its sides.[5]
- When shopping for the dustcover material, look for a fray-resistant, upholstery-grade fabric.
- If you detached your chair seat from the frame, don't reattach it just yet.
-
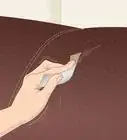
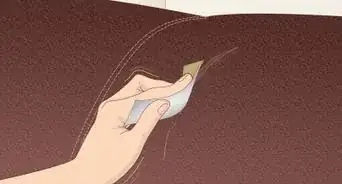
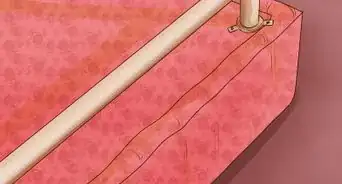
6Sew the piping for the edges of the chair's back. The piping goes along the edges of the back of the chair and helps create a seamless transition from the front piece to the back piece. Use a 2 inches (5.1 cm) wide swath of fabric and fold it over the piping (use the old piping from the chair or measure the same amount of piping from new material if needed). Fold the fabric over the piping (keep the pattern on the outside) and sew along the edge of the piping with a straight stitch to enclose it.[6]
- If your chair back doesn't have fabric on both sides, you can skip this step. In that case, treat it the same as the chair seat and secure the fabric to the back of the base with the staple gun.
-
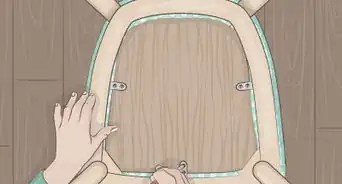
7Pin the piping between the pieces of fabric for the back of the chair. Lay down the pieces of fabric for the back of the chair so that the patterned sides are touching each other with the front-side fabric sitting on the top. Fold back the top edge of the fabric and place the piping down along the edges (position the seam of the piping so it's facing outwards). Replace the top piece of fabric, then pin along the edges of the material.[7]
- Make sure you pin the pieces in place properly. It would be frustrating to accidentally have something upside down or inside out.
-
8Sew the top back pieces together with a straight stitch. Carefully move the fabric to your sewing machine, and then sew all along the edges of the fabric to secure the piping in place. Do your best to sew as close to the piping as possible so that it's tight and won't wriggle around once it's on the chair.[8]
- If there is a lot of excess fabric around the edges, go ahead and trim it off so it doesn't make your seam look bulky.
-
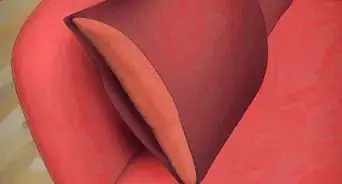
9Staple the fabric for the back of the chair in place. Turn the seat cover right-side out and slide it over top of your chair's back. Position it so the piping is along the edges of the chair and make any adjustments needed. Pull the fabric taut and secure it around the bottom of the back frame with your staple gun. Do your best to put the staples down as far as you can so they won't be visible from the front.[9]
- Around the edges of the chair, you may need to fold or pleat the fabric (as you would when wrapping a present) so that the material lays flat.
-
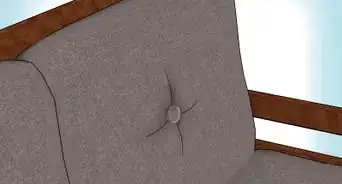
10Reassemble the chair if needed and secure any loose fabric. If you had detached the chair seat at the beginning of your project, go ahead and screw it back in place. Check the chair to see if there are any loose pieces of fabric and secure them with another staple.[10]
- You could also use fabric glue to glue down the excess fabric.


Buying and Using a Slipcover
-
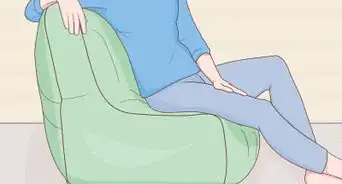
1Measure your chair to determine what size cover you need to buy. Use a flexible measuring tape to get the width of the chair's base as well as the chair's height. Write down your measurements on a piece of paper or on a note on your phone so you don't forget![11]
- A lot of slipcovers are sold as one-size-fits-all, but there might be gradations of size that will help you pick one that'll be a little more suited to your chair.
-
2Shop online and in physical stores to compare options and pricing. There are lots of fabrics, patterns, and colors that you can choose from. Consider the other design elements that are already in the room where the chair goes and try to match that style for a cohesive look. Price out how much shipping will be (if you're buying online), and always ask about return policies.[12]
Tip: Check out the care instructions before buying a slipcover. Some covers have to be dry cleaned, whereas others can be cleaned in a regular washer and dryer.
-
3Order a custom-made slipcover if you have uniquely-shaped chairs. If you can't find an option in the stores or online that will fit your chair, look into having a slipcover made. Keep in mind that you'll be paying for the material, labor, and shipping, so it'll probably be a bit more expensive than a ready-to-buy option.[13]
- Depending on the company you use and the complexity of your order, you might pay anywhere from $200 to $2000 for a custom slipcover.
-
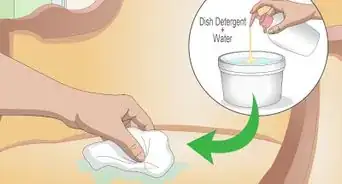
4Wash your slipcover before using it to rid it of any irritants. Your slipcover may have come into contact with some chemicals while it was being manufactured, so it's always a good idea to give it a wash before putting it on your chair. Follow the care instructions and make sure the cover is dry before you use it.[14]
- Generally, slipcovers can be washed at home on the gentle cycle with cool water. Line-dry the item, or put it in the dryer on a low-heat setting.
-
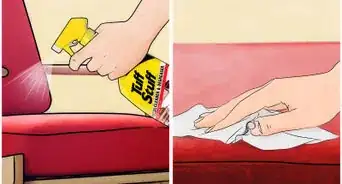
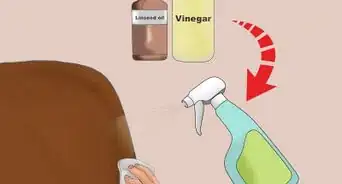
5Remove and wash the slipcover every 3 to 6 months. Keep your slipcovers in good condition by regularly cleaning them. If you notice they are dirty at any time between cleanings, go ahead and pop them in the washer—it won't hurt anything![15]
- Spot treat stains as they appear to keep your slipcover looking like new.


Things You'll Need
Reupholstering a Chair
- Needle-nose pliers
- Screwdriver (optional)
- Paper and pencil
- Marker
- Scissors
- Staple gun
- Sewing pins
- Staples
- Batting
- Upholstery fabric
- Dust cover
- Piping
- Sewing machine
- Fabric glue (optional)
Buying a Slipcover
- Tape measure
- Paper and pencil


References
- ↑ https://www.familyhandyman.com/woodworking/furniture-repair/how-to-reupholster-a-chair/
- ↑ https://www.familyhandyman.com/woodworking/furniture-repair/how-to-reupholster-a-chair/
- ↑ https://www.bhg.com/decorating/do-it-yourself/fabric-paper-projects/diy-chair-upholstery-guide/
- ↑ https://www.bhg.com/decorating/do-it-yourself/fabric-paper-projects/diy-chair-upholstery-guide/
- ↑ https://www.familyhandyman.com/woodworking/furniture-repair/how-to-reupholster-a-chair/
- ↑ https://www.bhg.com/decorating/do-it-yourself/fabric-paper-projects/diy-chair-upholstery-guide/
- ↑ https://www.bhg.com/decorating/do-it-yourself/fabric-paper-projects/diy-chair-upholstery-guide/
- ↑ https://www.bhg.com/decorating/do-it-yourself/fabric-paper-projects/diy-chair-upholstery-guide/
- ↑ https://www.bhg.com/decorating/do-it-yourself/fabric-paper-projects/diy-chair-upholstery-guide/
- ↑ https://www.bhg.com/decorating/do-it-yourself/fabric-paper-projects/diy-chair-upholstery-guide/
- ↑ https://visualhunt.com/dining-chair-covers-types-inspirations-and-diy-tips
- ↑ https://visualhunt.com/dining-chair-covers-types-inspirations-and-diy-tips
- ↑ https://www.huffpost.com/entry/buying-guide-best-slipcovers_n_1862932
- ↑ https://www.huffpost.com/entry/buying-guide-best-slipcovers_n_1862932
- ↑ https://visualhunt.com/dining-chair-covers-types-inspirations-and-diy-tips
About This Article