X
This article was co-authored by wikiHow staff writer, Jack Lloyd. Jack Lloyd is a Technology Writer and Editor for wikiHow. He has over two years of experience writing and editing technology-related articles. He is technology enthusiast and an English teacher.
This article has been viewed 308,435 times.
Learn more...
This wikiHow teaches you how to create a basic racing game using MIT's free Scratch program. The main point of this racing game is to complete the track in as little time as possible without crashing.
Steps
Part 1
Part 1 of 4:
Creating a Track
-
1Open Scratch. Go to https://scratch.mit.edu/ in your computer's web browser.
- Scratch is a free programming resource for beginners.
-
2Click Create. It's a tab at the top of the page. Doing so opens the Scratch interface.Advertisement
-
3Close the "All Tips" sidebar. Click the X in the list of tips on the right side of the page. While not completely necessary, doing this will make it easier to work in Scratch's interface.
-
4Enter a title. In the text box with "Untitled" written in it that's in the upper-left corner of the page, enter your game's title (e.g., "My Racing Game").
- You may first have to enable Adobe Flash by clicking the Allow prompt or logo.
-
5Delete the cat-shaped sprite. Right-click the cat in the "Sprites" window that's in the lower-left side of the page, then click delete in the resulting drop-down menu.
- On a Mac, you can hold down Control while clicking the sprite to prompt the drop-down menu.
-
6Click the Backdrops tab. It's at the top of the Scratch page.
-
7Fill in the background. Before you can draw your track, you'll need to create the background on which the track resides:
- Click the paint bucket icon that's below the T icon.
- Select your track's background color (e.g., green for grass) at the bottom of the page.
- Click the background on the right side of the page.
-
8Draw your track. You can make your track as uniform or irregular as you like:
- Click the brush icon that's at the top of the list of tools.
- Select a color for your track (e.g., black) at the bottom of the page.
- Increase the brush width by dragging right the slider at the bottom of the page.
- Draw the track in a cyclical (not necessarily circular) shape.
-
9Add a finish/start line. Select a color that's different than the one you used for the background and the track, then decrease the brush's width and draw a line across the place in which you want the race to finish.
- This is also the point in front of which your car will start the race.
- You may want to use the straight line tool, which resembles a back slash (\) below the brush icon.


Advertisement
Part 2
Part 2 of 4:
Drawing a Racer
-
1Click the "Paint new sprite" icon. It's a brush-shaped line in the upper-right side of the "Sprites" pane, which is in the lower-left side of the page.
-
2Zoom in. Click the "Zoom in" icon, which resembles a magnifying glass icon with a + in it, at least four times. You should see the large + icon in the middle of the right-hand pane grow larger.
- If you didn't do it earlier, you may first have to close the "Tips" sidebar on the right side of the page by clicking the X icon in the sidebar's left-hand corner.
-
3Draw your racer. Using the brush, draw your racer however you like.
- If you're making a car, you might want to use the rectangle tool (the rectangle-shaped icon) to draw the body and then add the car's wheels with the circle tool.
- The + icon in the pane represents the center of your racer.
-
4Draw a crashed racer. Click the brush shaped "Paint new costume" icon below the "New costume" heading, then draw a crashed (or otherwise different) version of your racer. This is the version which will display if your racer touches the grass or any other obstacles you define later.
- For example, if your current racer is a happy face, you might make the "crashed" costume a sad face.
-
5Select your first racer. On the left side of the pane in which you were drawing your racers, click the first one you drew.
-
6Drag your racer to the starting position in front of the finish line. You'll do this in the left-hand pane. Doing so will ensure that your racer is in the correct starting position when you go to create your script.
- The racer will stop once it touches the finish line, so make sure the racer is in front.


Advertisement
Part 3
Part 3 of 4:
Creating a Starting Point
-
1Click the Scripts tab. You'll find this at the top of the Scratch page.
-
2Click Events. It's an option just below the Scripts tab. Doing so brings up a list of event-based code brackets.
-
3Add the "when flag clicked" event to the pane. Click and drag the "when [green flag] clicked" icon onto the right-hand pane, then release it there.
-
4Click Motion. This blue link is in the Scripts section.
-
5Add your racer's starting location. This will determine where your racer starts whenever you begin a new game:
- Place your mouse cursor over your racer.
- Review your racer's x and y coordinates just above the upper-right side of the "Sprite" window.
- Drag the "go to x: 16 y: 120" event to fit under the "when flag clicked" event.
- Double-click the "16" text box, then type in the x value.
- Press the Tab ↹ key, then type in the y value.
- Press ↵ Enter.
-
6Change the starting position. Drag the "point in direction 90" event from the "Motion" menu to fit under the "go to x y" box. This will ensure that your car is facing the correct direction when the flag is clicked.
-
7Indicate which costume to use. Click Looks, then drag "switch costume to costume2" to fit below the starting position, click the "costume2" box, and select costume1. This causes your racer to revert to its non-crashed costume when you reset the game.


Advertisement
Part 4
Part 4 of 4:
Writing Movement Rules
-
1Add a movement script. This is the script which your racer will use to move forward:[1]
- Click Events.
- Drag the "when flag clicked" event onto the pane, separate of the first "when flag clicked" script.
- Click Control.
- Drag the "forever" event to fit below the "when flag clicked" script.
- Click Motion, then drag the "move 10 steps" option to fit in the "forever" slot.
- Change the "move 10 steps" variable from "10" to "2", then press ↵ Enter.
-
2Create controls. You'll use the following script to assign turning controls to your racer:
- Click Events, then drag the "when space key is pressed" event onto the pane twice. You should have two separate "when space key is pressed" events.
- Click the "space" text box on one "when space key is pressed" event, then click left arrow in the drop-down menu.
- Click the other "when space key is pressed" event's "space" box, then click right arrow in the drop-down menu.
-
3Add motions to the controls. This is how you'll use the arrow keys to turn your racer:
- Click Motion.
- Drag the "turn [right arrow] 15 degrees" event to fit below the "right arrow" control.
- Drag the "turn [left arrow] 15 degrees" event to fit below the "left arrow" control.
-
4Create an out-of-bounds rule. Using this rule will ensure that, should your racer touch the background color (not the track), it will "crash":
- Click Control, then drag the "if then" option onto a blank space.
- Click Sensing, then drag the "touching color" option into the "if then" option's blank space (between the "if" and "then").
- Click the current color next to "touching color", then click once the background for your racer's track.
- Click Looks, then drag "switch costume to" to fit in the "if then" gap.
- Drag the entire "if then" assembly to fit in the "forever" gap below the "move 2 steps" rule.
- Click Control, then drag the "stop all" option to fit below the "switch costume to" option.
- Click "all", then click this script in the resulting drop-down menu.
-
5Make a finish line reaction. The following script will create a victory message once your racer crosses the finish line:
- Click Control, then drag the "if then" option onto a blank space.
- Click Sensing, then drag the "touching color" option into the "if then" option's blank space (between the "if" and "then").
- Click the current color next to "touching color", then click once the finish line.
- Click Looks, then drag the "say hello for 2 secs" option to fit inside the "if then" gap.
- Change "hello" to say "You won!", then change the "2" to whatever amount of time you want to use and press ↵ Enter.
- Drag the whole "if then" assembly into the "forever" bracket below the other "if" bracket.
-
6Test your game. Zoom out by clicking the - icon in the bottom-right side of the backdrop area, click the green flag above the left-hand pane, and then use the arrow keys to maneuver around your track. You should be able to reach the finish line without crashing.
- If you determine that the track is too narrow or irregular to complete, you can adjust it by clicking the track's icon in the lower-left side of the page, clicking the Backdrops tab, and drawing in the areas which need fixing with your track's primary color.


Advertisement
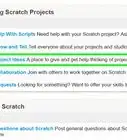
Community Q&A
-
QuestionHow do I create a character for a game?
 Community AnswerLoad a picture, find a picture, or make your own. Look at the doll on the create screen and you can find a doll. Next to that are options to make your own, take a picture, or load your own.
 -
QuestionI cannot use the Scratch website because the scratch team is making changes to scratch.mit.edu. What can I do?
 Community AnswerJust be patient and do something else in the meantime. This happens to all websites occasionally, and usually doesn't last longer than a few hours to a day.
 -
QuestionHow do I upload it on the website?Community AnswerClick the "see outside" button in the top right corner, add a description and notes, then click "share." The project will be saved and uploaded.
Advertisement
Warnings
- Scratch is a fairly simple tool geared toward beginning programmers, so using it to create a complex racing game isn't recommended.⧼thumbs_response⧽
Advertisement


References
About This Article
Jack Lloyd
wikiHow Technology Writer
This article was co-authored by wikiHow staff writer, Jack Lloyd. Jack Lloyd is a Technology Writer and Editor for wikiHow. He has over two years of experience writing and editing technology-related articles. He is technology enthusiast and an English teacher. This article has been viewed 308,435 times.
Co-authors: 42
Updated: July 28, 2022
Views: 308,435
Categories: Creating Games
Advertisement