X
This article was co-authored by wikiHow staff writer, Jack Lloyd. Jack Lloyd is a Technology Writer and Editor for wikiHow. He has over two years of experience writing and editing technology-related articles. He is technology enthusiast and an English teacher.
The wikiHow Tech Team also followed the article's instructions and verified that they work.
This article has been viewed 460,425 times.
Learn more...
This wikiHow teaches you how to create and edit a free website using Google Sites. Remember that you must have a Google account in order to create a Google site.
Steps
Part 1
Part 1 of 5:
Creating the Site
-
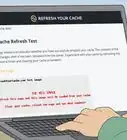
1Open Google Sites. Go to https://sites.google.com/ in your web browser. This will open the Google Sites page if you're logged into your Google account.
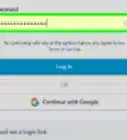
- If you aren't logged into your Google account, enter your email address and password to log in before continuing.
-
2Click New Google Sites. It's on the left side of the page. Doing so opens the most recent version of Google Sites.Advertisement
-
3
-
4Enter a title for your home page. Type the title that you want to use into the "Your page title" field at the top of the page.
-
5Create a Google Site address. Click the "Enter site name" text field in the top-left corner of the page, then type in the word or phrase that you want to use for your Google Site.
- Your site name must be unique, so you may be prompted to choose a different, unique site name at a later point.
-
6Upload a cover photo. You can add a photo to the top of your home page by hovering over the image at the top of the page, clicking Change image at the bottom of the image, clicking Upload in the drop-down menu, selecting a photo, and clicking Open.
-
7Click PUBLISH. It's a purple button in the top-right corner of the page.
-
8Click PUBLISH when prompted. Doing so will create your Google Site at the domain
https://sites.google.com/view/sitename.


Advertisement
Part 2
Part 2 of 5:
Opening the Editor
-
1Open your website. Go to
https://sites.google.com/view/sitename(replacing sitename with your Google site's address). This will open your Google site. -
2
-
3Review the editing options. On the right side of the page, you'll see a column with several options. This column is broken into three main tabs:
- INSERT - Add a text box or a photo, or embed documents or videos from other websites (or Google Drive).
- PAGES - Add a page to your site (e.g., "About").
- THEMES - Add a different theme to your site. Themes change the appearance and layout of your website.
-
4Remember to preview your changes. Whenever you make a significant change (e.g., adding a text box) to your site, you can preview what the change will look like on a live version of the site by clicking the eye-shaped "Preview" button at the top of the page.
- It's best to preview changes before publishing anything.
- When previewing a site, you can click different screen sizes in the bottom-right side of the page to see what the website will resemble on a computer, a tablet, and a phone screen (from right to left).


Advertisement
Part 3
Part 3 of 5:
Inserting Content
-
1Click the INSERT tab. It's in the upper-right side of the page. This is the tab that opens by default when you open the editor.
-
2Insert a text box. Click Text box at the top of the column.
-
3Add a divider. Click the Divider element to add it below the text box.
-
4Move the elements around. You can click and drag the divider up to place it above the text box, or you can click and drag the text box's left-hand corner to move the text box.
-
5Add an image. Click Images at the top of the column, select an image location, click an image that you want to insert into your website, and click Select. This will insert it into the middle of the page, at which point you can resize it and move it around the page.
- You can upload photos to Google Drive and then select them on your Google Site.
-
6Insert other content. Depending on what you want to add to your site, this will vary; however, you can add the following items to your website:
- Google Drive documents - Click Google Drive in the right-hand column, then select a file.
- YouTube / Google Calendar / Google Maps - Click one of these headings in the right-hand column and follow the on-screen prompts.
- Google Docs - Click one of the document types below the "Google Docs" heading in the right-hand column and follow the on-screen prompts.
-
7Complete your home page. Once you've added and rearranged the content on your home page, you can proceed.
-
8Publish your changes. Click PUBLISH in the upper-right side of the webpage. This won't exit the editor, but it will save your changes.


Advertisement
Part 4
Part 4 of 5:
Adding a Page
-
1Click the PAGES tab. It's at the top of the right-hand column in the editor. This will bring up a list of your website's current pages, the only one of which should be the "Home" page.
-
2Click the "Add page" icon. This paper-shaped icon is in the lower-right side of the page. A pop-up menu will appear.
-
3Enter the page's name. Type in the name that you want to use for the page. For example, if you're creating a download page, you'd type in Downloads or something similar.
-
4Click DONE. It's at the bottom of the pop-up menu. Doing so adds the page to your website.
-
5Edit the page as needed. Just like the home page, you can insert elements, add files, and customize the position of different items on the page.
-
6Click PUBLISH when you're done. This will save your changes and push them to the live version of your website.


Advertisement
Part 5
Part 5 of 5:
Applying a Theme
-
1Click the THEMES tab. It's at the top of the column on the right side of the page.
-
2Select a theme. Click a theme that you want to preview. Doing so will cause your website's theme to change in the main window.
-
3Select a color for the theme. Click one of the colored circles below the theme's name to preview the color.
- Different themes use different color palettes.
-
4Click Font style. It's a drop-down box below the colored circles under your theme's name. A drop-down menu will appear.
-
5Click a font name. Doing so will select it and apply it to your website's preview.
-
6Click PUBLISH when you're done. This will save your changes and push them to the live version of your website. At this point, you're free to continue adding pages, inserting content, and changing the theme as you like.


Advertisement
Community Q&A
-
QuestionDo I have to pay to use Google Sites?
 Community AnswerNo, you do not need to pay to use Google Sites.
 -
QuestionSo can I put whatever I want on the website I have?
 Community AnswerYou can put everything but it should be useful. Suppose you created a website of your own, it should have a very short and cool name and obviously the important things mostly people prefer. Then the people will love your website and they will definitely suggest to other people. Take a survey from the people around you.it will definitely gonna help you. Also, don't put anything on the website that breaks the law where you live.
 -
QuestionHow do I upload the completed website?
 Community AnswerIf you use Google Sites, you don't have to upload your site. It's all stored on Google's servers or in the Cloud.
Advertisement
Warnings
- Do not post nudity or explicit images, violent images, or hate speech on Google Sites. Your site may be removed by Google if you do so.⧼thumbs_response⧽
Advertisement


About This Article
Jack Lloyd
wikiHow Technology Writer
This article was co-authored by wikiHow staff writer, Jack Lloyd. Jack Lloyd is a Technology Writer and Editor for wikiHow. He has over two years of experience writing and editing technology-related articles. He is technology enthusiast and an English teacher. This article has been viewed 460,425 times.
How helpful is this?
Co-authors: 105
Updated: December 14, 2022
Views: 460,425
Categories: Creating and Enhancing a Website | Google Applications
Article SummaryX
1. Go to https://sites.google.com.
2. Click +.
3. Enter a title.
4. Create an address.
5. Upload a cover photo.
6. Click Create Site
Did this summary help you?
Advertisement