X
This article was co-authored by wikiHow Staff. Our trained team of editors and researchers validate articles for accuracy and comprehensiveness. wikiHow's Content Management Team carefully monitors the work from our editorial staff to ensure that each article is backed by trusted research and meets our high quality standards.
This article has been viewed 33,026 times.
Learn more...
The dreamcatcher comes from a Lakota legend, and the Sioux people use them to prevent bad dreams by hanging them in their bedrooms.[1] You can crochet a dreamcatcher easily with some basic crochet knowledge and a few special items. Try making a crocheted dreamcatcher to hang in your bedroom or to give as a gift.
Steps
Part 1
Part 1 of 3:
Creating the Base
-
1Gather your materials. Making a crocheted dreamcatcher is an easy craft, but you will need some special materials to do it. Before you get started, you will need:[2]
- An embroidery hoop in the size of your choice. 10 centimeters is a good size for a small dreamcatcher.
- Size G/6 (4mm) crochet hook
- A medium worsted weight yarn in the color of your choice
- Beads, feathers, scrap fabric, lace, ribbon, or anything else you want to hang from the bottom of the dream catcher.
- String and needle for hanging beads and feathers.
-
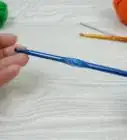
2Single crochet around the hoop. To cover the embroidery hoop, you will need to single crochet around the hoop. Start by making a slipstitch and slipping it onto your hook. Then, insert the yarn through the center of the hoop, loop the yarn around the end of your hook on the outside of the hoop, and pull this yarn through the loop on your hook. Then, yarn over again and pull through again.[3]
- Continue to single crochet around the hoop until you have covered the whole thing in yarn. Keep the stitches close together by sliding them over as you go.
Advertisement -
3Chain 60 for the hanging loop. To make a loop for hanging the dreamcatcher, chain 60 stitches. Then, connect the chain back into the hoop at the chain’s base with a slipstitch.[4] To slipstitch, simply insert the hook in through the stitch and the loop the yarn over. Then, pull this new yarn through both loops on the hook.[5]
- After the hoop is covered and the hanging loop is connected, you can cut the yarn and tie off the end. Set the hoop aside for now and begin working on the doily for the dreamcatcher’s web.


Advertisement
Part 2
Part 2 of 3:
Crocheting the Web
-
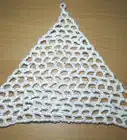
1Chain four and slipstitch. To start the web, you will need to make a chain and connect it into a ring. Chain four stitches, and then connect the ends with a slipstitch.[6]
-
2Chain three and double crochet 11 stitches. For the first round, start by chaining three stitches and then double crochet 11 stitches around the ring.[7] To finish the round, slipstitch into the third chain.
- The chain of three will count as one stitch so this round will have a total of 12 stitches.
-
3Make a chain of five, double crochet, and chain two. For the next round, you will need to chain five to start the round. This will count as your first double crochet. Then, follow with a double crochet and chain of two.[8]
- Continue to double crochet and chain two all the way around.[9]
- Finish the round with a slipstitch into the third chain in the beginning chain of five.
-
4Chain five, skip, and slipstitch to create larger loops. As you continue to work around the circle, you will want to make the loops larger. To do this, start your next row with a chain of five and skip a stitch and slipstitch into the next one. Continue to chain five, skip, and slipstitch all the way around the round.[10]
- You will need to do a few rounds to get the doily large enough to connect with the hoop. With each new round, increase the number of stitches you chain by one. For example, chain six for the next round and seven for the round after. This will help to create larger spaces in the web as you move outwards.
-
5Connect the doily to the hoop. Continue to chain and slipstitch around the circle until the doily is almost the same size as the hoop. To connect the doily to the hoop, start another chain round but wrap each chain around the hoop before you connect it back into the circle with a slipstitch. Do this for the whole round until the doily is fully connected to the hoop.


Advertisement
Part 3
Part 3 of 3:
Embellishing Your Dreamcatcher
-
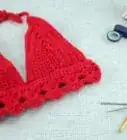
1Add beads. You can string some beads and hand these from the bottom of your dream catcher to add color and interest. Thread a needle and tie a knot at the bottom. Then, string some beads onto the thread and tie the thread to the bottom of the dreamcatcher.[11]
-
2Include a few feathers. Feathers are often added to dream catchers as a decorative touch. Thread a needle and insert the needle through the ends of the feathers. Then, tie the thread to the bottom of the dream catcher.[12]
- Another option is to cut out feather shapes from felt fabric and attach these to the dream catcher with thread.
-
3Cut up some lace or fabric. An easy way to embellish your dreamcatcher is to cut some lace or fabric into strips and then tie them to the bottom of the dreamcatcher.[13] Use some fabric and lace in colors that match or complement your yarn.
- You can also tie strips of ribbon to the bottom of the dreamcatcher.


Advertisement
Community Q&A
-
QuestionWhere would I buy the materials?
 Community AnswerI normally buy my knitting stuff from Michael's, but other craft stores like JoAnn's are good too.
 -
QuestionHow do I put the beads in the doily?
 FlutasmoradasCommunity AnswerString the bead on the yarn before beginning to crochet your pattern. If the bead is too small, find a bigger bead or smaller yarn.
 -
QuestionWhen I use the embroidery hoop, do I use both pieces or just one? And if just one, top or bottom?
 Rebekah ArmstrongCommunity AnswerThere is a top and bottom to each set of hoops. The fabric you use to embroider on will be stretched over the bottom hoop. The top hoop will have a screw that you can loosen and tighten. Loosen the screw on the top hoop and place it over the fabric and bottom hoop. Tighten the screw so the top hoop fits tightly over the bottom hoop and fabric. To complete setting up to embroider, pull the corners of your fabric so that the area you will be sewing on is not sagging, but don't pull it too tightly.
Advertisement
References
- ↑ http://aktalakota.stjo.org/site/News2?page=NewsArticle&id=8820
- ↑ http://craftbits.com/project/how-to-make-a-crochet-dreamcatcher/
- ↑ http://craftbits.com/project/how-to-make-a-crochet-dreamcatcher/
- ↑ http://craftbits.com/project/how-to-make-a-crochet-dreamcatcher/
- ↑ http://newstitchaday.com/how-crochet-slip-stitch/
- ↑ http://craftbits.com/project/how-to-make-a-crochet-dreamcatcher/
- ↑ http://craftbits.com/project/how-to-make-a-crochet-dreamcatcher/
- ↑ http://craftbits.com/project/how-to-make-a-crochet-dreamcatcher/
- ↑ http://craftbits.com/project/how-to-make-a-crochet-dreamcatcher/
About This Article

wikiHow Staff
wikiHow Staff Writer
This article was co-authored by wikiHow Staff. Our trained team of editors and researchers validate articles for accuracy and comprehensiveness. wikiHow's Content Management Team carefully monitors the work from our editorial staff to ensure that each article is backed by trusted research and meets our high quality standards. This article has been viewed 33,026 times.
Co-authors: 1
Updated: August 4, 2021
Views: 33,026
Categories: Crochet | Yarn and Thread
Advertisement