This article was co-authored by wikiHow Staff. Our trained team of editors and researchers validate articles for accuracy and comprehensiveness. wikiHow's Content Management Team carefully monitors the work from our editorial staff to ensure that each article is backed by trusted research and meets our high quality standards.
There are 8 references cited in this article, which can be found at the bottom of the page.
The wikiHow Culinary Team also followed the article's instructions and verified that they work.
This article has been viewed 425,917 times.
Learn more...
Curing is an age-old process of preserving meat for later use. With just a few ingredients — salt, nitrites, and time — the meat transforms: from water-packed and pliable to dry and stiff. Over time, the flavor develops, too. Leeched of excess water, dry-cured meat takes on an intense umami flavor that is equal parts mouthwatering and soul-slaking. Learn how to dry- and wet-cure your own meat for a fraction of the cost you'd ordinarily pay in a restaurant or fine foods purveyor, paying attention to proper safety standards to avoid tainted meat.
Steps
Dry-Curing Meat
-
1Decide what kind of meat you'd like to use. Ham is a popular choice for curing, but you can use anything from beef to venison and much more in between. With a good piece of meat, you really can't go wrong, although the first-time curers might want to go with a more forgiving piece of meat, like pork belly or pork butt.
- For the most part, use meats with whole muscle groups in their anatomical connection.[1] Pork loin and belly, beef hindquarter or brisket, mutton legs and even duck breast are popular cuts for dry-curing.
-
2If necessary, trim off any excess fat, tendons, or meat. Say you're trying to make Capicola charcuterie. You might buy a boneless pork shoulder, and then cut the picnic end of the pork shoulder from the pork butt, leaving you with two distinct cuts of meat. You can then use the picnic end of the shoulder in a sausage, for example, and the butt in your dry-cure charcuterie.Advertisement
-
3For larger cuts of meat, consider stabbing the meat with a prong for better salt coverage. You don't have to stab the meat before applying the dry rub, but for certain cuts of meat — larger cuts or cuts like pork belly, which are often covered with a lining of fat — stabbing the meat allows the salt and nitrite mix to penetrate deeper into the meat, improving the efficiency and effectiveness of the cure.
-
4Decide whether you want to cure with a pre-mixed curing salt or mix your own. Dry-curing with salt will sap away the moisture from the meat and intensify the flavor of the meat, but it still won't eliminate the possibility of botulism spores germinating. To combat botulism, sodium nitrite is often used in combination with salt as "curing salts," "Instacure #1," and "pink salts." Botulism is a dangerous illness characterized by paralysis and respiratory problems caused by the bacteria Clostridium botulinum.[2]
- Consult manufacturer's instructions for how much curing salt to use alongside regular salt. Usually, a 10:90 ratio of pink salt to regular salt is called for.
- If you are particular about exactly what goes into your cured meat, it might be best to add the sodium nitrite on your own. (See next step.) Most casual curers, however, will find it easiest to use pre-mixed curing salts, where they won't have to fuss with the ratio of salt to sodium nitrite.
- Why are pink salts pink? Manufacturers of pink salt purposely dye the salt for cooks so that they don't confuse curing salt with regular salt. That's because, in large quantities, sodium nitrite is toxic.[3] Accidentally using pink salt instead of regular salt in your chicken soup, for example, could be very unfortunate. The pink dye itself does not influence the final color of the cured meat; the sodium nitrite does.
-
5Use a ratio of 2:1000 sodium nitrite and salt, if mixing your own curing salt. If you want to make your own curing salts, be sure to nail the ratio of sodium nitrite to salt. For every 2 grams (0.071 oz) of sodium nitrite, for example, use 1,000 grams (35.3 oz) of salt. Another way to do this is to take the total weight of your salt, multiply it by .002, and use that much sodium nitrite in your mix.
-
6Mix up your spices along with your curing salt. Spices add a rich dimension of flavor to your cured meats. While it's important not to get too carried away and spice the meat to oblivion, a good spice mix will intensify flavors and add distinct profiles to your cures. In a small spice grinder, grind up your spices and add them to the curing salt/salt mixture. Here are some suggestions for spices to use:
- Peppercorns. Black, green, or white are essential in most spice mixes. There's a reason they call peppercorns the "master spice."
- Sugar. A little Demerara sugar adds a touch of caramel sweetness to your cure.
- Coriander and mustard seed. Adds smokiness to the meat.
- Star anise. Silky and slightly sweet, a little bit goes a long way. Slightly nutty.
- Fennel seed. Adds a pleasantly green or grassy dimension to the cure.
- Citrus zest. Adds a light, pleasantly acidic element that cuts through fattier pieces of meat.
-
7With your hands, rub the curing salt and spice mix over the entire cut of meat.[4] Cover a tray with parchment and line the bottom generously with your curing salt and spice mix. Place your meat on the bed of curing salt (fat side up, if appropriate) and cover the top of the meat with your remaining mix for equal coverage. If desired, cover the top of the meat with another piece of parchment, then another tray, and finally a pair of bricks or another heavy object to weight the meat down.
- Do not use metal trays for this step without parchment. The metal reacts with the salt and sodium nitrite. If using a metal tray for underlayment, always use a piece of parchment between it and the salt mix.
- If you have a round piece of meat and want to keep it (more or less) round, you don't have to weight it down. The salt will do its job naturally. Weighting down is preferable for a pork belly, for example, that you later want to roll into shape.
-
8Refrigerate the meat for 7 to 10 days. Allow for adequate airflow by leaving at least a small portion of the meat uncovered. After 7 to 10 days, a lot of the moisture should have been drawn out by the salt.
-
9After 7 to 10 days, remove from the refrigerator and rinse off all the salt/spice mix. Under cold water, remove as much of the salt/spice mix as possible and allow to briefly air-dry over an elevated rack. Take a paper towel, as insurance, and wipe away any excess moisture before proceeding to the next step.
-
10Roll up the meat (optional). Most cured meats will not need to be rolled into shape at this point, but some will. If you're taking pork belly, for example, and trying to make pancetta, you want to start with a rectangular piece of pork belly and roll up the longer end very tightly. The tighter the roll, the less space there is for mold or other bacteria to inhabit.
- If you are rolling the cured meat, it helps to start with an even square or, usually, rectangle. Cut off pieces of meat on all four sides until you have a neat rectangle. Save the scraps for soups or render off the fat separately.
-
11Wrap the meat in tightly cheesecloth. Tightly wrapping the meat in cheesecloth will help wick away any moisture that forms on the outside of the meat, keeping it dry while it ages. Fold the cheesecloth over both sides of the meat, bunch the cheesecloth up at both ends, and tie the ends into knots. If possible, create a second knot at the top of the cheesecloth into which you can pry your hanging hook.
-
12Truss your meat to help it keep its shape while it ages (optional). Especially if dealing with a rolled piece of meat, trussing will help the meat stay tightly rolled and keep its shape. Use butcher's twine and simply tie off every inch until the length of the meat is trussed. Remove any dangling pieces of twine with shears.
-
13Label the meat and hang in a cool, dark place for anywhere from two weeks to two months. A walk-in refrigerator is ideal, being cool and dark, but anywhere that doesn't get a lot of light and doesn't exceed 70 degrees Fahrenheit (21 degrees Celsius) will work.[5]
-
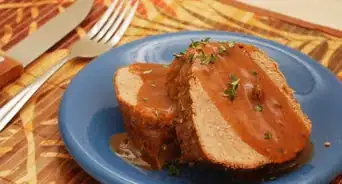
14Serve. After you've removed the trussing and cheesecloth, cut thin slices of the cured meat and enjoy. Store any cured meat you don't use immediately in a refrigerator.


Wet-Curing Meat
-
1Choose your piece of meat. Wet-brining is great for ham or other smoking recipes. Try wet-curing your Christmas ham, for example, and then finishing it off in the smoker for a delicious recipe.
-
2Mix up your brine cure. Making a simple brine, and then adding the nitrites in the curing salt (which will cure the meat) is all it takes to wet-cure meat.[6] Try this basic brine recipe, or research brines with added nitrite for a different kind of taste. In one gallon of water, bring the following ingredients to a boil and then allow brine to cool completely:
- 2 cups brown sugar
- 1 and 1/2 cups kosher salt
- 1/2 cup of pickling spice
- 8 teaspoons of pink salt (not to be confused with sodium nitrite)
-
3Place your meat in a brining bag. A brining bag is essential for larger cuts of meat, like a Christmas ham. Smaller cuts of meat can simply go in resealable freezer bags, but make sure that there's enough room for the meat and brine to rest comfortably in.[7] For larger cuts of meat, Place the brining bag in a larger tub or container first, and then fill with brine. Add 1⁄2 gallon (1.9 L) to 1 gallon (3.8 L) of ice water to the brine to dilute the concentrated brine. Mix thoroughly before sealing.
-
4In the refrigerator, brine your meat one day for every two pounds of meat.[8] If you have a five pound piece of meat, brine for approximately two and a half days. Turn the meat every 24 hours if possible. The salt in the brine tends to be thicker on the bottom half of the brine and turning the meat allows the brine to work evenly.
- Change the brine after 7 days during the curing process to help prevent spoiling.
-
5Rinse the cured meat thoroughly in fresh cold water to get rid of the crystallized salt on the surface of the meat.
-
6Set the meat on a wire mesh screen to drain for 24 hours in a well ventilated area and store in the refrigerator [9] for up to 30 days.
-
7Smoke the meat. Wet-cured meat, such as ham, is great after smoking. Smoke your wet-cured meat in a smoker and serve on a special occasion.


Community Q&A
-
QuestionIs there a way to cure without using nitrite? It's horrible for folks with blood cancer!
 Community AnswerYes, But there are inherent increases in the risks of Bot and Lysteria. I have done it, and do it, and generally just use more heat in the cooking phase and/or keep things cooler, so it can be done. If you "wet cure" i.e brine/pickle under controlled refrigeration, you can get equally complex and pleasant results while avoiding the need for curing salts.
 -
QuestionDoes dry cured bacon release the horrid white or clear liquid when fried?Community AnswerOf course it does. The liquid is the pig fat in the bacon. That "horrid" liquid is the reason bacon tastes so good.
-
QuestionWhere can I get pink salt?
 Community AnswerPink curing salt (which is not the same as the popular Himalayan sea salt crystals) is available on Amazon, or from specialty food stores.
Warnings
- Nitrates and nitrites are dangerous if used in large quantities.[10] There are FDA regulations on nitrites amounts in parts per million. Most recipes have exact specifications on the amounts needed. And general advice is not to add more than suggested.⧼thumbs_response⧽


References
- ↑ https://melissaknorris.com/how-to-dry-cure-meat-at-home/
- ↑ https://www.cdc.gov/botulism/
- ↑ http://dontwastethecrumbs.com/2012/09/nitrates-the-good-the-bad-the-truth/
- ↑ https://www.foodrepublic.com/2016/06/09/how-to-cure-your-own-meats-at-home-mini-fridge-required/
- ↑ https://mattikaarts.com/blog/meat-curing-safety/
- ↑ http://thesaltcuredpig.com/brine-cured-ham-101/
- ↑ http://thesaltcuredpig.com/brine-cured-ham-101/
- ↑ https://www.homesicktexan.com/2010/03/how-to-cure-ham.html
- ↑ http://thesaltcuredpig.com/brine-cured-ham-101/
About This Article

To cure meat, you'll need a pre-mixed curing salt that has sodium nitrate in it. Sodium nitrate will protect against botulism. Trim any large chunks of fat off of the meat you're curing so it doesn't go bad during the curing process. Then, rub the curing salt into the meat so it's completely covered. Add other spices to the cure if you'd like, like brown sugar or fennel seeds. Next, place the meat in a sealable food storage bag. Push as much air out of the bag as possible and seal it up. If possible, use a vacuum sealed bag to ensure that no air gets inside. Refrigerate the meat for 10 days to give it time to dry out. After 10 days, take the meat out of the fridge and rinse it off under cold water to remove the excess salt. Wipe any excess water away with a paper towel. Then, roll the meat up into a bundle as tightly as you can. Cover the meat in a cheesecloth and tie the cloth down with multiple pieces of twine. Let the meat dry in a cool, dry location for at least 5 weeks. The longer you let the meat cure, the lighter the meat will become. Once you’ve lost roughly 30% of the meat’s weight, which may take 2-4 months, you are ready to eat or cook the meat. If you want to learn how to wet-cure the meat in a brine, keep reading the article!