X
This article was co-authored by Ashley Adams. Ashley Adams is a Licensed Cosmetologist and Hair Stylist in Illinois. She completed her Cosmetology education at John Amico School of Hair Design in 2016.
This article has been viewed 327,321 times.
It's possible to curl your hair even if you don't have access to a hair curler. Simply twist strands of your hair up into pin curls and wrap them in aluminum foil. By applying heat from a hair straightener to the foil, you'll create beautiful, lasting curls. Using aluminum foil to form curls will allow you to keep your hair away from the flat iron's heat while still getting great curls.
Steps
Part 1
Part 1 of 3:
Preparing the Foil and Sectioning Your Hair
-
1Plug in the straightener and turn it to the appropriate heat setting. Let your hair straightener start heating up so that it’s ready to go once you've wrapped all of your hair in foil. Most modern hair straighteners heat up in less than 1 minute, but you can wait a couple minutes just to be sure.[1]
- If you have thin hair, set your hair straightener to 250 °F (121 °C). For normal hair, use a temperature of 365 °F (185 °C). If you have thick hair, set your straightener to 400 °F (204 °C).[2]
- If your hair straightener doesn't have exact degrees, set it to medium heat, or a number that's roughly in the middle.
- Be sure the hair straightener is far from any sources of water or flammable objects.
-
2Separate the aluminum foil into 5-inch (13-cm) squares. To curl your hair, you’ll need to cut the aluminum foil into pieces that are big enough to hold the curls. Usually, 5 inches (13 cm) squares work well, but you don’t need to worry about making them precisely that measurement.
- As an alternative to this preparation, pre-cut pieces of aluminum foil can be found online or in beauty stores.
- For larger curls, try using squares that are 6 inches (15 cm). Smaller curls can be made using regular 5-inch (13-cm) squares.
Advertisement -
3Cut 10-20 squares of foil. You’ll want to cut out 10-20 squares, depending on how thick your hair is and how big you’d like the curls to be. For larger curls, you’ll need fewer squares but should cut them larger. For small, tight curls, you’ll need lots of squares that don’t need to be as large since the curls will be tightly wound.[3]
-
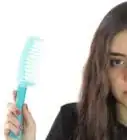
4Dry and brush your hair thoroughly. Before curling your hair using aluminum foil, you’ll need to make sure your hair is completely dry. Using a hair straightener on wet or damp hair can cause damage. Brush your hair out after it’s dry to get rid of any tangles.[4]
- You don't need to wash your hair before curling it — if your hair is a little bit dirty, it will actually hold the curls better.
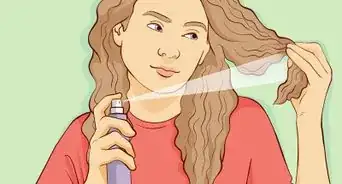
- You can apply a heat protectant, if desired.
-
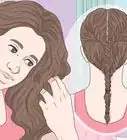
5Separate your hair into 2-3 sections, if desired. If you have thick hair or just want to ensure you can reach each piece, you can separate your hair into sections. Part your hair from ear to ear and pin the top section up so that it’s sitting on the top of your head. This will allow you to reach the bottom half of your hair much more easily.[5]
- If you have extra thick hair, separate your hair into 3 sections instead of 2. Section off the very top layer of hair, a middle layer, and then the bottom layer.


Advertisement
Part 2
Part 2 of 3:
Wrapping Your Hair in Foil
-
1Choose a strand of hair and work systematically around your head. To start the curling process, gather a small strand of hair. The strand of hair should be about the width of a pencil when compressed. If you've sectioned off parts of your hair, start with the bottom layer. You'll work your way from one side of your head to the other to ensure you don't miss any strands.[6]
- If you haven't sectioned off your hair, choose a section of hair from the top of your head to start with.
- For larger curls, take a larger strand of hair.
-
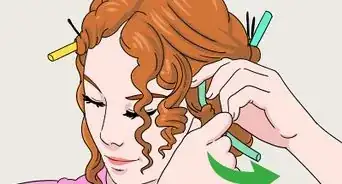
2Coil a strand of hair up to your roots, creating a swirl. Using a strand of hair, start winding your hair into swirls from the bottom of the strand going up. You can wrap the end of your hair around your fingers to start with and then continue rolling it into a circle until you get close to the top of your head, creating a pin curl.[7]
- The tighter the coil, the curlier your hair will be. Similarly, if you have a loose coil, you're going to have much looser curls.
-
3Place the foil under the rolled hair while holding the hair in place. Take a square piece of the aluminum foil and place it under the rolled up strand of hair. It’s important that you hold the pin curl in place when positioning the aluminum foil to ensure that it doesn’t unravel.[8]
-
4Wrap the foil around the pin curl to keep it in place. Fold the foil over the twisted hair so that it’s stable and won’t unravel, scrunching in the sides of the foil if necessary. It’s best if you keep the curl flat, folding each side of the foil inwards so that the pin curls stay round and contained. Keep the foil wrapped tightly. You don't need to cover the hair up with foil all the way to your roots — as long as the swirl is covered in foil, it's good.[9]
- It’s okay if the foil isn’t completely flat after being wrapped. As long as the strands stay curled up, it should work.
-
5Continue wrapping pin curls in foil around your entire head. Repeat the process of winding each strand of hair up into a pin curl and then wrapping them securely in aluminum foil. If you’ve sectioned off your hair, start with the bottom section and then move your way up, completing the top section of hair last.[10]
- If you haven't sectioned off your hair, simply move from one side of your head to the other, making sure you wrap every strand.

Advertisement
Part 3
Part 3 of 3:
Heating the Curls
-
1Clamp the flat iron onto each wrapped curl for a couple seconds. After the hair straightener has heated up, clamp it around each section of foil. You only need to heat up the foil for about 5 seconds—leaving it clamped around the foil for too long could damage your hair.[11]
- If you have thick hair, clamp the foil for a couple seconds and then release it. Repeat this 2-4 times on 1 section of foil, making sure you don’t keep it clamped for too long each time.
- Try not to let the foil touch your skin once it’s been heated up or it could burn you.
-
2Wait 5-15 minutes for your hair to cool and the curls to set. This allows the curls to cool and hold their shape. For softer curls, you’ll only need to wait roughly 5-10 minutes, depending on how thick your hair is. For super tight, bouncy curls, wait at least 15 minutes.[12]
- To see if the foil is still hot, lightly touch it with your finger. If it’s still warm, wait a few more minutes before checking again.
-
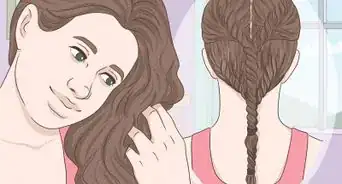
3Unwrap each foil once they’ve cooled to reveal curls. Once the aluminum foil has cooled, you can start unwrapping them. Remove each piece of foil, carefully unwrapping them to reveal your curls, until each foil has been taken out. Run your fingers gently through each curl to separate them and make them look more natural.[13]
-
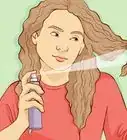
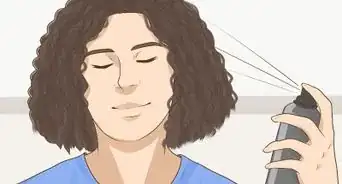
4Spray hairspray onto your curls to make them last longer, if desired. If you’d like to ensure your curls maintain their shape and bounce, apply hairspray evenly to your hair. Run your fingers through your hair after spraying them to give your hair a little bit of shape.
- Be careful not to overspray — you only need a quick, even spray for the curls to keep their shape. Spraying too much hairspray will make the curls stiff and difficult to run your fingers through.

Advertisement
Community Q&A
-
QuestionDo I have to use heat?
 Community AnswerYes.
 -
QuestionHow do I twist my hair in aluminum foil?Community AnswerYou roll your hair up into a curl first and wrap it in foil.
Advertisement
Warnings
- Foil becomes very hot once it has been heated up by the hair straightener. Be careful not to let hot foil touch your skin.⧼thumbs_response⧽
Advertisement
Things You'll Need
- Aluminum foil or beauty hair foil pre-cuts
- Hair straightener
- Hairbrush
- Hairspray (optional)
References
- ↑ https://www.today.com/style/tin-foil-hair-curling-trick-get-longer-lasting-curls-t115658
- ↑ http://www.marieclaire.com/beauty/news/a15722/flat-iron-perfect-temperature/
- ↑ https://www.today.com/style/tin-foil-hair-curling-trick-get-longer-lasting-curls-t115658
- ↑ http://alldaychic.com/how-to-curl-hair-using-foil/
- ↑ https://www.youtube.com/watch?v=fVLaIEkd4jI
- ↑ https://www.youtube.com/watch?v=fVLaIEkd4jI
- ↑ https://www.youtube.com/watch?v=fVLaIEkd4jI
- ↑ https://www.today.com/style/tin-foil-hair-curling-trick-get-longer-lasting-curls-t115658
- ↑ https://www.today.com/style/tin-foil-hair-curling-trick-get-longer-lasting-curls-t115658
About This Article

Ashley Adams
Professional Hair Stylist
This article was co-authored by Ashley Adams. Ashley Adams is a Licensed Cosmetologist and Hair Stylist in Illinois. She completed her Cosmetology education at John Amico School of Hair Design in 2016. This article has been viewed 327,321 times.
Co-authors: 13
Updated: September 9, 2020
Views: 327,321
Categories: Heat Free Curls
Advertisement