This article was co-authored by wikiHow staff writer, Eric McClure. Eric McClure is an editing fellow at wikiHow where he has been editing, researching, and creating content since 2019. A former educator and poet, his work has appeared in Carcinogenic Poetry, Shot Glass Journal, Prairie Margins, and The Rusty Nail. His digital chapbook, The Internet, was also published in TL;DR Magazine. He was the winner of the Paul Carroll award for outstanding achievement in creative writing in 2014, and he was a featured reader at the Poetry Foundation’s Open Door Reading Series in 2015. Eric holds a BA in English from the University of Illinois at Chicago, and an MEd in secondary education from DePaul University.
There are 17 references cited in this article, which can be found at the bottom of the page.
This article has been viewed 12,956 times.
Learn more...
How you choose to cut plastic depends on the type of plastic that you plan on cutting. If your plastic is weak or thin, like a water bottle, you can use scissors or a small knife. Larger items, like plastic sheets or acrylic flooring, can often be cut by scribing and breaking them. Thick plastic materials may require power tools. You can easily cut plastic in a short period of time, and you’ll find that each process will become quite easy as you get the hang of it! Regardless of the method that you choose to cut plastic, always take the proper safety precautions and work slowly and carefully.
Steps
Cutting Weaker Plastics by Hand
-
1Use scissors for simple arts and crafts projects. If you’re cutting thin plastic, like a soda bottle or soft sheet, you can use scissors. Make sure that you’re firmly holding your plastic in your non-dominant hand and cut carefully, using a flat surface to brace your plastic. Never cut directly next the hand you’re holding the plastic material in.
- You can mark the locations that you want to cut with a permanent marker. You can also use a dry erase marker if you want to wipe the marks away when you’re done.[1]
-
2Make delicate and clean cuts with a utility knife. Place your plastic on a cutting board. Apply pressure to your plastic material with your non-dominant hand, laying it as flat as possible on your cutting board. Mark the line where you want to cut with a dry erase or permanent marker. Make an initial incision along your marked line by poking into it at a 45-degree angle. Holding the utility knife firmly in your dominant hand, drag your wrist along the area that you wish to cut.[2]
- You can also use a box cutter if you don’t have an utility knife.
Advertisement -
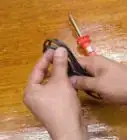
3Apply friction with some sewing thread to cut harder plastics. Surprisingly, you can actually cut through plastic with some strong sewing thread. To do this, secure your plastic to a firm surface with some standard clamps or tape.[3] Wrap a long line of sewing thread around each hand to secure it. Then, wrap the thread around the section that you want to cut and pull the thread back and forth in rapid and short movements. The pressure and friction from the thread will heat the plastic and you’ll be able to snap it right off![4]
- This method is best used for removing smaller pieces of plastic from a larger item.
- To wrap sewing thread around your hands, twist the thread between your thumb and forefinger and rotate your wrists inward to create tension.
- The movement of your thread should be quick, and you should apply a light degree of pressure as you’re pulling on it.


Scribing and Breaking Plastic Sheets
-
1Lay your plastic on a flat and secure surface near an edge. You’ll need a portion of your plastic to hang off of your table or workstation, so lay your plastic out as flat as possible. This method really works best with sheets of plastic.[5]
- Scribing refers to the process of removing a piece of material along a specific line to make it fit somewhere else.[6]
-
2Use a straight edge or ruler to draw the line where you want to cut. Apply pressure to your straight edge with your non-dominant hand wherever you plan on cutting. Draw a line along your straight edge using a marking pen or permanent marker.
-
3Move your plastic sheet so that your line is on the edge of your table. Line up the marking that you made with the edge of your table or workstation. The portion that you are trying to remove should be hanging off of the edge. Make sure that your plastic sheet lays flat.[7]
-
4Place a heavy straight edge parallel to the line that you want to cut. You’ll need something to weigh your sheet down to the table. Use another sheet of plastic or a heavy straight edge and place it evenly along the line that you plan to cut.[8]
-
5Cut halfway through your line using an acrylic knife or scribing tool. While applying pressure to the straight edge that’s weighing your plastic down to the table, begin cutting alongside the line you’ve drawn at a 45-degree angle. You should apply some pressure to each cut, but you’ll be making multiple cuts so don’t worry about pushing through the entire sheet all at once.[9]
- Breaking the plastic at the end will produce the clean edge, so don’t worry if your cuts aren’t perfect.
-
6Continue to cut until you feel the excess portion weaken and wobble. After several cuts, you should feel the plastic portion that’s been hanging over the edge begin to wobble and give a little. This is an indication that you’re almost done, since it’s a sign that the plastic is ready to fall off. [10]
- You can test if it’s ready to be broken off by applying some light pressure on the excess plastic. If it moves a little when you press on it, you’re ready to snap it off.
- You don’t need to cut more than halfway through a sheet of plastic to prepare it for breaking.
-
7Break the plastic along the scribed line by applying pressure. With the cut line facing up, place your non-dominant hand on the object you used to weigh your plastic down. Apply force to the portion that’s hanging off of the table with your free hand. The plastic sheet should break cleanly along your line.[11]
- If you can’t get the plastic to snap off with minimal effort it means that you didn’t cut deep enough. Put your straight edge back along the line you’ve made and continue cutting.


Using a Circular Saw on Thicker Plastics
-
1Mark the line where you want to cut with a grease pen or permanent marker. This method works if you need a clean cut but can’t scribe and break the plastic due to its thickness. To start, use a straight edge and a permanent marker or grease marker to create your cutting line if you need your cut to be straight. Otherwise, you can mark your plastic freely along the edges that you need to remove.
- Always wear protective goggles and a dust mask when working with power tools.[12]
-
2Secure the plastic with clamps by fastening them to your work surface. Using either bar clamps or pipe clamps, affix your plastic to the edge of your work surface. The plastic should be held in place firmly enough that it can’t be moved. Test your clamps by pulling on the edge of your plastic to see if it moves. If it does, tighten your clamps.
- To secure your clamps, twist the movable portion between your work surface and plastic material. Twist it as tightly as the clamp allows to ensure that your material won’t move.
- You cannot do this with your plastic in the middle of a standard table, since you’re cutting through it to the bottom. Clamp your plastic over the edge of a firm table or use a working stand for woodworking.
-
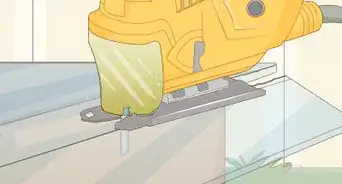
3Begin sawing carefully along your marked line by using the guiding lines. Affix your circular saw to the edge of your plastic by resting your saw’s base plate on top of the line that you’ve marked.[13] Tighten your blade guard by pulling it towards you until you’ve reached the desired depth and angle.[14] Turn it on and move carefully along the line, using the guides of your saw to navigate your marking. Move slowly: thicker plastic tends to be a little harder to cut.[15]
- Never take your hands off of the two handles on top of your circular saw.[16]
- The blade guard is the section of your saw with a lever on it, and is used to adjust the height and depth of your cut.[17]
- Run the cord to your saw over your shoulder. This will keep the cord out of your way while you cut.[18]
-
4Push the blade through the plastic while watching for kickback. You don’t want to apply too much pressure. Your saw should be doing most of the work. If you feel your saw pushing out, release the lever and let the saw settle before continuing.[19]
-
5Finish the job by letting your plastic cool for a moment. Plastic will get quite hot under a saw, and you’ll want to let it sit for a moment before touching it or taking any additional steps. Simply let the plastic sit for 2-3 minutes and it should cool off on its own.


Warnings
- There are certain plastics that you should never cut because they either emit dangerous fumes, or catch fire quite easily. Avoid cutting PVC, vinyl, or plastic leather. Milk bottles have also been known to catch fire quite easily when cut. Avoid cutting painted plastics as well, since many paints emit dangerous fumes when cut.[20]⧼thumbs_response⧽
- Do not operate power tools unless you have the necessary experience and take the proper safety precautions. Always wear protective eyewear and a dust mask when using a circular saw.⧼thumbs_response⧽
Things You’ll Need
Cutting Softer Plastic by Hand
- Scissors
- Dry erase or permanent marker
- Utility knife or box cutter
- Cutting board
- Sewing thread
- Clamps (optional)
- Tape (optional)
Scribing and Breaking Plastic Sheets
- Straight edge
- Permanent marker
- Acrylic knife or scribing tool
Using a Circular Saw
- Protective goggles
- Dust mask or respirator
- Grease or permanent marker
- Clamps
- Circular saw


References
- ↑ https://youtu.be/MWE5Rjht178?t=97
- ↑ https://youtu.be/MWE5Rjht178?t=94
- ↑ https://youtu.be/0XDFoKaRAhc?t=29
- ↑ https://youtu.be/FguIgnWNrew?t=501
- ↑ https://youtu.be/nh62xaTEmxw?t=55
- ↑ https://www.carpentry-tips-and-tricks.com/how-to-scribe.html
- ↑ https://youtu.be/nh62xaTEmxw?t=76
- ↑ https://youtu.be/nh62xaTEmxw?t=79
- ↑ https://toolguyd.com/plastic-scoring-knife/
- ↑ https://toolguyd.com/plastic-scoring-knife/
- ↑ https://youtu.be/nh62xaTEmxw?t=91
- ↑ https://www.ccohs.ca/oshanswers/safety_haz/power_tools/saw_circ.html
- ↑ https://youtu.be/4jpOYxRyTFY?t=53
- ↑ https://youtu.be/4jpOYxRyTFY?t=59
- ↑ https://www.familyhandyman.com/tools/circular-saws/how-to-use-a-circular-saw/
- ↑ https://youtu.be/4jpOYxRyTFY?t=45
- ↑ https://youtu.be/4jpOYxRyTFY?t=59
- ↑ https://www.familyhandyman.com/tools/circular-saws/how-to-use-a-circular-saw/
- ↑ https://youtu.be/4jpOYxRyTFY?t=154
- ↑ https://cpl.org/wp-content/uploads/NEVER-CUT-THESE-MATERIALS.pdf
About This Article