This article was co-authored by wikiHow staff writer, Amber Crain. Amber Crain has been a member of wikiHow’s writing staff for the last six years. She graduated from the University of Houston where she majored in Classical Studies and minored in Painting. Before coming to wikiHow, she worked in a variety of industries including marketing, education, and music journalism. She's been a radio DJ for 10+ years and currently DJs a biweekly music program on the award-winning internet radio station DKFM. Her work at wikiHow supports her lifelong passion for learning and her belief that knowledge belongs to anyone who desires to seek it.
There are 9 references cited in this article, which can be found at the bottom of the page.
This article has been viewed 98,042 times.
Learn more...
Wood slices are great for crafting, but purchasing them from your local hobby store can get pricey. If you are comfortable using a bandsaw or miter saw and you have access to fallen tree branches, you can cut your own wood slices at home. Use a chainsaw if you're cutting very large slices from tree trunks. Smooth the edges of each slice with a sanding block, then dry the slices in your oven before using them to make coasters, ornaments, table tops, and other fun crafts.
Steps
Cutting Small Slices with a Bandsaw
-
1Decide how thick you want your slices to be. If you are making wooden coasters, you may want your slices as thick as 0.5 inches (1.3 cm). If you’re making ornaments or other crafts, you might want slices closer to 0.125 inches (0.32 cm). Think about what thickness you need.
- When using a bandsaw to make thin, small slices from a tree branch, it's best to use a branch that is 6 inches (15 cm) or less in diameter. Different band saws have different capacities, however, so you may want to check the product manual first.[1]
-
2Create a guide with a piece of scrap wood and clamps. Locate a piece of flat scrap wood (such as a 2 x 4). Use your tape measure to determine how far from the blade you need your branch to be. Clamp the piece of wood onto your bandsaw at that distance. The flat edge of the wood will act as a guide for your wood slices.[2]
- If you want your slices to be 0.5 inches (1.3 cm) thick, your branch needs to be 0.5 inches (1.3 cm) from the blade.
- If you are right-handed, clamp the guide onto the left side of your saw. If you are left-handed, clamp the guide onto the right side of your saw.
Advertisement -
3Put on a dusk mask/respirator and protective goggles. Operating a saw and working around fine sawdust can be dangerous. Wear a dust mask or respirator to prevent yourself from breathing in the dust. Goggles will shield your eyes from dust and wood chips.[3]
-
4Make sure you have a firm grip on the tree branch. A tree branch is not flat or smooth, which can make it more difficult to cut. Be sure you have a very firm grasp on the branch before you begin cutting. Stop and readjust your grip as needed.[4]
-
5Locate all of the knots in the wood so you can avoid them. Sawing through a knot in the wood can be dangerous. Before you begin, evaluate the branch for knots. Skip over any places where knots are located. Do not attempt to saw through a knot.[5]
- A knot is a circular area where the wood is condensed. Look for a circle shape that protrudes slightly from the branch.
-
6Turn on the bandsaw and glide the branch into the blade. Hold your branch perpendicular to the blade, so that the top of the branch rests against your guide. Maintain a solid grip on the branch as you carefully slide it into the blade. Repeat this until you have enough slices.[6]
- You can also use a miter saw for this project, which may allow you to make more precise cuts. It really just depends on what you have available and what you're comfortable operating. A bandsaw is typically easier to use for a novice because the blade is stationary.[7]
- Always keep your fingers at least 3 inches (7.6 cm) away from the blade.
- Don't use your thumb to feed the wood into the blade. Grip and stabilize with both hands and feed it through. Don't push your fingers toward the blade, just feed the wood into the blade.[8]
-
7Put the slice aside and repeat, if desired. If you only want 1 slice, you're all done! If you want multiple slices, turn off the bandsaw, unclamp the wood, and put your first slice off to the side. Line up the branch the same way you did the first time to make a new slice and repeat the same actions.


Cutting Large Slices with a Chainsaw
-
1Wear thick gloves, long sleeves, and protective goggles. Operating a chainsaw can be dangerous, so it's important to be safe. Thick work gloves and a long-sleeved shirt will protect your hands and arms from flying wood chips and splinters. Goggles will protect your eyes, but if you're planning to cut a lot of slices, consider buying a helmet with a face screen.[9]
- A dust mask can help prevent you from breathing in fine sawdust.
- Steel-toed boots are a wise choice for footwear.
-
2Prop the end of the tree up at least 6 inches (15 cm) off the ground. You need the end propped up so that your chainsaw can slice through the wood cleanly without hitting the ground below. A scrap piece of wood works well for this. Work the scrap wood underneath the end of the tree where you plan to start making cuts.[10]
- Large tree slices are typically used to create rustic table tops and pedestals. A chainsaw can cut through very large branches and trunks. For this project, you probably don't want to exceed 12 inches (30 cm) to 18 inches (46 cm) in diameter because you won't be able to dry the slices in the oven.
- If you have a kiln, you can make bigger slices.[11]
-
3Take note of the knots in the trunk so you can avoid them. Sawing through a knot in the wood can be dangerous. Before you start measuring and marking your slices, evaluate the tree trunk for knots in the surface. Avoid cutting slices where knots are located.[12]
- A knot is a circular area where the wood is condensed. Look for a circle shape that protrudes slightly from the branch.
-
4Measure and mark the tree where you want to make the cut. The thickness is up to you, but 1 inch (2.5 cm) to 2 inches (5.1 cm) is pretty typical for table tops. Measure the thickness with a tape measure. Mark the trunk in multiple places with a permanent marker so that you can line the saw blade up at those points.
- You can also try wrapping a piece of masking tape around the tree trunk and use that as your cutting guide.
-
5Hold the chainsaw firmly with both hands and turn it on. Hold the saw 4 inches (10 cm) to 5 inches (13 cm) above the tree and line it up with the marks you made. Wrap your left thumb around the front handle of the saw's grip. Turn the saw on and slowly lower it down to the tree trunk.[13]
- Wrapping your left thumb around the grip will allow you to keep the saw under control if you experience any kickback.
-
6Glide the chainsaw blade through the wood slowly. Apply a small amount of pressure as you push downward through the tree trunk with the saw. Go slow and hold the chainsaw as firmly as possible so that your cut is clean and straight.
- You don't need to press down with a lot of force; let the blade do most of the work while you guide it.
-
7Move the slice out of the way and repeat, if desired. If you only want 1 slice, turn off the chainsaw and you're done! If you want multiple slices, turn off the chainsaw and move the first slice out of the way. Measure and mark your new slice and repeat the same actions.


Sanding and Drying Your Slices
-
1Use a wire or nylon brush around the edges of each slice. Brush around the edges where the bark is still attached to remove loose bark. Take care to remove all loose or broken pieces of bark from the edges of each slice.[14]
-
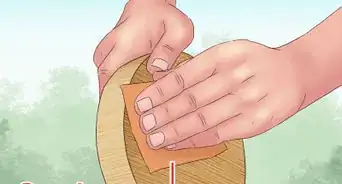
2Sand both flat sides of the slice if you want a smooth finish. For table tops, a relatively smooth finish is desirable. Use a sanding block to smooth away any rough and uneven areas on both sides of the slice. Once you're happy with the smoothness, brush away any sawdust clinging to the surface.[15]
- Use a 120 to 220 grit sanding block for the smoothest finish.
-
3Wipe down the slice thoroughly with a damp cloth. Lightly dampen a soft cloth with tap water. Use it to wipe the flat surfaces of the slices first, then run the damp cloth around the edges of each slice to remove any lingering sawdust and loose bark.[16]
- Let the wood air-dry completely before proceeding. You are only using a dampened cloth to wipe the wood down, so it shouldn't take longer than 30 minutes to dry. Touch the surface with your fingers to test it before proceeding.
-
4Preheat your oven to 250 °F (121 °C). Make sure nothing is inside your oven. Set the dial to 250 °F (121 °C) and wait 10 minutes for it to heat up.[17]
-
5Line your slices up on a foil-lined baking sheet. Tear off a sheet of regular aluminum foil and spread it over a baking sheet. Position your wood slices on the lined baking sheet so that none of them are touching.[18]
- Depending on how many slices you made, you may need to do this in batches.
- If you are working with large slices that don't fit into an oven, you'll need to use a kiln instead.[19]
-
6Bake the slices in the oven for about 60 minutes. Once the oven is fully preheated, slide the baking sheet into the oven at the center of the main rack. Close the oven door. Baking your slices will dry the wood as well as make sure there are no critters still living inside.[20]
- Drying the wood is necessary if you plan to paint your slices and/or seal them with a clear coat.


Community Q&A
Did you know you can get answers researched by wikiHow Staff?
Unlock staff-researched answers by supporting wikiHow
-
QuestionHow do you prepare wood slices for crafts?
 wikiHow Staff EditorThis answer was written by one of our trained team of researchers who validated it for accuracy and comprehensiveness.
Staff AnswerwikiHow Staff EditorStaff AnswerFor just about any kind of craft, you’ll need to sand and dry the slices first. If you’re making something simple, like coasters, you may only need to add a little clear varnish to finish off the slice. If you plan to paint on your slices, add a primer, such as acrylic polymer, to the untreated wood surface to keep your paint from soaking in.
Support wikiHow by unlocking this staff-researched answer.
-
QuestionHow do you dry wood slices without cracking them?wikiHow Staff EditorThis answer was written by one of our trained team of researchers who validated it for accuracy and comprehensiveness.
Staff AnswerwikiHow Staff EditorStaff AnswerDrying your wood slices in alcohol or another drying chemical, like polyethylene glycol, can prevent them from shrinking too quickly. This may reduce the stress that often causes cracks to form. Putting salt paste on the slice may also keep it from shrinking as much as it dries. Alternatively, try cutting a hole in the center of the slice, which will allow it to shrink more without as much stress.Support wikiHow by unlocking this staff-researched answer.
-
QuestionHow do you make wood slices food safe?wikiHow Staff EditorThis answer was written by one of our trained team of researchers who validated it for accuracy and comprehensiveness.
Staff AnswerwikiHow Staff EditorStaff AnswerThoroughly sand down the wood slice so you don’t risk getting any splinters in your food. Treat the wood with a food-grade butcher block or cutting board oil (these are mineral oil-based products). Pour the oil onto the wood and rub it in with a clean rag. You may need to apply 3-4 coats, allowing each coat to dry for about half an hour between treatments. If you want, you can finish it off with a coating of butcher block or cutting board wax, which will help prevent staining and keep the board watertight.Support wikiHow by unlocking this staff-researched answer.
Things You’ll Need
Cutting Small Slices with a Bandsaw
- Tree branch
- Bandsaw or miter saw
- Piece of scrap wood
- Tape measure
- Clamps
- Safety goggles and dust mask
Cutting Large Slices with a Chainsaw
- Large tree trunk
- Piece of scrap wood
- Chainsaw
- Tape measure
- Permanent marker or masking tape
- Protective goggles or helmet with a face screen
- Long-sleeved shirt
- Thick work gloves
- Steel-toed boots
Drying Slices
- Sanding block
- Damp cloth
- Wire or nylon brush
- Baking sheet
- Aluminum foil
Warnings
Instead of baking, let them dry naturally off the ground under a tarp or in a shed. If you don't, the wood discs can fill up your house with smoke and can ignite a fire. They can get charred.
- Always wear protective eyewear and gloves when operating power tools.⧼thumbs_response⧽
- If you are new to using any of the saws mentioned here, ask someone experienced to help you.⧼thumbs_response⧽
- Maintain a balanced stance at the saw blade.⧼thumbs_response⧽
- Always keep your fingers 3 inches (7.6 cm) from the blade.⧼thumbs_response⧽


References
- ↑ https://www.youtube.com/watch?v=zUgDDtOkL1M
- ↑ https://createandbabble.com/cut-wood-slices/
- ↑ https://www.weekendcraft.com/journal/how-to-cut-wooden-discs
- ↑ http://weekendcraft.com/journal/how-to-cut-wooden-discs
- ↑ http://weekendcraft.com/journal/how-to-cut-wooden-discs
- ↑ https://createandbabble.com/cut-wood-slices/
- ↑ http://www.thesawguy.com/miter-saw-vs-table-saw/
- ↑ https://www.familyhandyman.com/tools/saws/how-to-use-a-bandsaw-essential-bandsaw-tips-tricks/view-all/
- ↑ https://www.familyhandyman.com/tools/power-tools/using-a-chain-saw-safely/view-all/
- ↑ https://realhousemoms.com/diy-wood-slice-cake-serving-pedestal/
- ↑ http://www.wood-database.com/wood-articles/drying-wood-at-home/
- ↑ http://weekendcraft.com/journal/how-to-cut-wooden-discs
- ↑ https://www.familyhandyman.com/tools/power-tools/using-a-chain-saw-safely/view-all/
- ↑ https://realhousemoms.com/diy-wood-slice-cake-serving-pedestal/
- ↑ https://realhousemoms.com/diy-wood-slice-cake-serving-pedestal/
- ↑ https://realhousemoms.com/diy-wood-slice-cake-serving-pedestal/
- ↑ https://realhousemoms.com/diy-wood-slice-cake-serving-pedestal/
- ↑ https://realhousemoms.com/diy-wood-slice-cake-serving-pedestal/
- ↑ http://www.wood-database.com/wood-articles/drying-wood-at-home/
- ↑ https://realhousemoms.com/diy-wood-slice-cake-serving-pedestal/
About This Article

If you have a bandsaw or miter saw at home, you can save a lot of money by cutting your own wood slices from tree branches. First, clamp a piece of scrap wood as far away from your saw blade as the size you want your wood slices to be to make a guide. For example, if you want your slices to be a half-inch thick, clamp your scrap wood a half-inch away from the blade. Use protective goggles and a dust mask to protect yourself from sawdust. Hold your tree branch firmly and glide it towards the blade alongside your guide. Cut the branch where there are no knots, since sawing through these can be dangerous. For more tips, including how to cut large wood slices with a chainsaw, read on!