This article was co-authored by Archie Guerrero and by wikiHow staff writer, Janice Tieperman. Archie Guerrero is a Commercial and Residential Painting Specialist and the Operations Manager for DGP Painting in Austin, Texas. With a decade of experience, Archie specializes in interior and exterior painting and staining, cabinet refinishing, and wallpaper and popcorn removal. DGP Painting offers clients environmentally friendly paint materials and top-of-the-line paint products. DGP Painting has an A+ rating with the BBB and has been in Austin’s “Best of the Best.”
There are 9 references cited in this article, which can be found at the bottom of the page.
This article has been viewed 9,807 times.
If you’ve ever painted before, you’ve probably had to paint along some corners, edges, baseboards, and trim. While these areas seem impossible to work around, you can use the thin edge of your brush to apply a cut, or crisp line of paint, along these edges. Once you’ve applied a clean line of paint around these tricky areas, you can paint larger sections of your walls much more quickly and efficiently. With careful preparation and special paint strokes, you’ll be one step closer to a completed paint job!
Steps
Masking Your Painting Space
-
1Arrange drop cloths over your floors and furniture. Set plastic sheeting or drop cloths along the floor and over nearby pieces of furniture. Use strips of painter’s tape to keep your drop cloths in place, so they don’t shift while you step on them.[1] [2]
- Only place your paint cans and painting trays on some type of sheeting or drop cloth.
- Consider wearing old, dirty clothes in case of any paint spills.
-
2Press strips of painter’s tape along hard-to-reach edges and corners. Rip or cut away strips of painter’s tape that are about 12 in (30 cm) long. Arrange them along the edge of your walls, corners, trims, and baseboards, as well as any other place that’s difficult to paint around, like wall sockets, wall fixtures, and window sills.[3] Keep these sections of tape flush with these edges, so you don’t leave any gaps alongside these trims and fixtures.[4]Advertisement
-
3Pour 2 in (5.1 cm) of paint into the tray or bucket. Fill your tray with a small amount of paint. Don’t fill up the container too much—since you’ll be using a brush to cut the paint, you don’t need to have too much on hand. If needed, you can always pour more paint in later.[5]
- If you’re using a roller to paint other walls and surfaces, feel free to add more paint as needed.
-
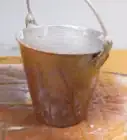
4Fill a bucket or bowl with tap water. Take any container and fill it at least halfway with cool water. Set the bucket or bowl near your painting tray, so you can access it easily when using your paint brush.[6]
- Don’t use boiling water for this type of project.
-
5Use a fan or window to ventilate the painting area. Even if you don’t plan on painting for a long period of time, make an effort to open a window or set up a fan to keep fresh air moving throughout the room. When setting up a fan, turn it backward so it can blow the paint fumes out of the general area.[7]
- If you want to take extra precautions, consider wearing a ventilation mask when working with paint.


Applying the Paint Properly
-
1Dip your brush in water so the paint adheres consistently. Take a clean or unused paint brush and partially submerge it into the water. Soak about ⅔ of the bristles, then remove the brush from the water.[8]
- Ideally, your brush should be about 2 to 3 in (5.1 to 7.6 cm) wide. If you’re working on a smaller project, your brush can be thinner.
- Wetting the brush ahead of time makes it easier to apply the paint, and also makes it easier to clean off the brush afterward.
-
2Spin the brush in an empty bucket to remove any excess water. Clip a spinning attachment to the end of your brush, then extend the lever on the end of the equipment. While dangling the brush over an empty bucket, push the lever down to spin the brush around quickly. Pull and release this lever 3-4 times, or until the brush is damp to the touch.[9]
- You can find these spinning attachments at most paint supply stores.
-
3Coat ⅔ of your brush with paint. Take your damp brush and dip it into the paint tray. Don’t use too much paint for this—instead, only cover a little more than half of the brush bristles with paint. Make sure that there’s enough product on both sides of the brush before you continue.[10]
- Try not to get any paint into the metal rim that secures the bristles into place. If paint gets into this area, then the bristles will dry out and the brush won’t last as long.
-
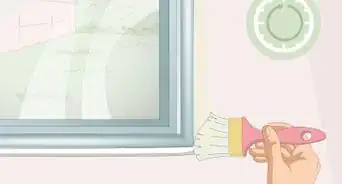
4Paint a line 1 in (2.5 cm) away from a masked edge. Take one side of the brush and paint a 12 in (30 cm) line that’s slightly separated from the trim, baseboard, corner, or other wall edge. Work in a horizontal line if you’re painting along trim, baseboard, or ceiling. If you’re working along a vertical surface like a corner, paint a vertical stripe of paint next to the edge you’re cutting into.[11]
- When you “cut” the paint, you’ll be painting along the 1 in (2.5 cm) gap that you just created.
-
5Rotate your brush by 90 degrees to get a thinner paint application. Turn your brush slightly, centering the thin portion of the brush bristles along the edge. Since you’re aiming for a smooth, crisp paint job, you don’t want to paint a thick strip along your wall or ceiling edge, baseboard, or trim. [12]
- If you were initially painting in a horizontal line, turn your brush 90 degrees clockwise. If you were painting in a vertical line, turn your brush 90 degrees counterclockwise.
-
6Cover the unpainted 1 in (2.5 cm) of space with paint. Move the thin portion of your brush along the 1 in (2.5 cm) gap, covering it completely. Work in a slow, straight line so the paint can apply smoothly along the edge. As you continue painting, keep applying your paint in sections by painting a thick line, then a thinner cut.[13]
- The term “cut” refers to the smooth, sharp finish of the paint job.
-
7Go over any obvious brush strokes to smooth out the paint job. Flip your brush, or move it in the opposite direction that you were originally painting in. Look for any obvious smudges or brush strokes in your paint job, and remove them with additional brush strokes. Instead of applying new paint, try to use the paint that’s already applied to the surface as you get rid of unwanted smears.[14]
- Repeat the cutting process for each edge, corner, fixture, and so on.
-
8Use a paint roller to paint the rest of your space. Once you’ve outlined the tough-to-reach edges, trims, and baseboards, roll your painting sponge or brush 5-6 times in the painting tray. After rolling off any extra paint into the tray, apply a consistent amount of pressure to the roller as you paint the rest of the wall. Use long, even strokes, working the paint in a “W” shape as you paint along the wall.
Tip: If you want to apply your paint more evenly, try dipping an unused roller into a bucket of water and rolling out the extra liquid onto a drop cloth before you start painting.
-
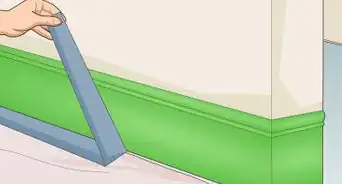
9Remove the painter’s tape after an hour. Wait 60 minutes for the paint to be sticky instead of actively wet. Starting from the outer edge of the adhesive, peel back the tape at a 45-degree angle so the masking can be removed as smoothly as possible. If you wait several hours or days to remove the tape, you might end up peeling away dried paint from your project.[15]
- Lightly score the tape with a utility knife if the masking doesn’t peel off easily.


Things You’ll Need
- Drop cloths
- Painter’s tape
- Water
- Bucket or small container
- Brush spinning attachment
- Empty bucket
- Paint tray
- Paint brush
- Paint
- Paint roller
- Fan (optional)


References
- ↑ Archie Guerrero. Commercial & Residential Painting Specialist. Expert Interview. 17 June 2021.
- ↑ https://www.houselogic.com/remodel/painting-lighting/using-a-drop-cloth/
- ↑ Archie Guerrero. Commercial & Residential Painting Specialist. Expert Interview. 17 June 2021.
- ↑ https://www.bobvila.com/articles/how-to-cut-in-paint/
- ↑ https://www.bobvila.com/articles/how-to-cut-in-paint/
- ↑ https://m.youtube.com/watch?v=-QpdW-l0FRg&t=018s
- ↑ https://www.epa.gov/indoor-air-quality-iaq/best-practices-indoor-air-quality-when-remodeling-your-home
- ↑ https://m.youtube.com/watch?v=-QpdW-l0FRg&t=018s
- ↑ https://m.youtube.com/watch?v=-QpdW-l0FRg&t=027s
- ↑ https://m.youtube.com/watch?v=-QpdW-l0FRg&t=0m49s
- ↑ https://www.bobvila.com/articles/how-to-cut-in-paint/
- ↑ https://www.bobvila.com/articles/how-to-cut-in-paint/
- ↑ https://www.bobvila.com/articles/how-to-cut-in-paint/
- ↑ https://m.youtube.com/watch?v=-QpdW-l0FRg&t=1m40s
- ↑ https://www.bhg.com/decorating/paint/all-about-painters-tape/
About This Article