wikiHow is a “wiki,” similar to Wikipedia, which means that many of our articles are co-written by multiple authors. To create this article, 35 people, some anonymous, worked to edit and improve it over time.
This article has been viewed 139,941 times.
Learn more...
On Roblox, creating clothing is an easy way to show off your creativity, learn to use digital painting programs, and earn some Robux. If you're lucky, your clothing may get popular within the catalog and you may make thousands of Robux. However, making clothing can be confusing at first, especially if you don't know how the shirt/pants template works or how to upload clothing. This wikiHow article will teach you how to make and upload your own clothing.
Steps
Making a T-Shirt
-
1Find an image or make one to use for the t-shirt. This will only be shown in front of the torso, so there is no restriction.
- Find an image online or make your own image.
- Do not use images that contain copyrighted material, this will likely result in your t-shirt and account being moderated.
- Make sure your image complies with the Roblox Community Rules
-
2Upload your image. Log into the ROBLOX website, and in the top left, click on "Create".
- In the sidebar under 'My Creations", click T-Shirts. Shirts are different, so make sure you don't mix up the terms.
- Click on "choose file". Select the image you have saved from earlier.
- Name your t-shirt. Avoid using misleading names if you're planning to sell it, as your design may not show up in the catalog.
- Click upload. Enjoy your new t-shirt! If you have a Premium subscription, you may sell it in the catalog. You can still wear your own t-shirt without premium.


Making Shirts or Pants
-
1Download the shirt or pants template [1]. This is the only way to design a usable outfit.
-
2Open up the file in a paint tool. This is where you can create your shirt design
- Make sure the design fits into the template. Anything outside of the boxes in the template will not show up once the clothing is uploaded.


-
1
- If you're designing on a PC, popular paint tools utilized by clothing designers include GIMP, Paint.NET, Pixlr (website only), and Krita.
- If you're designing on a phone or tablet, popular paint tools utilized by clothing designers include ibisPaint X and Procreate (iOS only).
- If there is an option to add layers, use that opportunity to create a color guide. This will help you to put the right texture or design into the right box.
-
2Begin coloring in the boxes. Avoid coloring outside the lines - use a selection tool or bucket for that.
- Remember, Roblox folds up the net of patterns so it is essential that you arrange the designs in the correct position.
- Make your design look both great and unique. You can find inspiration on sites such as Pinterest if you need it. Some drawing apps have a materials library with clothing patterns and textures you can use.
- You can copy, paste and resize images into the boxes. Be accurate and careful.
- Do not spend little time on the design, as the result may either look ridiculous or not work.
- Save your design before exiting!
- Make sure your design is 585 pixels by 559 pixels. Any larger or smaller, even if the image has the same aspect ratio, and your template will not upload.
- Do not use images that contain copyrighted material, this will likely result in your clothing and account being moderated.
- Make sure your design complies with the Roblox Community Rules
-
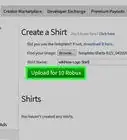
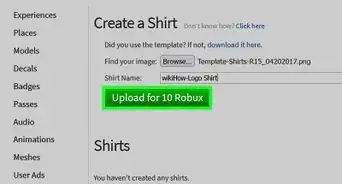
3Upload your design. Enter the ROBLOX website. Ensure that you have logged in.
- In the top left, click on "Create".
- In the sidebar under 'My Creations", click "Shirts" or "Pants". T-Shirts are different and do not need a template, just an image. See the t-shirt method for that.
- Click on "choose file". Select the template you have saved and edited.
- Name your design. Avoid using misleading names as your design may not show up in the catalog.
- Uploading pants and shirt designs cost 10 Robux to prevent spam on the catalog.
- Click "Upload for 10 Robux". If you would like to upload the design to your group instead, click "Group Creations" instead of "My Creations". Enjoy your new Roblox shirt or pants! If you would like to sell your shirt or pants, you need to have Premium. You can set any price you'd like, the minimum being 5 Robux.


Community Q&A
-
QuestionWhat painting download do I use for Mac?
 Community AnswerFor Mac, I use the app Paint 2 that I got from the app store, and it's pretty simple and perfect for Roblox clothing making.
 -
QuestionHow do I develop clothing in Roblox if I can't find the develop button?
 Community AnswerIf you are on a computer, click the tab called "Create," then click the option of your choice, shirt, pants, t-shirt, etc. Roblox changed it from "Develop" to "Create."
 -
QuestionHow can I make a shirt or pants without a membership and having to buy it?
 Community AnswerYou can try getting a designer with a membership to upload them on your behalf and offer to share the profits.


About This Article
While you need to be a ROBLOX member to design most clothing, non-members can still design t-shirts. You’ll need to be logged into your account to do this. To make a t-shirt, choose or design an image to go on the front of the shirt. Then, click on the “Develop” tab on the top of the screen to upload your image. Make sure to choose an accurate title for your t-shirt so viewers who see it in the catalog know what it is. To learn how to make shirts and pants on ROBLOX, read on!