wikiHow is a “wiki,” similar to Wikipedia, which means that many of our articles are co-written by multiple authors. To create this article, volunteer authors worked to edit and improve it over time.
This article has been viewed 22,195 times.
Learn more...
Polymerase Chain Reaction (PCR) is a technique that has various applications in research, medical, and forensic field. It amplifies the DNA fragment of interest. It is also a sensitive test for disease diagnosis and genotyping. The basic ingredients of a reaction system include a DNA template, a buffer solution, deoxyribonucleoside triphosphate (dNTPs), Taq polymerase, and a pair of primers (the forward one and the reverse one). Properly designed primers reduce the cost and time spent on experimentation. Primer-BLAST is a powerful tool to find the primers specific to a template. This tool is free to use and does not require software installation or programming skills. This article demonstrates how to design PCR primers with an example of Primer-BLAST.
Steps
Preparing
-
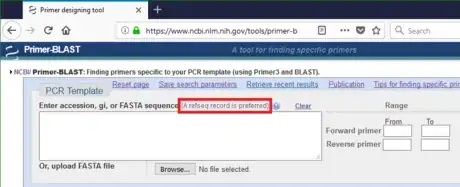
1Go to the Primer-BLAST website (https://www.ncbi.nlm.nih.gov/tools/primer-blast/). Notice that a RefSeq accession is the preferred template format. The Reference Sequence (RefSeq) collection is a secondary database with the non-redundant information selected from the primary database GenBank.
- Primer-BLAST is a primer designing tool developed by the National Center for Biotechnology Information (NCBI).
- NCBI, as a national resource for molecular biology information, maintains biology databases and facilitates the use of such databases.
- Since all genetic information gained by biological researches ultimately deposits to the databases maintained by NCBI, Primer-BLAST is suitable for any organism as long as the right parameters are selected.
-
2Decide the purpose of the primers. The purpose affects the primer design. Parameters such as the PCR product length and the locations of the primers largely depend on the purpose. Whether it is to amplify the entire gene, or to check the presence of the gene, or to detect its expression level, or other purposes?
- Take an example. Let the gene of interest be the tumor suppressor gene p53 in the model organism Drosophila melanogaster (common fruit fly).
- Let the purpose be to detect expression level of this gene.
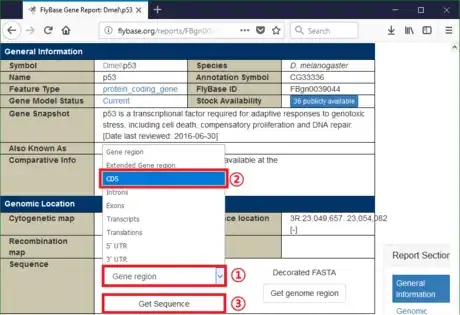
- In this case, the primers bind to the reverse transcribed complementary DNA (cDNA) from messenger RNA (mRNA), instead of the genome. The template thus narrows down to the coding sequence (CDS) of p53.
Advertisement -
3Know PCR template. The source of nucleotide sequences varies depending on different situation of the research. It can be generated through a sequencing result, or obtained from a database. If it is from a raw sequencing result, go to the part "Running BLAST for Raw Sequence" directly. If it is from a database, play with that database for some time.
- In the case of Drosophila melanogaster p53 gene, the annotated sequence is available in NCBI database.
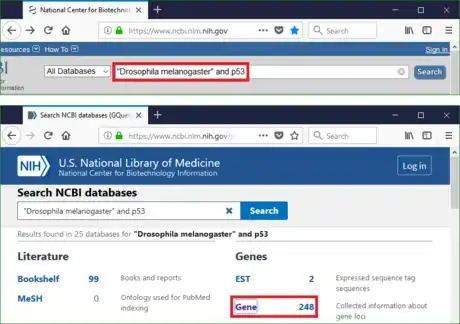
- Go to NCBI homepage (https://www.ncbi.nlm.nih.gov/).
- Type the keywords in the search bar. The logical operators such as AND, OR, NOT are applicable in this bar.
- Click search and explore the information about Drosophila melanogaster p53 gene.
-
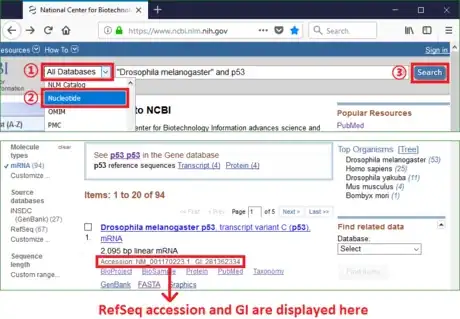
4Get accession for sequences found in a database. Primer-BLAST identifies the template better by RefSeq accession than by raw DNA sequence. Another advantage of RefSeq accession is functions related to exon/intron are available only when inputting RefSeq mRNA sequence as the PCR template.
- If the sequence is obtained from an online database, simply search the keywords on NCBI homepage to get its RefSeq accession.
- Then skip the part "Running BLAST for Raw Sequence" and go to the part "Adjusting the Parameters" directly.
Running BLAST for Raw Sequence
-
1Access RefSeq database for the raw sequence accession. The related RefSeq accession is accessible via Basic Local Alignment Search Tool (BLAST). To find the RefSeq accession of a raw sequence means to search the NCBI database for the sequence identical to that raw sequence.
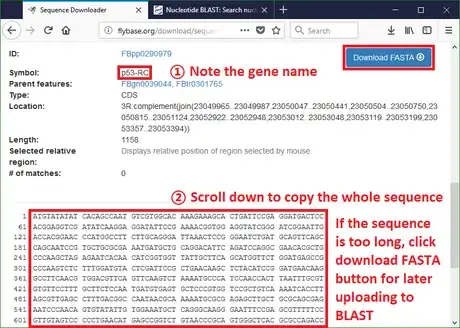
- Continue with the example. For demonstration, let's suppose Drosophila melanogaster p53 gene is not annotated. To get its raw sequence, go to the Drosophila database (http://flybase.org). Type "p53" in Jump to Gene bar. It will navigate to that gene. Find the CDS of Drosophila melanogaster p53 gene.
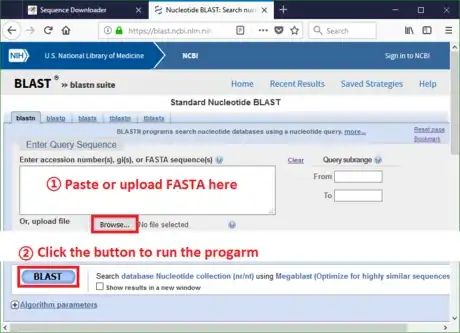
- Open the BLAST website (https://blast.ncbi.nlm.nih.gov/Blast.cgi).
- Since it is aligning a DNA sequence with another DNA sequence in this case, click nucleotide BLAST button.
-
2Copy the sequence or download FASTA from Flybase. FASTA is a standard format to store nucleotide codes in bioinformatics. Almost all text-processing tools can open and edit this file type.
-
3Run BLAST. Paste the CDS to the query sequence box. Scroll down and click BLAST to run the local alignment.
-
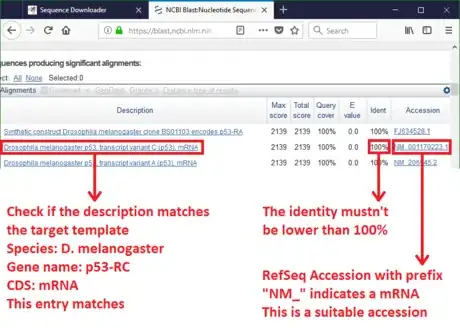
4Select the RefSeq accession that matches the target template. Pay attention to the information listed in the BLAST result. Determine the appropriate accession.
- Apparently, the alignment identity should be 100% to ensure the RefSeq accession represents the target template.
- If there is no hit with a 100% identity, this means the query sequence is poorly studied. Use the raw sequence for Primer-BLAST in this case. Deposit this new sequence to GenBank to contribute to biology database.
- Another key point is to match the description, which tells about the organism and the name of the sequence.
- In the example, both the RefSeq NM_001170223.1 and the one beneath are suitable accessions. It is fine to choose either one of them.
-
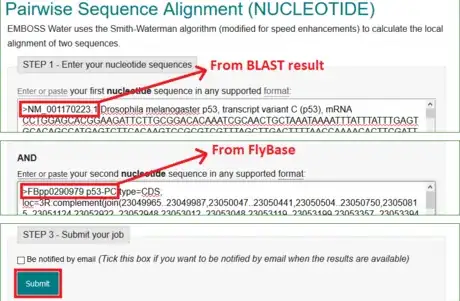
5Run a pairwise alignment for the selected reference sequence and the target template. Keep in mind that the reference sequence with the matched accession usually does not have identical length as the target template. A pairwise alignment can find the exactly same region.
- Go to the pairwise sequence alignment tool website on EMBL-EBI (https://www.ebi.ac.uk/Tools/psa/).
- Choose a local alignment algorithm.
- In the example of Drosophila melanogaster p53 gene expression level detection, copy and paste NM_001170223.1 sequence to one of the boxes; p53-RC CDS the other box.
- Click the submit button to run the program.
-
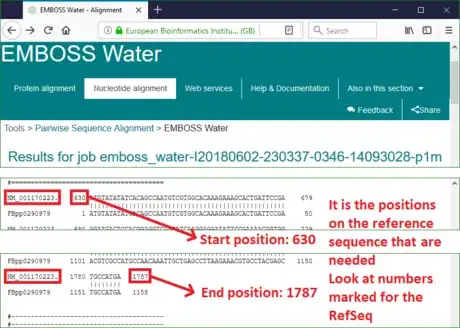
6Record the positions on the reference sequence where the two fragments align. The first and last number in the alignment represent the starting and ending point where the two fragments align.
- In the example, the result indicates that the CDS of p53-RC starts at 630th and ends at 1787th nucleotide of the NM_001170223.1 sequence.
- The reason to perform a local alignment lies here. The alignment tool on EMBI-EBI returns the result in a text format. It is hard to count the positions without a grid. Conveniently, local alignment result returned by it omits the unaligned regions and displays the aligned positions directly.
Adjusting the Parameters
-
1Input the PCR template information into Primer-BLAST.
- In the example, the RefSeq accession is NM_001170223.1.
- The forward primer from position is 630.
- The reverse primer to position is 1787.
- The above two parameters confines the range within the CDS region of p53-RC. They are unnecessary if the template is not a RefSeq accession obtained from raw sequence BLAST.
-
2Adjust the Primer Parameters. In Primer-BLAST, parameter values that differ from the default are highlighted in yellow automatically by the system.
- For the purpose of gene expression level detection in the example, a relatively short PCR product is enough.
- So the minimal and maximal PCR product sizes are set to be 100 and 250 respectively.
-
3Adjust the Exon/intron selection. This step is not necessary for genomic DNA primer design. But it is important for cDNA primer design, because it allows the researcher to check if there is genomic DNA contamination in cDNA sample in future experiments.
- In the example, since the template is a cDNA, turn on the intron inclusion option.
- The genomic DNA would have a longer PCR product than cDNA template.
-
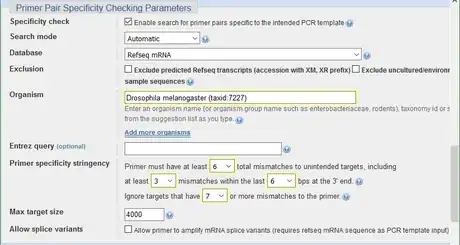
4Adjust the Primer Pair Specificity Checking parameters. Input the organism name so that the program can search the corresponding database. For stringency, the more mismatches there are and the larger the number of mismatches required to ignore unintended targets, the more stringent the primer specificity is.
- In the example, the organism is Drosophila melanogaster
- 6 is the highest number of mismatch allowed by Primer-BLAST
- Mismatch at the 3' end of a primer is sensitive. It interrupts binding to unintended targets effectively.
- The limit of this program to detect unintended target is up to 35% mismatches, which means 7 mismatches for a primer with 20 nucleotides.
-
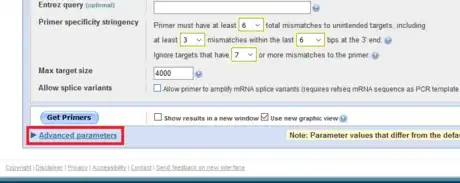
5Expand the Advanced parameters menu.
-
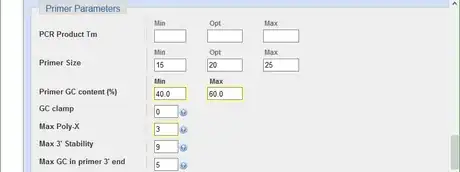
6Optimize the primer parameters. the GC content between 40-60% gives a fair melting temperature. The maximal poly-X value acceptable is 4. Consecutive nucleotides of the same base should generally be avoid. Set Max Poly-X to be 3 lessen the chance to misprime.
-
7Reduce the max self and pair complementarity to avoid primer dimers. Because in early cycles of a PCR reaction, the template concentration is much lower than that of the primers, if primers readily bind to themselves, few primers will bind to the template to initiate nucleotide chain elongation. Limiting the number of complementary nucleotides in primers improves the efficiency.
Getting Primers
-
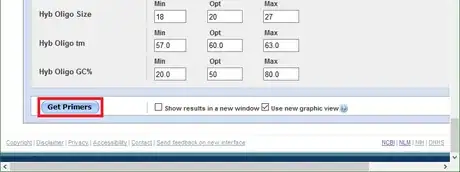
1Generate the designed primers. Scroll down and click Get Primers button to get primer candidates. Usually the program takes less than 2 minutes to run. Sometimes, especially during working hours, the sever is at full capacity. It will put the requests to a waiting list, and may take more than half an hour to get the result. The tip is to avoid such rush hours.
-
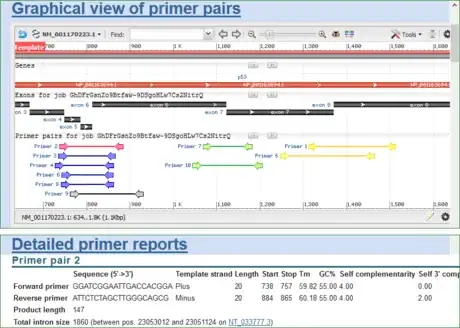
2Select 2-3 pairs from these candidates. One pair is synthesized first. The remaining pairs serve as backups. When picking the backup primers from the candidates, it is better to choose distinct pairs than similar ones. If one of the primer pairs has low efficiency or specificity in the experimental test. Similar ones are likely to have the same problem.
- In the example of Drosophila melanogaster p53 gene expression level detection, the number of primer pairs to return is set to the default value of 10. The program gives 10 candidate primer pairs.
- The candidate primers are grouped in different colors for explanation purpose. The original result generated by Primer-BLAST has only one color.
- If the primers in red is synthesized first, but it fails in experiment, then the primers in green, yellow, or black can be the backups.
- But it is better not to select the primer pairs in blue as a backup, for there is overlap between the red primers and the blue ones.
-
3Check the quality of the synthesized primers experimentally. Run a PCR using the synthesized primer pairs. Test its efficiency and specificity by analyzing an gel electrophoresis result or a high resolution melting analysis (HRMA). If the primers do not pass the test, synthesize the backup pair and repeat the check step until a suitable pair is found.
- The high brightness of the electrophoresis bind or the fluorescence of the HRMA indicates the efficiency of the tested primers.
- The single bind in electrophoresis or single melting peak in HRMA indicates the specificity of the tested primers.
- In the example, the primers are designed for quantitative PCR (qPCR). It is important to follow a qPCR efficiency determination protocol to check the quality of the primers.
