This article was co-authored by wikiHow staff writer, Nicole Levine, MFA. Nicole Levine is a Technology Writer and Editor for wikiHow. She has more than 20 years of experience creating technical documentation and leading support teams at major web hosting and software companies. Nicole also holds an MFA in Creative Writing from Portland State University and teaches composition, fiction-writing, and zine-making at various institutions.
This article has been viewed 16,254 times.
Learn more...
Since your antivirus program protects your computer from dangerous viruses and malware, you really shouldn't disable it without a good reason. If it's causing you trouble or affecting how an app you need installs or runs, you can usually disable it—however, you should reenable it as soon as you can. This wikiHow teaches you how to temporarily disable some of the most popular antivirus apps for Windows and macOS.
Steps
Windows Security
-
1Open your Windows Settings. You can do this by clicking the gear icon in the Windows menu or by pressing the Windows key and the i key at the same time.
- Use this method to disable Windows 10's built-in antivirus protection.
- There is no way to disable the Windows built-in antivirus protection permanently. It will automatically turn back on after an undisclosed amount of time.
-
2Click Update & Security. It's the icon of two curved arrows.Advertisement
-
3Click Windows Security. It's in the left panel.
-
4Click Virus & threat protection. It's in the right panel. This opens your antivirus settings.
-
5Click Manage settings. It's the link just below "Virus & threat protection settings" in the right panel.
-
6
-
7Click Yes. This disables antivirus protection on Windows.
- If you had any scheduled scans, they will still run as scheduled.
- If you want to turn antivirus protection back on sooner, return to this screen and click the switch to enable it.


Avast for Windows
-
1Right-click the Avast icon in the system tray. The system tray is the area near the clock, which is usually at the bottom-right corner of the screen. The Avast icon is an orange splat with a small "a" at its center. A menu will expand.
- If you don't see this icon, click the up-arrow to the left of the icons beside the clock to expand more.
-
2Select Avast shields control. This opens another menu.
-
3Select a time period. You can choose to disable antivirus protection for 10 minutes, 1 hour, until you restart the computer, or permanently. Once you select an option, a confirmation message will appear.
-
4Click OK, Stop to stop Avast. Antivirus protection is now disabled.
- You can reactivate Avast early by returning to this menu and choosing the option to turn it back on.


Avast for Mac
-
1Open Avast on your Mac. You'll find it in your Applications folder and on the Launchpad.
-
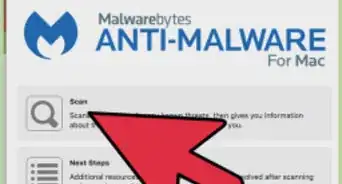
2Click Core Shields. It's the tile with a shield icon.[1]
-
3Click the gear icon. It's in the upper-right corner of the window.
-
4Remove the checkmarks from each of the boxes. Avast's "shields" are the things protecting you from viruses and malware in real time. To disable this protection, you'll need to disable each shield's features.[2]
- Depending on your version of Avast, you may see switches below the shield names instead. If you do, click the switch below the shield to disable it.
- You can re-enable these features at any time by replacing the checkmark.
-
5Click the Scans tab. It's at the top of Avast.
-
6Remove the checkmarks from each option. To prevent Avast from scanning for viruses, remove the checkmarks from each option under "Smart Scan." Once you've finished this, Avast will be effectively disabled on your Mac.
- You can re-enable Avast at any time by replacing the checkmarks.


AVG for Windows
-
1Right-click the AVG icon in the system tray. The system tray is the area near the clock, and that's typically at the bottom-right corner of the screen. The icon is a yellow, blue, red, and green patchwork square.[3]
- If you don't see this icon, click the up-pointing arrow left of the other icons near the clock to expand more.
- Disabling AVG is temporary, as it will automatically reactivate next time you restart your computer. If you want to permanently disable the software you must uninstall it.
-
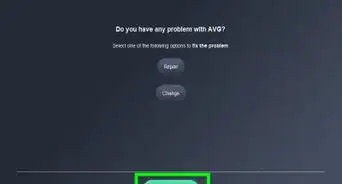
2Click the "Protection is on" switch. If AVG is active right now, this will pop-up a warning asking if you really want to disable Avast.
-
3Click the green OK, STOP button. This disables AVG until you reboot your PC.
- You can turn AVG back on early by toggling the switches back on.


AVG for Mac
-
1Open AVG on your Mac. You'll find it in your Applications folder and on the Launchpad.
- There is no way to temporarily disable AVG on your Mac. The only way to stop AVG is to uninstall it. This method will cover uninstalling AVG properly.
-
2Click the AVG AntiVirus menu. It's at the top of the screen.[4]
-
3Click Uninstall AVG AntiVirus on the menu. A confirmation message will appear.
-
4Click Continue. This will start the process of removing AVG from your Mac.
- Depending on your settings, you may have to enter your password to continue.
-
5Click Finish once the app is uninstalled. AVG is no longer installed on your Mac.


Norton for Windows
-
1Right-click the Norton icon in the system tray. The system tray is the area near the clock, and that's typically at the bottom-right corner of the screen. The icon is a yellow, black, and white checkmark. A menu will expand.
-
2Click Disable Auto-Protect on the menu. This opens the "Security Request" window.[5]
-
3Select a duration. You can disable antivirus protection for any of the specified amounts of time. After that time elapses, virus protection will start again automatically.
-
4Click OK to confirm. This turns of Norton antivirus protection.
- Return to this menu to reactivate Norton at any time.


Norton for Mac
-
1Open Norton on your Mac. You'll find it in the Applications folder and on the launchpad.
- If opening Norton first displays the "My Norton" window, click Open next to "Device Security" to open the app.
-
2Click Advanced or Settings. The option you see depends on your version of Norton.
-
3Click Protect My Mac. It's in the left panel.
-
4Slide the "Automatic Scans" switch to the off position. This prevents Norton from running scans for viruses.
-
5Click the Firewall tab. It's in the left panel.
-
6Slide the "Connection Blocking" switch to the off position. This prevents Norton from blocking incoming threats in real-time.
-
7Slide the "Vulnerability Protection" switch to the off position. This turns of vulnerability protection. Now that all options are disabled, Norton is turned off.
- To re-enable Norton, re-open the application and click Fix Now.


References
- ↑ https://support.avast.com/en-gb/article/Mac-Security-scan-exclusions/
- ↑ https://fixablestuff.com/disable-avast-mac/
- ↑ https://support.avg.com/SupportArticleView?l=en&urlName=Disable-AVG-Antivirus&supportType=home
- ↑ https://support.avg.com/SupportArticleView?l=en&urlname=Uninstall-AVG-Antivirus
- ↑ https://support.norton.com/sp/en/us/home/current/solutions/v116457581
About This Article

1. Open your Windows Settings.
2. Click Update & Security.
3. Click Windows Security.
4. Click Virus & threat protection.
5. Click Manage settings.
6. Slide the "Real time protection" switch off.
7. Click Yes.