This article was co-authored by Ira Israel. Ira Israel is a Licensed Counselor and Psychotherapist who has been in private practice for over 14 years. He specializes in teaching others about happiness and authenticity. Ira teaches sold-out Happiness and Authenticity workshops at Esalen Institute and Kripalu Center and has written over 400 articles on psychology, philosophy, Buddhism, yoga, film, art, music & literature for The Huffington Post, Good Men Project, Mind Body Green, Thrive Global, and Medium. Ira is also the author of How to Survive Your Childhood Now That You’re an Adult: A Path to Authenticity and Awakening. He attended The University of Pennsylvania and has graduate degrees in Psychology, Philosophy, and Religious Studies.
There are 22 references cited in this article, which can be found at the bottom of the page.
wikiHow marks an article as reader-approved once it receives enough positive feedback. This article received 36 testimonials and 83% of readers who voted found it helpful, earning it our reader-approved status.
This article has been viewed 1,632,609 times.
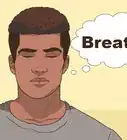
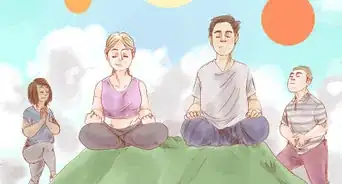
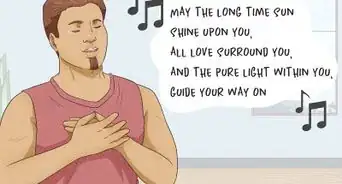
Pranayam (also known as pranayama) is the ancient practice of controlling your breath in order to control the movement of life force (“prana”) through your body.[1] Practicing pranayam is said to help calm and center the mind while soothing the body. Pranayam can be done on its own or before, during, or after a series of yoga poses (asanas). There are a number of different pranayamas (breathing patterns) that you can try, each of which will help you achieve slightly different goals, such as reducing stress, cultivating heat, relaxing your mind, or releasing anger.
Steps
Cultivating Heat and Balance through Ujjayi (Ocean Breath)
-
1Sit in a comfortable position. Try sitting in an easy cross-legged position with your spine long and shoulders rolled down and back from your ears. You can also sit on a yoga block or in a chair if that feels better. If you prefer, you can also lie flat on your back.
- When you are first learning the ujjayi breathing pattern, begin in a position that takes little effort to hold. This allows you to focus on your breath rather than your body.
- Once you understand the basic ujjayi breathing pattern, you can try incorporating it into a hatha yoga practice to cultivate heat, balance, and focus.[2]
-
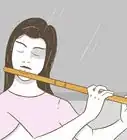
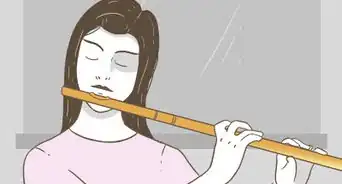
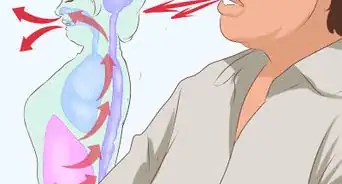
2Inhale slowly through your nose. Seal your lips to ensure all the air is channeling through your nostrils. Make this inhale slightly deeper and more intentional that your regular breathing, fully filling your lungs. Direct the breath across the back of your throat as you inhale so that the air makes a slight hissing sound.[3]
- Your breath should mimic the sound of the ocean when water is receding from the shore in order to form the next wave.[4]
- Count as you inhale to measure the length of your breath. Although there is no “correct” length, you can start by aiming for a count of 4 or 5. Keep your inhales and exhales evenly timed as you go.
Advertisement -
3Exhale slowly through your nose while constricting your throat. Keeping your lips sealed, breathe out through your nose. Try to constrict the muscles in the back of your throat, just as you would if you were whispering. However, be careful not to overly constrict your throat to the extent that breathing becomes difficult. As you exhale, your breath should make a noise similar to waves crashing on the shore.[5]
- If you’re having trouble making the correct ujjayi sound, practice opening your mouth and making a “HAAAAAH” sound, almost as if you were trying to fog up a mirror with your breath. Then close your mouth and attempt to make a similar sound through your nasal passages.
- Some people compare ujjayi breathing to the breath sounds of Darth Vader from Star Wars.
- Try to match the length of your exhale to the length of your inhale. You may need to count in your head in order to ensure your breaths remain even.
-
4Continue to inhale and exhale for 5-8 minutes. Once you become more experienced, you can gradually increase your practice to 10-15 minutes. Always remember to stop and resume normal breathing if you become dizzy or short of breath.[6]
- Ujjayi breathing can also help soothe you if you’re feeling nervous or agitated.


Quieting Your Mind with Nadi Shodhana (Alternate Nostril Breathing)
-
1Sit in a comfortable position with your left hand resting on your lap. You can try sitting in an easy cross-legged position on the ground with your spine long and shoulders back. However, if this isn’t comfortable for you, you can sit on top of a yoga block, low bench, or chair. Just make sure that your spine is straight and your chest is open rather than concave.[7]
- Your left hand can relax into your lap or sit on your knee. You can connect your thumb and pointer finger to form an “okay” gesture if that feels restful, or you can simply place your hand so that your palm faces upwards.[8]
-
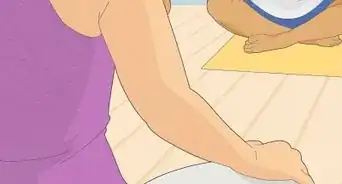
2Close your right nostril with your right thumb. You can rest your pointer and middle fingers on your forehead (between your eyebrows) or fold them and rest your knuckles just below your nose.[9]
- Place your thumb on the slight indentation below the bone at the top of your nose. This allows you to close the air channel without pressing too hard.[10]
-
3Inhale through your left nostril. Breathe in slowly but steadily through your nose. To ensure your inhales and exhales are consistent, try counting to 4 or 5 as you inhale. You can increase the length of your breaths as you become more experienced with pranayam.[11]
-
4Close your left nostril using your right ring finger and release your right nostril. At the top of the inhale, use the inside of your right ring finger to gently block your left nostril so that both nostrils are closed. You can retain your breath here for a slight pause, but do not wait more than a single count. Then release your thumb from your right nostril so that only your left nostril is blocked.[12]
- If your pointer and middle fingers are resting bent below your nose, it may be easier to bend your ring and pinky fingers as well. Simply do whatever feels best for you. Focus on your breath, rather than your hands.
-
5Exhale and inhale through your right nostril. Exhale through your right nostril and pause for just a moment. Then inhale through your right nostril without moving your hand position.
- Try to match the length of your exhale to the length of your inhale. Counting to 4 or 5 as you exhale can help with this.
-
6Switch to block your right nostril and exhale through your left nostril. Lightly block your right nostril, unblock your left nostril, and then complete a full exhale through your left nostril. This constitutes one cycle of the pranayama.[13]
-
7Repeat 3-5 cycles before returning to regular breathing. Begin again by inhaling through the left nostril. Then continue to alternate between nostrils as you repeat the pranayam. Allow your mind to focus on the pattern and sound of your breath.[14]
- To ensure your breaths are even, you can continue to count to 4 or 5 during each inhale and exhale.


Reducing Stress with Dirga (Three-Part Breath)
-
1Sit or lie in a comfortable position. You can try sitting in an easy cross-legged position on the ground with your spine long and shoulders back. If this doesn’t feel good, you can sit on a yoga block or in a chair with your feet flat on the ground. You can also choose to lie flat on your back on top of a yoga mat or blanket.
- If you are sitting, visualize your sitz bones (the bones you feel in your bottom when you sit, located on the very bottom part of your pelvis) grounding into the floor or seat. If you’re lying down, try to imagine every part of your body that is in contact with the floor pressing down into the earth. This helps ground you physically and mentally so that you can focus fully on your breathing.
-
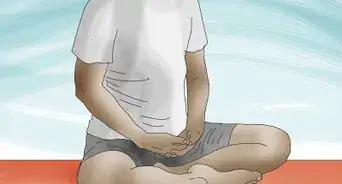
2Bring your left hand to your belly and your right hand to your chest. Place your left hand slightly below your belly button and your right hand on the middle of your chest, above your nipples but below your collarbone. Allow your hands to rest comfortably without gripping tightly.
-
3Inhale through your nose into your abdomen, then rib cage, then upper chest. As you inhale, use your hands to feel as your diaphragm first fills up the abdomen. Then feel the inhale move into your ribs as your lungs fill. Finally, allow your breath to lift up into the upper chest. Each part of your abdomen and chest should lift as you breathe into it.[15]
- It can be helpful to visualize each section (abdomen, ribs, upper chest) as you breathe into it.
-
4Exhale from your upper chest, then ribs, then abdomen. Breathe out through your nostrils. As you do so, allow your collarbone to deflate and relax, followed by your rib cage and your abdomen. Again, use your hands to feel the progression as each part of your chest falls.
- To ensure you are inhaling and exhaling for equal amounts of time, it can be helpful to count to 4 as you inhale and then again as you exhale.
-
5Repeat this pattern of inhaling and exhaling for 3-5 minutes. Continue to inhale into your belly, then ribs, then upper chest, and exhale in the reverse order for approximately 3-5 minutes. If your mind begins to wander, acknowledge the thought and then return your focus to your breathing.
- If you don’t have a full 3-5 minutes, you can still practice dirga pranayam and receive many stress-reducing benefits. Whether you are at home beginning your day or in the middle of a difficult workday, you can find a moment to close your eyes and practice dirge pranayam for few cycles of inhales and exhales.


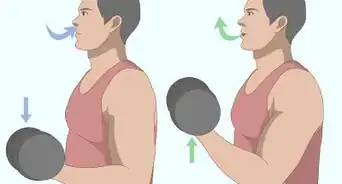
Using Kapalabhati (Skull Shining Breath) to Release Toxins
-
1Sit in a comfortable position and inhale deeply to prepare. Try an easy cross-legged position on the ground to begin. If that doesn’t feel comfortable, you can place a yoga block under your bottom or try sitting in a chair instead. No matter how you choose to sit, make sure to keep your spine straight and your shoulders are rolled back.[16]
- Kapalabhati must be practiced in a seated, rather than supine, pose.[17]
- Some practitioners like to close their eyes while performing kapalabhati in order to focus on their breathing.
Expert AnswerQWhen is the best time to practice pranayam?
Ira Israel is a Licensed Counselor and Psychotherapist who has been in private practice for over 14 years. He specializes in teaching others about happiness and authenticity. Ira teaches sold-out Happiness and Authenticity workshops at Esalen Institute and Kripalu Center and has written over 400 articles on psychology, philosophy, Buddhism, yoga, film, art, music & literature for The Huffington Post, Good Men Project, Mind Body Green, Thrive Global, and Medium. Ira is also the author of How to Survive Your Childhood Now That You’re an Adult: A Path to Authenticity and Awakening. He attended The University of Pennsylvania and has graduate degrees in Psychology, Philosophy, and Religious Studies.Licensed Counselor and Psychotherapist EXPERT ADVICEAnswer from Ira Israel:
It's great to practice pranayam both in the morning and in the evening. Doing pranayam in the morning helps you anchor yourself for the day, while doing pranayam in the evening helps you shift from your workday back into your home life.
-
2Contract your lower belly quickly to push a sharp burst of air out of your nose. Pull your abdomen inward in order to force the air from your lungs in an active and forceful breath. It may be helpful to place your hands on your lower belly to ensure you’re using the correct muscles to force the exhale. The abdomen should snap in sharply.[18]
-
3Release the contraction to allow the inhale to come in on the “rebound.” After the sharp contraction of your lower abdomen pushes the air out of your lungs, relax your muscles quickly. This allows the breath to flow back into your lungs naturally, recoiling or rebounding from the force of the exhalation. The inhalation, in contrast to the exhalation, is smooth and effortless.[21]
- Inhale through your nose, keeping your lips sealed throughout your kapalabhati practice.
-
4Repeat this breath cycle 11 times before taking a break to breathe normally. Pace yourself slowly if you’re just beginning and aim for about 1 exhale-inhale cycle every 1-2 seconds. As you become more experienced with the practice, you may want to increase your pace to 2 exhale-inhale cycles per second.[22]


Blowing off Steam with Simhasana (Lion’s Breath)
-
1Kneel on the floor, sitting back onto your heels. Place a cushion, blanket, or yoga mat beneath you to cushion your knees. You can cross the front of the one ankle over the back of the other (with feet pointing out to the sides) if that feels better. If kneeling doesn’t feel good to you, take any other comfortable seated pose.[25]
- Palms can be placed firmly against your knees with fingers splayed out.[26]
-
2
-
3Open your mouth and stretch your tongue out. After you inhale, open your mouth wide as if you were at the dentist. Stick out your tongue and lengthen the tip out and down so that it extends towards your chin.[29]
- For a more intense option, open your eyes wide at the same time that you open your mouth and bring your gaze upward.[30]
-
4Exhale the breath slowly out through your mouth. The breath should pass over the back of your throat and make a distinct “haaaa” sound. Imagine you are trying to fog up a window with your breath. You should feel the muscles in the front of your throat contract.[31]
- Press down through your palms as you exhale.[32]
-
5Repeat 2-3 times. Since the exhalation of simhasana is meant to release negative energy, it is important that it remains powerful throughout your practice. Therefore, it is best to repeat Lion’s Breath only a few times in a row so that you don’t lose the strength behind the breath.[33]
- If the strong exhalations make you feel at all dizzy, take a break from the pranayam and breathe normally for a few minutes. You can place one hand on your chest to help regulate your breath pace.


Expert Q&A
-
QuestionWhat are the benefits of pranayam breathing?
 Ira IsraelIra Israel is a Licensed Counselor and Psychotherapist who has been in private practice for over 14 years. He specializes in teaching others about happiness and authenticity. Ira teaches sold-out Happiness and Authenticity workshops at Esalen Institute and Kripalu Center and has written over 400 articles on psychology, philosophy, Buddhism, yoga, film, art, music & literature for The Huffington Post, Good Men Project, Mind Body Green, Thrive Global, and Medium. Ira is also the author of How to Survive Your Childhood Now That You’re an Adult: A Path to Authenticity and Awakening. He attended The University of Pennsylvania and has graduate degrees in Psychology, Philosophy, and Religious Studies.
Licensed Counselor and PsychotherapistPranayam breathing helps ease you out of your flight-or-flight instincts when you're feeling overstimulated. For instance, it could help you work through some anxiety you're experiencing while traveling in a car or on a plane. -
QuestionWhat is the best pranayam to help me deal with asthma?
 Community AnswerKapalbhati and anulom vilom are very useful for asthma.
 -
QuestionWhat type of Pranayam is useful for feeling active for today's work?
 Community AnswerAll Pranayama are equally effective in relieving stress, so you could do any type that you choose.
Warnings
- If you feel any discomfort or lightheadedness, stop practicing the pranayam immediately and return to regular breathing.[36]⧼thumbs_response⧽
- Kapalabhati (Skull Shining Breath) should be avoided by those with high or low blood pressure, coronary heart disease, problems with their eyes (e.g., glaucoma), ear issues, or nosebleeds..[37]⧼thumbs_response⧽


-Step-6-Version-3.webp)

References
- ↑ https://www.yogajournal.com/poses/types/pranayama
- ↑ https://www.doyouyoga.com/how-to-practice-ujjayi-pranayama-breathing/
- ↑ https://www.yogajournal.com/poses/conqueror-breath
- ↑ https://www.verywellfit.com/ocean-breath-ujjayi-pranayama-3566763
- ↑ https://www.verywellfit.com/ocean-breath-ujjayi-pranayama-3566763
- ↑ https://www.yogajournal.com/poses/conqueror-breath
- ↑ https://www.doyouyoga.com/a-basic-intro-to-alternate-nostril-breathing/
- ↑ https://www.doyouyoga.com/a-basic-intro-to-alternate-nostril-breathing/
- ↑ https://www.yogajournal.com/videos/nadi-shodhana
- ↑ https://www.yogajournal.com/videos/nadi-shodhana
- ↑ https://www.yogajournal.com/videos/nadi-shodhana
- ↑ https://www.doyouyoga.com/a-basic-intro-to-alternate-nostril-breathing/
- ↑ https://www.yogajournal.com/poses/channel-cleaning-breath
- ↑ https://www.yogajournal.com/poses/channel-cleaning-breath
- ↑ https://www.doyouyoga.com/5-types-of-pranayama-for-beginners/
- ↑ https://youtu.be/B6bnFlVkKrE?t=36
- ↑ https://yogainternational.com/article/view/learn-kapalabhati-skull-shining-breath
- ↑ https://youtu.be/B6bnFlVkKrE?t=56
- ↑ https://yogainternational.com/article/view/learn-kapalabhati-skull-shining-breath
- ↑ https://www.yogajournal.com/poses/skull-shining-breath
- ↑ https://yogainternational.com/article/view/learn-kapalabhati-skull-shining-breath
- ↑ https://www.yogajournal.com/poses/skull-shining-breath
- ↑ https://youtu.be/B6bnFlVkKrE?t=212
- ↑ https://yogainternational.com/article/view/learn-kapalabhati-skull-shining-breath
- ↑ https://www.yogajournal.com/poses/lion-pose
- ↑ https://youtu.be/xdUyHPa66A4?t=157
- ↑ https://youtu.be/xdUyHPa66A4?t=199
- ↑ https://youtu.be/xdUyHPa66A4?t=358
- ↑ https://youtu.be/xdUyHPa66A4?t=248
- ↑ https://www.yogajournal.com/poses/lion-pose
- ↑ https://www.yogajournal.com/poses/lion-pose
- ↑ https://youtu.be/xdUyHPa66A4?t=210
- ↑ https://www.yogapedia.com/definition/6746/lions-breath
- ↑ https://www.doyouyoga.com/4-pranayamas-you-can-do-before-bed/
- ↑ https://www.yogajournal.com/poses/lion-pose
- ↑ https://www.onemedical.com/blog/live-well/breathing-pranayama-techniques
- ↑ https://yogainternational.com/article/view/learn-kapalabhati-skull-shining-breath
About This Article
If you want to do Kapalbhati Pranayam, inhale normally through your nostrils until your lungs are full, and then contract your stomach muscles to forcefully push the air out through your nostrils. Repeat that exercise for 5 minutes at a time, until you reach a total of 15 minutes. Alternately, to do Bahya Pranayam, lift your head and inhale slowly. Then, return your head to a normal position, exhale, and lower your chin to your chest. Repeat that 3 to 5 times. To learn how to do the other 4 Pranayam exercises, read more!