This article was co-authored by wikiHow Staff. Our trained team of editors and researchers validate articles for accuracy and comprehensiveness. wikiHow's Content Management Team carefully monitors the work from our editorial staff to ensure that each article is backed by trusted research and meets our high quality standards.
This article has been viewed 64,667 times.
Learn more...
Celtic knots are a beautiful and intricate type of braid. They look very impressive and a little intimidating, but this hairstyle is much easier than it seems if you take it step-by-step. With a little practice, you can join in on this trend and sport a beautiful Celtic knot in your hair! Keep reading for a beginner-friendly hair tutorial on creating a Celtic knot braid.
Steps
Making a Basic Celtic Braid
-
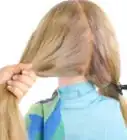
1Grab a thin section of hair from each side of your head. Pull the sections from your temples or just above your ears. You will be using these to form the knot, so make them thin—about the thickness of a pen or pencil.[1]
-
2Fold the left strand into a loop. Position the loop at the center-back of your head. Point the loop upward and hold it between the thumb and forefinger on your left hand. Make the loop about two fingers thick.Advertisement
-
3Hold the right strand between your left pinky and ring fingers. Take the right strand with your right hand. Wrap it around the back of your head, towards your left hand. Grab it with your left pink and ring finger. Left go of the strand with your right hand.
-
4Pull the right strand upwards behind the left strand. Slide your right thumb and forefinger down through the top of the left strand, so that they are between the strand and your head. Grab the right strand, and pull it upwards so that it's between the left strand and your head.[2]
-
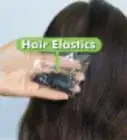
5Clip the loop in place. Unless you have a helper, you will need to clip the loop in place. Use a duck bill hair clip to secure the left loop. Leave the right strand along for now.
-
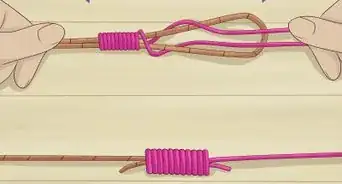
6Bring the right strand over the top of the loop. Grab hold of the right loop. Pull it away from your head, then drag it downward so that it crosses in front of the left loop.[3]
-
7Push the end of the right strand through the loop, towards your head. Slid your fingers under the right strand and out through the left loop. Grab hold of the right strand, and pull it through the loop, towards your head. Continue pulling the strand under the right strand.[4]
-
8Let go of the knot. Gently tighten it. Find the tail ends of both strands. Gently tug on them to tighten the knot.
-
9Finish the knot. Gently tug on the loops to even them out. Once you are happy with their placement, clamp the knot between a flat iron. This will help set the knot and smooth it out. Finish off with a light misting of hairspray.[5]


Making a Celtic Braid Headband
-
1Take four thin strands of hair. Grab a thick section of hair from your hair line. Divide that section into four smaller strands. For the sake of this tutorial, think of them as strands: A, B, C, and D.
-
2Weave the first strand through the other strands. Take strand A. Cross it over strand B, then under strand C. Finally, bring it over strand D. You are working from right to left.[6]
- For the rest of this tutorial, you will be weaving the middle two strands, and ignoring the other two strands.
-
3Weave strand D back through the other strands. Now, you are working from left to right. Ignoring strand A, weave strand D over strand C and under strand B.[7]
-
4Weave strand B through the other strands. Ignore strand D. Take strand B. Weave it under strand C and over strand A on the far left side.[8]
-
5Continue weaving the strands back and forth. Always ignore the first and last strands on the far left and right. Weave them over and under across the other strands, like a basket, until you reach the bottom.[9] Keep braiding until the braid is the length you want.
-
6Secure the braid with a hair tie. Use a thin hair tie that matches your hair color, or a clear one.
-
7Style the braid. For a simple look, let dangle down the length of your hair. You can also tuck it behind your ear and secure it with a bobby pin. Here are some other styling ideas:
- Make a second braid on the other side of your head. Bring both braids around to the back of your head. Secure them with bobby pins, then cover them with strands of hair.[10]
- Make a second braid on the other side of your head. Gather all of your hair into a low bun at the nap of your head.[11]
- Fluff up the braid for a fuller look. Grab the bottom of the braid with one hand, and the elastic with the other. Slide the elastic upwards, then gently tug on the outer strands on the braid.[12]

Community Q&A
-
QuestionWhat makes it Celtic?
 Community AnswerThe knot is often depicted in ancient Celtic artworks, like carvings and jewelry, but maybe most famously as ornaments in Irish Bibles later on.
 -
QuestionIs there an easier way to do this?Community AnswerYou could cry the headband method on another person first. Four-strand braids take a while to get the hang of, but you will get it.
Things You'll Need
Making a Basic Celtic Braid
- Duck bill clip (or similar)
- Bobby pin (optional)
Making a Celtic Braid Headband
- Mini hair tie or clear hair elastic
- Bobby pin (optional)


References
- ↑ http://www.cutegirlshairstyles.com/hairstyles/holiday/st-patricks-day-hairstyles/3-ways-to-wear-a-celtic-knot-st-patricks-day-hairstyles/
- ↑ http://www.cutegirlshairstyles.com/hairstyles/holiday/st-patricks-day-hairstyles/3-ways-to-wear-a-celtic-knot-st-patricks-day-hairstyles/
- ↑ http://www.cutegirlshairstyles.com/hairstyles/holiday/st-patricks-day-hairstyles/3-ways-to-wear-a-celtic-knot-st-patricks-day-hairstyles/
- ↑ http://www.cutegirlshairstyles.com/hairstyles/holiday/st-patricks-day-hairstyles/3-ways-to-wear-a-celtic-knot-st-patricks-day-hairstyles/
- ↑ http://www.cutegirlshairstyles.com/hairstyles/holiday/st-patricks-day-hairstyles/3-ways-to-wear-a-celtic-knot-st-patricks-day-hairstyles/
- ↑ https://www.youtube.com/watch?v=_UiWnytY7s0
- ↑ https://www.youtube.com/watch?v=_UiWnytY7s0
- ↑ https://www.youtube.com/watch?v=_UiWnytY7s0
- ↑ https://www.youtube.com/watch?v=_UiWnytY7s0
- ↑ https://www.youtube.com/watch?v=w9nBD2SF6Bw
- ↑ https://www.youtube.com/watch?v=w9nBD2SF6Bw
- ↑ https://www.youtube.com/watch?v=_UiWnytY7s0
- ↑ http://www.cutegirlshairstyles.com/hairstyles/holiday/st-patricks-day-hairstyles/3-ways-to-wear-a-celtic-knot-st-patricks-day-hairstyles/
- ↑ https://www.youtube.com/watch?v=Ro6k2GRDVa8
- ↑ https://www.youtube.com/watch?v=l5FDTX-JGlA
About This Article