This article was co-authored by Christine George and by wikiHow staff writer, Amber Crain. Christine George is a Master Hairstylist, Colorist, and Owner of Luxe Parlour, a premier boutique salon based in the Los Angeles, California area. Christine has over 23 years of hair styling and coloring experience. She specializes in customized haircuts, premium color services, balayage expertise, classic highlights, and color correction. She received her cosmetology degree from the Newberry School of Beauty.
There are 24 references cited in this article, which can be found at the bottom of the page.
This article has been viewed 31,747 times.
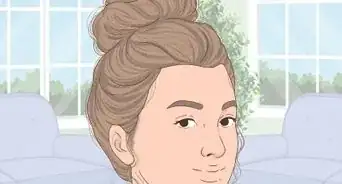
Slick low buns are great when you want to have a low maintenance hair day. If you’re a dance or ballet performer, you may be asked to create a sleek high bun for the stage. Both styles are easy to achieve with medium to long hair! Start with detangled hair and pull it into a sleek low or high ponytail, depending on which bun look you want. Twist the lengths of your hair and coil the twisted hair around the base of your ponytail to create the bun, then secure the style with bobby pins and styling gel.
Steps
Doing a Slick Low Bun
-
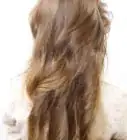
1Shampoo and condition your hair like you normally would.[1] Starting with freshly washed hair makes it easier to achieve the sleek look that you’re going for. Be sure to rinse the conditioner thoroughly out of your hair so that it isn’t slippery to work with.[2]
- Creating this style with damp hair is key, so if you don’t have time to wash your hair, spritz it with water to dampen it.[3]
- If your hair is a bit oily, you can apply a small amount of dry shampoo to soak up excess oil before you spritz your hair with water.
-
2Towel-dry your hair so that it’s not dripping wet. Squeeze your hair gently with a towel or an old T-shirt to get rid of excess moisture. A little bit of moisture helps you achieve this look, but you don’t want your hair to be so saturated that it’s dripping.[4]
- Quickly run a wide-toothed comb through the lengths of your hair to get rid of any tangles.[5]
Advertisement -
3Part your hair down the middle with a comb. Use the end of a rattail comb to part your hair in the middle, starting in the center of your forehead and running it back to the crown of your head. You should end up with 2 sections of hair—a section on the right side of your head and a section on the left side of your head.[6]
- A center part is the most common style, but you can also use a side part to create a slightly different look. It’s up to you![7]
-
4Smooth down the hair on each side with a natural bristle brush. Use a natural bristle brush to smooth down the hair on each side of your head, concentrating on the hair closest to the part. Smooth the hair down as close to your head as possible, then sweep each side back behind your ears. Keep the hair smooth as you sweep it back.[8]
- The hard bristles help to smooth and flatten your hair. A mixture of nylon and boar bristles also works well.[9]
- You don't need to brush out the lengths--just work on smoothing the hair against your scalp.
- Even if you have thick, curly hair, using a natural bristle brush shouldn't create frizz as long as your hair is damp. If your hair does get a little frizzy, try applying a small amount of leave-in conditioner to your hair before brushing it.
-
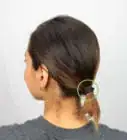
5Gather your hair at the nape and secure it with an elastic. Once the hair on both sides of your head is smoothed down as much as possible, bring the 2 sides together at the nape of your neck. Hold the hair in place with 1 hand and secure it into a low ponytail with a hair elastic.[10] [11]
- Be sure to secure the hair firmly. If you’re using scrunchies or fairly loose hair elastics, try using 2 of them to get the security you need for this look.[12]
-
6Use gel to slick the hair down from the hairline to the ponytail base. Apply a small amount of hair gel on each side of your head. Concentrate the gel on the hair close to your scalp. Then, run your natural bristled brush through the hair on each side, starting at the hairline and working your way to the base of the ponytail, to smooth it down as much as possible.[13]
- You can apply a little more gel to each side and use your palms to do a final smoothing so that it looks flat and clean.
- If you have natural hair or lots of baby hairs at your temples, try using a little more gel or an edge control product to shape your edges however you like them.
-
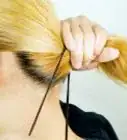
7Split the ponytail into 2 sections and twist them. Separate the lengths of your hair into 2 even sections. Then, twist the pieces around each other like you’re doing a normal twist hairstyle. Keep twisting until you reach the ends of your hair.[14]
- Twisting the lengths of your hair before you make the bun will give the hair a smoother appearance.
- You don’t need to secure the end of the twist with a hair elastic—just keep a good grip on the end so the twist doesn’t become unraveled. However, you can use a clear hair elastic for extra security if you want to.
-
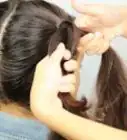
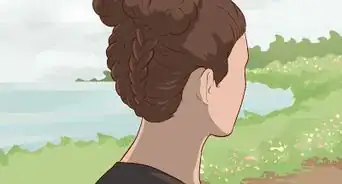
8Coil the twist around the elastic at the nape to create the bun. Twirl the twist around the hair elastic neatly and tightly to maintain a smooth looking bun. When you run out of hair length to coil, you’re ready to secure the bun in place.[15]
- The bun will completely obscure the hair elastic.
-
9Tuck the ends under the bun and bobby pin them in place. Use 4-5 bobby pins to secure the ends of your hair under the bun and to hold your bun in place. You can also place bobby pins around the bun if you have extra thick hair for an extra secure hold.[16]
-
10Apply more styling gel to lock the style in place. If you need additional hold, or to tame any unruly hairs that came loose while you were styling the bun, put a little styling gel on your fingertips and smooth the hair into place. Styling gel should be enough to hold your sleek low bun in place, but you can finish with a light misting of extra hold hair spray for more security.
- Carry the gel, hairspray, and some extra bobby pins with you in case you need to touch up your bun during the day.


Creating a Sleek Topknot
-
1Start with freshly washed damp hair or dampen it with water. You don’t have to shampoo and condition your hair before creating this style as long as you spritz your hair with water first to dampen it. The moisture will help you create the sleek look.[17]
- Some people prefer creating this style with hair that hasn’t been washed in 1-2 days, since just-conditioned hair can be a little slippery to work with.
- If you just washed your hair, towel-dry it until it’s damp. You don’t want your hair to be dripping wet for this.
-
2Brush through your hair to get rid of any tangles. Run a slicker brush or natural bristled brush through your hair, starting at the roots and going all the way down to the ends. If your hair is thick or tangles easily, consider applying a detangler product to help things along.[18]
- Smooth, tangle-free hair is essential for the slick bun.
- If you have thick, curly hair, try detangling with a wide-toothed comb.
-
3Pull your hair into a high ponytail and secure it with an elastic. Gather all of your hair at the top of your head and hold it with 1 hand. Use your other hand to brush down the hair close to your scalp and neaten the look of the ponytail. Then, once it looks as smooth as you want, wrap a hair elastic around the base of the ponytail to secure it.[19]
- Make the ponytail fairly tight. A loose pony won’t give you the sleek look you’re going for.
- You can apply a small amount of leave-in conditioner to your hair first if that helps you tame flyaways and get a sleeker look.
-
4Use hair gel to smooth down the hair around the ponytail. Dip your fingertips into a small amount of styling gel and rub your palms together to distribute the product onto both hands. Then, smooth your hair down with the palms of your hands to get rid of any remaining flyaways and slick the hair down.[20]
- For extra smoothness, spray a light misting of hairspray onto your hair and neaten the hair from your hairline to the ponytail base.
-
5Twist all of your ponytail into a single neat twist. Grab the ponytail and brush it out a final time to get rid of tangles. Then, rotate the hair with your hands to twist it from the ponytail’s base all the way down to the ends of your hair. The tighter you twist the hair, the sleeker your final look will be. If you want a relaxed look, do a loose twist. You can customize it however you like![21]
- Smooth a little more gel over the lengths of your hair before you twist it if flyaways are a problem or you need extra hold.
-
6Wrap the twist around the ponytail base and secure it with bobby pins. Coil the twisted hair around the hair elastic that's holding your high ponytail in place. Keep coiling until you run out of length. Then, use bobby pins to tuck the ends under the bun and secure the hair in place.[22]
- For extra hold, wrap another hair elastic at the base of the bun before you add the bobby pins.
-
7Add more styling gel and hairspray to complete the bun, if desired. Put a little styling gel on your fingertips and smooth the hair into place if you need to tame any flyaways. If you have a lot of baby hairs or want to shape your edges, apply gel and use an old toothbrush to brush and shape them until you’re happy with the look.[23]
- You can finish up with a final misting of hairspray for extra hold, if needed.


Making a High Slick Bun with Dry Hair
-
1Brush out your hair until it's as smooth as possible. Run a paddle brush or a comb through your hair to get rid of any tangles and knots. Get your hair as smooth as possible, but don't worry about perfection at this point.
- If you have straight hair, you can flat-iron it first to get it extra smooth.
-
2Apply styling gel to your hairline and smooth the hair down. Put a dime-sized amount of styling gel or edge control product in your palm and rub your palms together to distribute the product. Then, smooth the gel along your hairline and on the tops, side, and back of your hair to tame any flyaways.[24]
-
3Pull your hair into a tight high ponytail. Brush the hair towards the crown of your head to blend the gel in and create that slicked-down look. Use the brush to gather all of your hair at the top of your head. Once the ponytail is positioned where you want it, hold it in place with 1 hand.[25]
- If you would prefer a low slick bun, simply make a low ponytail instead of a high one.
- Secure the ponytail with a hair elastic once the sides and top are as smooth as you'd like.
-
4Apply hair gel to the lengths of your ponytail and twist it. Rotate the hair with your hands to create a single twist from the ponytail’s base all the way down to the ends of your hair. Twist the hair tightly to achieve the sleek look you're going for.[26]
-
5Wrap the twist around the ponytail base to create the bun. Coil the twisted hair around the base of your ponytail so that it hides the hair elastic. Keep wrapping the twisted hair until you run out of length.[27]
- If your hair is too short to twist and wrap around, just take the ends and wrap them around the ponytail to create a loose little puff. Then, wrap another hair elastic at the base of the "bun."[28]
-
6Secure the bun with bobby pins and more hairspray. Once you've wrapped the hair tightly into a bun, tuck the loose ends under the bun and secure the hair in place with bobby pins. Mist all over your head with extra-hold hairspray and use a rattail comb to smooth the hair down once more.[29]


Things You’ll Need
Doing a Slick Low Bun
- Shampoo and conditioner
- Towel or old T-shirt
- Wide-toothed comb
- Natural bristled brush
- 1-2 hair elastics
- 5-10 bobby pins
- Styling gel
- Rattail comb
- Hairspray (optional)
Creating a Sleek Topknot
- Spray bottle filled with water
- Slicker or natural bristled hairbrush
- Styling gel
- Leave-in hair conditioner (optional)
- 1-2 hair elastics
- Bobby pins, as needed
- Toothbrush for edge shaping (optional)
- Hairspray
Making a High Slick Bun with Dry Hair
- Styling gel or edge control product
- Brush or rattail comb
- 1-2 hair elastics
- Several bobby pins
- Hairspray
References
- ↑ Christine George. Master Hair Stylist & Colorist. Expert Interview. 10 January 2020.
- ↑ https://www.youtube.com/watch?v=5G6OU716aJU&feature=youtu.be&t=41
- ↑ https://www.youtube.com/watch?v=1Fn2Tm4Hhy8&feature=youtu.be&t=14
- ↑ https://www.youtube.com/watch?v=5G6OU716aJU&feature=youtu.be&t=44
- ↑ Christine George. Master Hair Stylist & Colorist. Expert Interview. 10 January 2020.
- ↑ https://www.youtube.com/watch?v=5G6OU716aJU&feature=youtu.be&t=78
- ↑ https://www.youtube.com/watch?v=eF8MoK09AV4&feature=youtu.be&t=255
- ↑ https://www.youtube.com/watch?v=5G6OU716aJU&feature=youtu.be&t=134
- ↑ https://www.cosmopolitan.com/style-beauty/beauty/how-to/a16175/slicked-back-ponytail-hair-tutorial/
- ↑ Christine George. Master Hair Stylist & Colorist. Expert Interview. 10 January 2020.
- ↑ https://www.youtube.com/watch?v=5G6OU716aJU&feature=youtu.be&t=154
- ↑ https://www.youtube.com/watch?v=5G6OU716aJU&feature=youtu.be&t=330
- ↑ https://www.youtube.com/watch?v=1Fn2Tm4Hhy8&feature=youtu.be&t=63
- ↑ https://www.youtube.com/watch?v=5G6OU716aJU&feature=youtu.be&t=390
- ↑ https://www.youtube.com/watch?v=5G6OU716aJU&feature=youtu.be&t=422
- ↑ https://www.youtube.com/watch?v=5G6OU716aJU&feature=youtu.be&t=452
- ↑ https://www.youtube.com/watch?v=WqxOFFzhBJw&feature=youtu.be&t=31
- ↑ https://www.youtube.com/watch?v=WqxOFFzhBJw&feature=youtu.be&t=31
- ↑ https://www.youtube.com/watch?v=WqxOFFzhBJw&feature=youtu.be&t=57
- ↑ https://www.youtube.com/watch?v=WqxOFFzhBJw&feature=youtu.be&t=117
- ↑ https://www.youtube.com/watch?v=WqxOFFzhBJw&feature=youtu.be&t=158
- ↑ https://www.youtube.com/watch?v=WqxOFFzhBJw&feature=youtu.be&t=166
- ↑ https://www.youtube.com/watch?v=WqxOFFzhBJw&feature=youtu.be&t=180
- ↑ https://www.youtube.com/watch?v=Vi1maLgFK00&feature=youtu.be&t=107
- ↑ https://www.youtube.com/watch?v=Vi1maLgFK00&feature=youtu.be&t=127
- ↑ https://www.health.com/beauty/sleek-bun-hair-video
- ↑ https://www.health.com/beauty/sleek-bun-hair-video
- ↑ https://www.youtube.com/watch?v=Vi1maLgFK00&feature=youtu.be&t=154
- ↑ https://www.health.com/beauty/sleek-bun-hair-video
About This Article