wikiHow is a “wiki,” similar to Wikipedia, which means that many of our articles are co-written by multiple authors. To create this article, volunteer authors worked to edit and improve it over time.
This article has been viewed 85,130 times.
Learn more...
If you're stepping up your dog drawing game by practicing particular breeds, the pitbull is a good one to try. Start with step one, below.
Steps
Drawing the Eyes, Nose, and Facial Structure
-
1Draw two angled almond-shapes starting near the center of the page, exaggerating the corners where the curves meet. They should be loose reflections of one another and be mostly symmetrical.
- Leave a space of between 2 and 3 eye widths between the eyes to display the wideset-nature of pitbull heads.
-
2Draw a circle within each eye, taking up the vast majority of the almond shape. Leave a small portion outside of each circle within the almond.Advertisement
-
3Draw a small circle in the center of each eye, leaving a sliver out of each circle in the same direction.
- These will form the pupils of the dog.
- The inner circles should resemble Pacman shapes
-
4Roughly one eye-width down from each eye, add two curved lines, one on either side, to outline the nose bridge of the dog. The curves should start under the inner sides of each eye, and gradually slope to the outside direction, about half the width through the eye.
-
5Three-quarters down each curve, in the center between the two curves, draw a slightly-widened half circle to start the nose, leaving the bottom portion of the circle open.
-
6Draw small curved lines from each edge of the semicircle, making small, round lobes on the interior of the circle.
- These will form the nostrils
-
7Draw curves coming off each lobe towards the center of the nose, a parabolic shape on either side of the nose.
- These will shape the septum.
-
8Reflect the top portion of the nose horizontally, to enclose the nose and form tear-drop shapes on either side of the center of the nose.
- Do not make the bottom portion as smooth as the top portion. Form a trough in the center to provide a more organic look
-
9Draw curved lines on the bottom center of the nose, curving outward to either direction from a straight-line center.
- These will act as creases, to further enhance and round the nose
-
10Continue a straight line, about two-thirds of the height of the nose, down from the crease origin.
- This will form the cleft of the dog’s mouth.
-
11Draw two, soft, gradual curves extending from the cleft, one in either direction. They should extended to the width of near the edges of each eye.
- The ending height of the curve should be the same height as the start of each curve (the bottom of the cleft).
- These will form the upper lip/whisker area of the dog.
-
12Draw around 10 dots spread out on each side of the cleft, within the boundaries of the curves.
- They do not have to be symmetrical, as these act as the whisker holes
-
13In the middle between the two eyes, starting near the top of the eyes, draw a rounded Y that is roughly the same size as the nose.
- This acts as the forehead wrinkle, a characteristic of many pitbulls.
-
14Draw a few accenting lines above and below each eye. They should loosely follow the curvature of the eye’s shape.
- These add character and help add to the rough look of pitbulls, as well as demonstrate the bony, muscular detailing in their facial structure.
-
15Starting from the outer edge of each eye, and the height of the curvature of the nose bridge, draw one parabolic, soft curve on each side of the dog’s face.
- These help outline the strong cheekbones on pitbulls.
-
16From the thin edge of each tear-drop nostril, draw a small curve in the opposite direction of the mouth curves. They should be about one-third the width of the eyeballs in size.


Drawing the Ears and Head Shape
-
1Draw a curved line on either side of the face, extending from the height of the corner of each eyeball down to just below the curves of the whisker area.
- These will form the strong, jutting cheek bones of the dog, and help to encompass the features of the face.
-
2Draw a very soft curves extending from the top of each cheek bone to the top of the forehead crease. These lines should be relatively straight.
-
3Draw a shape resembling a forehead burrow at the top of the head, spanning the width from the outer edge of each eye. It does not need to follow a very specific shape, but instead must feature a few slight curves, to form the top of the head and forehead.
-
4Draw elm leaf-shaped ears extending from the tops of the curves you drew earlier. They should end near the edges of the forehead burrow, but shouldn’t touch the line.
-
5Draw a curved line on either side of the furrow that touches both the ear and the furrow, and forms a small bump.
-
6Draw accenting lines around the ears, and end them with curves that reach outwards towards the inner base of the ears (near the furrow).


Drawing the Mouth, Jaw, and Personal Touches
-
1Draw small jowls extending from the jaw bones to slightly below the whisker area.
-
2Draw the lower portion of the mouth extending from the whisker area, leaving a gap in the middle to draw the tongue.
- The shape should replicate the shape drawn for the bottom of the nostrils, but on a wider scale.
-
3Draw the tongue by starting with two connected curves in the middle of the mouth hole that look like reflections of the curves in the whisker area.
-
4Extend the tongue down past the mouth with straight lines, touching each side of the gap you left open, and ending with a U-shaped curve.
-
5Draw a straight line extending from the cleft in the tongue, spanning about halfway down the tongue.
-
6Draw smile marks on both corners of the mouth.
-
7Draw a third curved line extending from the jowls to three-quarters of the way down the tongue, connecting the bottom jaw, but not going through the tongue.
- This will form the chin of the dog.
-
8Draw a few spikes bordering the bottom portion of the chin.
-
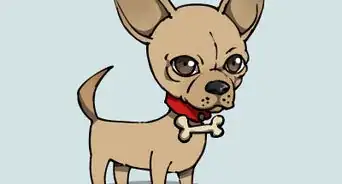
9Draw a rounded line from either side of the chin that passes underneath the chin and behind each spike, connecting to make a collar.
-
10Draw a bone shape underneath the middle of the collar and the tongue, and write your pit bull’s name is within the borders.
-
11Draw two outwardly-angled lines from each edge of the collar.
-
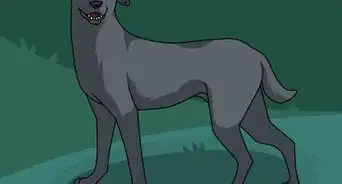
12Shade in the mouth, pupils, and ear holes, and your pitbull is complete!
-
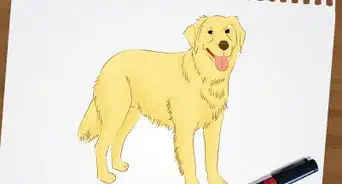
13Finished.


Community Q&A
-
QuestionWhy are there so many wrinkles? My pitt doesn't have any wrinkles.
 Community AnswerIt is just the artists rendition of a pitbull. If yours doesn't have as many wrinkles you can feel free to draw it how you would like. With all, some or no wrinkles.
 -
QuestionWhy does the example image have spikes around the pitbull?
 Community AnswerIt's a collar, but you don't have to put spikes in your image if you don't want to.
 -
QuestionWhy is the nose pink?Community AnswerSome pit bulls have pink noses, especially the white ones. You can color the nose whatever shade you like.

About This Article
To draw a pitbull, start by drawing 2 symmetrical upturned almond shapes with large circles and smaller pupils inside for the eyes. Then, draw the bridge of the nose by drawing 2 curved lines below the inner corners of the eyes, with the nose underneath. Next, under the nose, draw a straight line for the cleft of the dog’s mouth, with downward sloping lines coming off the cleft to make the rest of the mouth. Finally, draw 10 whisker dots on each side of the mouth and outline the head, ears, and jaw. To learn how to color in your pitbull drawing, scroll down!