X
wikiHow is a “wiki,” similar to Wikipedia, which means that many of our articles are co-written by multiple authors. To create this article, 17 people, some anonymous, worked to edit and improve it over time.
This article has been viewed 154,089 times.
Learn more...
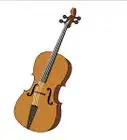
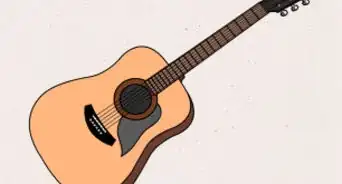
Have you ever wanted to draw a detailed picture of a violin but found it very complicated? Well, don't worry. This article will show you how to draw this beautiful sounding instrument.
Steps
-
1First you will need to draw an outline of the violin's "body." Using a pencil, lightly draw two "semi-arches", one facing the right and the other facing the left.
-
2When you get to the middle, make two arches connecting the "semi-arches", again one facing right and the other facing left.[1]Advertisement
-
3Now, draw lines connecting a larger arch underneath. In the center of the shape you just drew, draw a backward slanted sort of s in the right and a frontward slanted sort of s in the left. Be sure to leave space for the fingerboard.[2]
-
4To draw the finger board, place a ruler straight in the middle of the paper, between the two s'. Trace the sides of the ruler until right above the two s'. Draw a horizontal line to make a sort of a rectangle.
-
5Now draw two sets of parallel lines that are as far apart from each other as the fingerboard's width.
-
6On top of that, you will draw the scroll. This may be very tricky for some people, so you will need to pay close attention. First draw a small line in the space above the parallel lines. Then draw slightly arched lines on the two sides of the center line. After that, draw a smaller horizontal line alongside each of the slightly arched lines that you just drew.
-
7Now you will need to draw rather thick, curved lines on each side of the horizontal lines. The thick curves should be facing outward.
-
8Draw two small vertical and horizontal lines connecting the thick curves. Whew!
-
9After that, we will draw the pegs. Draw four sets of horizontal lines inside the parallel lines we drew in step #5.
-
10To the right of the parallel lines, draw two horizontal lines that are even with the first set of horizontal lines inside the parallel lines. Now draw a small circle that will fit on the horizontal lines you just drew.
-
11Repeat on the left with the next peg, on the right with the one after that, and then the left again.
-
12Since the pegs are finished, we can start drawing strings. The E string, or the string furthest right, will wrap around the third peg (inside the parallel lines from step #5). Then draw it straight down like a regular string that you are probably familiar with. Repeat with the other strings, the second furthermost right string (A string) wrapping around the first peg, the string to the left of the A string (D string) wrapping around the second peg, and the string left of the D string (G string) wrapping around the fourth peg.
-
13Draw the bridge between the two s', making it a slightly curvy rectangle. Next, draw a sort of triangular shape connecting with the strings and reaching the bottom of the violin. Draw four small circles on the triangular shape. These will be the fine tuners.
-
14At the bottom left of the violin, draw a semi-circle connected with a small rectangle at the bottom.
-
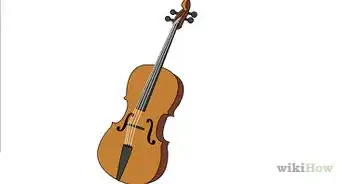
15Finally, color in your violin and you are finished![3]


Advertisement
Community Q&A
-
QuestionHow do I draw a bow to a violin?
 Community AnswerFirst you draw 2 lines and connect them with a slanted line. Then you make one side thicker.
 -
QuestionHow do I make it look 3D?
 Community AnswerUse the correct shading on the edges and back. Use heavier tones for the shadows and make the shape appropriate to how it would look if it were actually 3D.
 -
QuestionHow do I draw a person playing a violin?
 Community AnswerPrint out a nice picture of a person playing and trace it. With this method, you'll have more of an understanding of the figure of a violinist. Over time, you'll be able to recreate it without tracing.
Advertisement


References
About This Article
Advertisement