This article was co-authored by wikiHow Staff. Our trained team of editors and researchers validate articles for accuracy and comprehensiveness. wikiHow's Content Management Team carefully monitors the work from our editorial staff to ensure that each article is backed by trusted research and meets our high quality standards.
There are 9 references cited in this article, which can be found at the bottom of the page.
This article has been viewed 11,154 times.
Learn more...
Oak is the most popular wood type for smoking and grilling. It burns well, produces a steady amount of smoke, and adds a nice flavor to meat without overpowering it. However, you have to properly dry or “season” the oak before you cook with it or it won't burn with enough heat and smoke. You can air-dry the wood in the spring and summer for 3-6 months, or you can speed the process up with a kiln in just a few days. Once you’re done, you can enjoy delicious smoked meals at home.
Steps
Air-Drying the Wood
-
1Begin drying the wood in the spring. Oak can take about 3-6 months to season completely, so allow enough time before the winter begins. Start in the early or mid-spring, when the weather starts getting warmer, so you have all summer to dry the wood.[1]
- If it’s too late in the year, you could dry the wood with a kiln instead.
-
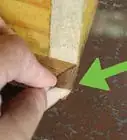
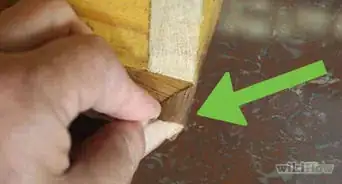
2Cut and split the wood so there’s more surface area to dry. Start by cutting the wood so it fits into your smoker lengthwise. Then split each piece into quarters so the inside is exposed.[2]
- Oak is a tough wood type, so it’s best to use a chainsaw or mechanical wood splitter. Using an axe will be difficult and time-consuming.
- Always wear eye protection when you’re splitting wood. Fragments can fly through the air and injure you.
- If you bought the wood already cut and split, then you can probably skip this step. Just make sure the wood fits inside your smoker and cut it if you have to.
Advertisement -
3Set up a raised platform underneath a covered outdoor area. Find a spot on your property with an awning or similar covering to protect the wood from the rain. Then set up a pallet or similar raised platform that’s open on the bottom. A raised platform keeps ground moisture away, and also brings airflow underneath the wood for more effective drying. [3]
- A spot that gets some sunlight would be good, but good airflow is more important for drying.
- If you don’t have a suitable covered area, then you can set up a tarp over the wood to protect it from the rain.
-
4Stack the wood in single piles about 3–4 ft (0.91–1.22 m) tall. Lay each piece of wood out across the platform from one side to the other. Then make additional rows on top of each other until the stack is about 3–4 ft (0.91–1.22 m).[4]
- Start a new stack if you have more wood leftover. Stacking wood too high is unstable and dangerous.
- Keeping the wood in single stacks is important so all the pieces receive the same amount of airflow.
-
5Leave at least 20 in (51 cm) between stacks of wood. If you stack multiple piles of wood, make sure there’s enough airflow between them. Leave at least 20 in (51 cm) between them so all the wood dries equally.[5]
-
6Dry the wood for 3-6 months. Air-drying wood takes time, so be prepared to leave it in place for a few months and let nature work. Don’t move it unless you notice that it’s getting wet in the rain.[6]
- The drying time depends a lot on the climate. In a hot, dry climate, the drying process could take only a few weeks. In a more humid area, it’ll take longer.
-
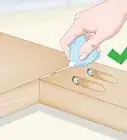
7Measure the wood’s water content with a wood moisture meter. You can monitor the wood’s drying process with a moisture meter. Every few weeks, press the meter’s prongs against a few wood pieces and check the moisture content. Fresh wood has a moisture reading of about 30%, so the number should be falling from there.[7]
- You can buy water content meters online for $20-50. It’s a good investment to ensure you dry the wood correctly.
- If you don’t have a water meter, you can judge the wood’s moisture content by its color. Fresh wood has a rich, shiny tan color. Dried-out wood has less color and no shine. It might even look slightly gray on the inside. It’s also much lighter than fresh wood because the water has evaporated.
-
8Move the wood into storage when it reaches a 9-14% moisture content. This percentage is ideal for smoking. The wood is dry enough to catch fire easily, but has enough moisture to produce smoke. When the wood reaches this level, move it to your storage area and use it when you’re ready. A shed outside works well for storage. You can also stack it in the open and cover it with a tarp to keep it dry.[8]
- Don’t over-dry the wood. Otherwise it’ll burn too fast and won’t produce enough smoke to cook with.
- Store the wood 20–30 ft (6.1–9.1 m) from your home or any other lived-in structure in case it catches fire.[9]


Using a Kiln for Faster Drying
-
1Cut and split the wood to fit into your smoker. If you chopped the wood yourself or bought it whole, then start by cutting it so it fits inside the smoker. Then split it into quarters so the interior is exposed.[10]
- Always wear goggles when you’re splitting wood. Chips could fly through the air and injure you.
-
2Stack the wood inside the kiln. Pile the wood up along the walls of the kiln. Stack the pile about 3 ft (0.91 m) high before making a new row.[11]
- Read the instructions that come with your kiln to make sure you stack the wood correctly. Some kilns might have designated locations for the wood.
- Some people prefer to stack and tie the wood into bundles, but this isn’t necessary for drying. It just makes transporting and selling the wood easier.
-
3Set the kiln temperature at 140 °F (60 °C), 180 °F (82 °C), or 220 °F (104 °C). These are common kiln drying temperatures. As the temperature increases, the drying time shortens. The drying time for each temperature is about 11 days, 6 days, and 30 hours, respectively. Pick a temperature based on how much time you have.[12]
- Always check the manual with your kiln for the specific drying times and temperatures. They may vary with different types of kilns.
- Remember that in general, the faster the wood dries out, the faster it will burn. If you’re planning on slow-smoking your food, then let the wood dry on a lower temperature for longer.
-
4Turn on the kiln ventilation system. Most kilns use fans to circulate hot air around the wood. Turn on the fan system after stacking the wood, then shut the kiln.[13]
- If the fan system doesn’t work then the wood won’t dry properly, so make sure the fans are operating before you close the kiln.
-
5Keep adding a constant fuel supply to the kiln. The kiln needs fuel constantly to generate heat. If yours can’t hold enough for the entire drying process, then make sure you constantly add fuel so the drying process continues. The kiln should have a slot on the exterior where you can add more firewood, coals, or oil.[14]
- Kilns use different fuel sources. Some use firewood, some up oil, and others are solar-powered.
- Wood-burning kilns require a lot of supervision and you might have to add wood 5-6 times per day.
- Check your user manual for the correct fuel loading procedure.
-
6Shut off the kiln and let the wood cool before moving it. When the correct drying time passes, turn the power off and open the vents around the kiln to release the hot air. Let the kiln vent for 4-6 hours before trying to take the wood out to avoid getting burned.[15]
- Do not open the kiln door until it’s been venting for a few hours. Otherwise, you’ll be hit with extremely hot air when you open the door.
- Always refer to the cooling instructions that come with your kiln.
-
7Transfer the wood to a storage location. Once the wood is dried out, take it to your shed or another storage location. After that, you can use it whenever you want.[16]
- An open shed is a good storage location for firewood. You can also leave it out in the open if you cover it with a tarp to keep it dry.
- For safety, store the wood 20–30 ft (6.1–9.1 m) from your home in case it catches fire.[17]


Things You’ll Need
Air-Drying the Wood
- Chainsaw or wood splitter
- Goggles
- Wood pallets
- Tarp
Using a Kiln for Faster Drying
- Kiln
- Chainsaw or wood splitter
- Goggles
- Fuel source
Warnings
- Always wear eye protection while you’re splitting wood to prevent wood chips from getting in your eyes.⧼thumbs_response⧽


References
- ↑ https://forestry.ca.uky.edu/firewood-seasoning
- ↑ https://forestry.ca.uky.edu/firewood-drying
- ↑ https://youtu.be/uy4bratwBog?t=60
- ↑ https://youtu.be/uy4bratwBog?t=75
- ↑ https://youtu.be/uy4bratwBog?t=75
- ↑ https://forestry.ca.uky.edu/firewood-seasoning
- ↑ https://bbq.tamu.edu/2016/01/07/seasoned-wood-for-smoking-barbecue/
- ↑ https://bbq.tamu.edu/2016/01/07/seasoned-wood-for-smoking-barbecue/
- ↑ http://warren.cce.cornell.edu/natural-resources/heating-with-wood/storing-and-drying-firewood
- ↑ https://forestry.ca.uky.edu/firewood-drying
- ↑ https://www.fpl.fs.fed.us/documnts/fplrn/fplrn254.pdf
- ↑ https://www.fpl.fs.fed.us/documnts/fplrn/fplrn254.pdf
- ↑ https://www.firewood-for-life.com/firewood-kiln.html
- ↑ https://www.firewood-for-life.com/firewood-kiln.html
- ↑ https://www.firewood-for-life.com/firewood-kiln.html
- ↑ https://www.firewood-for-life.com/firewood-kiln.html
- ↑ http://warren.cce.cornell.edu/natural-resources/heating-with-wood/storing-and-drying-firewood
- ↑ https://www.foodrepublic.com/2015/05/13/if-youre-smoking-barbecue-at-home-wood-is-the-essential-ingredient/
About This Article