This article was co-authored by wikiHow Staff. Our trained team of editors and researchers validate articles for accuracy and comprehensiveness. wikiHow's Content Management Team carefully monitors the work from our editorial staff to ensure that each article is backed by trusted research and meets our high quality standards.
There are 9 references cited in this article, which can be found at the bottom of the page.
This article has been viewed 23,165 times.
Learn more...
Bone marrow refers to the milky-white, buttery interior of cows’ femur bones, and it’s often viewed as a luxury or high-end menu item. When you eat this food at a restaurant or at home, there are a few things you need to know before you dig in—like how to extract the marrow and how to use the other elements that might be on the plate. You can prepare bone marrow at home relatively easily by coating it with salt, baking it in the oven, and coating it with bountiful herbs or other additions, like blue cheese or flavored butter.[1]
Ingredients
Roasted Bone Marrow
- 8 3 to 4 in (7.6 to 10.2 cm) pieces of bone marrow, sliced lengthwise
- 1 cup (25 grams) of fresh, chopped parsley
- 2 small, sliced shallots
- 2 tablespoons (30 mL) of extra virgin olive oil
- 2 tablespoons (30 mL) of lemon juice
- 1 tablespoon (15 mL) of drained capers
- Sea salt
- 4-6 slices of rustic white bread
Makes 4 servings
Steps
Enjoying Bone Marrow at Home or at a Restaurant
-
1Use your hands to grab and tilt the bone to access all the marrow. When you are ready to eat the bone marrow, it is totally okay to use your hands to maneuver the bones. In fact, doing so is the only way you’ll be able to really gain access to the entire thing. So don’t leave it on the plate and try to poke at it with your spoon—grab it and move it as you need to.[2]
- The bones may be a bit greasy from the marrow drippings, so be careful to grip them firmly so they don’t slip out of your hands.
- When you order bone marrow in a restaurant, it will traditionally be served with toasted bread and a small side salad. The salad is used as a palate cleanser and the bread is an accompaniment to the marrow.
-
2Scoop out some bone marrow and place it on a piece of toasted bread. Use your spoon to scoop out about half a spoonful of marrow and spread it evenly over a piece of crusty bread. Depending on your tastes, put more or less marrow onto each bite of bread.[3]
- When eating bone marrow, keep in mind that you won’t be eating any of the actual bone and should avoid any hard bits that may have come loose in the cooking process. Simply set any hard pieces off to the side.
- The action of scooping out marrow is similar to scooping out the insides of a zucchini or squash.
Advertisement -
3Use chopsticks to scrape out all of the marrow from the bone. Long, thin chopsticks are normally presented along with the bone marrow dish if you’re eating it at a restaurant. Use these chopsticks to poke into the corners of both ends of the bone. There is normally a large chunk of marrow hidden away that you can’t access with just a spoon.[4]
- If you don’t have chopsticks, you may be able to use a knife or the tines of a fork, though those instruments may still not be able to fully get into the smaller crevices.
-
4Eat the salad on the plate separately and use it as a palate cleanser. Don’t pair a bite of marrow along with a bite of salad. Rather, use the salad between bites of marrow, or save it until the end of the dish and eat it on its own.[5]
- The salad paired with bone marrow is normally very light and should have a bright, citrus-based dressing.
-
5Take a luge shot out of the bone for a fun ending to the meal. On one end of the bone there will be a small hole—use this hole to drink the shot. Pour the shot into the bone and enjoy the alcohol along with the remnants of the seasonings and drippings from the marrow.[6]
- Jameson Irish Whiskey is typically paired with bone marrow.
-
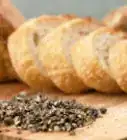
6Use a piece of bread to soak up the juices from the bone. Whether or not you take a luge shot, you can use a piece of crusty bread to enjoy the last little bit of flavor from the bone. Simply dab at the interior of the bone with your bread to absorb the rest of the juices.[7]
- Bone marrow is normally a more expensive dish, and no one is going to fault you for relishing every last bit of it.


Roasting Bone Marrow
-
1Call or visit your butcher to purchase your bone marrow. Request that your butcher cut your marrow for you because it’s really hard to do yourself at home. Generally, you’re going to want to order your bone marrow sliced lengthwise (or “canoed”) so that it’s easier to season and access once it’s cooked.[8]
- If you decide to use bone marrow that is unsliced, that is okay! You will cook it the same way and just use chopsticks or a small spoon to get the marrow out of the bone once it’s done cooking.
- If you are going to split the bone marrow at home yourself, you’ll need a meat clever or a band saw and a steady pair of hands.
-
2Preheat your oven to 425 °F (218 °C) and line a baking sheet with foil. If you’re cooking unsliced bone marrow, bump that temperature up to 450 °F (232 °C). Line a baking sheet with aluminum foil so that it’s ready to go once the oven has preheated.[9]
- The aluminum foil makes cleaning up a lot easier—there will be a lot of juices from the marrow that flow out once it starts cooking.
-
3Chop up the parsley and slice the shallots to prepare a garnish. Use a clean cutting board and a sharp kitchen knife to finely chop 1 cup (25 grams) of fresh parsley. Set the parsley aside in a mixing bowl, and then thinly slice 2 shallots. Add those to the mixing bowl, too.[10]
- You definitely don’t have to include a garnish if you don’t want one! A lot of people enjoy bone marrow simply roasted with salt and no other garnishes.
- You could also add in other fresh herbs, like basil or even a little bit of cilantro.
-
4Mix the parsley, shallots, oil, lemon juice, and capers together. To the mixing bowl with your chopped parsley and shallots, add 2 US tbsp (30 mL) of extra virgin olive oil, 2 US tbsp (30 mL) of lemon juice, and 1 US tbsp (15 mL) of drained capers. Combine everything together with a spoon and set the mixture to the side so it can marinate.[11]
- Use fresh lemon juice if you can, but if you don’t have any then it’s okay to use bottled lemon juice.
- If you don’t like extra virgin olive oil, you could also use avocado, grape seed, or other oil alternatives.
- If you don’t like capers, try switching them out for the same amount of minced garlic.
-
5Season the bone marrow aggressively with salt to bring out the flavor. Use the sea salt and rub some into the marrow-side of the bone, similar to how you would salt a chicken or a piece of steak. In general, the more salt you use, the more the flavor of the marrow will come through.[12]
- If you’re nervous about over-salting, just add a thin coat to the marrow before you cook it. You can always add a pinch of sea salt to each bite of marrow if you find it needs a little more.
-
6Lay the pieces marrow-side up on your lined baking sheet. Place the sections so that the hard bone is against the sheet and the marrow is facing the top of the oven. Space them evenly apart so that the heat has room to move all around each piece.[13]
- You can leave your oven tray at whatever level you usually use.
-
7Bake the bone marrow for 20 minutes at 425 °F (218 °C). There is no technical level of “done” for bone marrow, but if you bake it for too long, the marrow will completely melt and you won’t be able to eat it. Rather, you just want to give it enough time in the oven so that the marrow gets soft. You can test your marrow by poking a fork into it—if the fork pierces it easily, you’re good to go![14]
- If you’re cooking unsliced bone marrow, cook it for the same amount of time but at 450 °F (232 °C).
- If you’re nervous about over-cooking the marrow, set your timer for 15 minutes and check it at that point to see if it needs more time. If it’s still hard, it needs to keep cooking.
-
8Add a thick layer of the garnish to the bone marrow. Spoon on a generous amount of the parsley, shallots, oil, lemon juice and capers. Divide the garnish equally between each section of bone marrow, and then lay 2 sections of bone, garnish-side up, onto each person’s plate.[15]
- In addition to tasting great, the garnish also adds a really nice pop of color to your plate which makes the presentation look even nicer.


Presenting and Serving Bone Marrow
-
1Pair the dish with a light, refreshing salad to contrast the flavors. Arugula and lemon juice are great complementary flavors to pair with the buttery, decadent flavors of the bone marrow. Try to stay away from creamy dressings, like ranch or blue cheese, and instead choose a more acidic option.[16]
- If you have leftover parsley, you could even make a fresh, light tabouli to pair with the bone marrow.
-
2Serve bone marrow as an appetizer or as a main dish with steak. You can scoop out a little bone marrow and spread it on a piece of toast, or you could spread a little onto a piece of steak. It works wonderfully as an accompaniment to a great piece of protein, or you can use it as an appetizer before a main course.[17]
- Keep in mind that bone marrow is very rich, so you won’t want to pair it with other heavy foods, like potatoes or pastas.
-
3Use a flavored butter to add additional flavors without using a garnish. If you’re not into using fresh herbs to coat your bone marrow, consider using a flavored butter, like garlic butter, to enhance the rich flavor of the dish.[18]
- Add the butter to the bone marrow before cooking or spread it onto the marrow once it comes out of the oven.
-
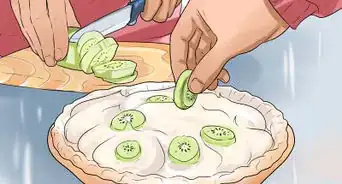
4Add blue cheese crumbles for a bitter, creamy accent. The bitter notes of the blue cheese pair really well with the rich, decadent nature of the bone marrow. Simply spread or crumble the cheese on top of the bone marrow to enjoy.[19]
- You could also use goat cheese (or even an herbed goat cheese) for another flavor component.


Things You’ll Need
Roasting Bone Marrow
- Measuring cups and spoons
- Sharp kitchen knife
- Cutting board
- Baking sheet
- Aluminum foil
- Mixing bowl
- Spoon
Presenting and Serving Bone Marrow
- Plates
- Utensils
Enjoying Bone Marrow at Home or at a Restaurant
- Prepared bone marrow
- Plate
- Chopsticks
- Spoon


References
- ↑ https://www.bonappetit.com/test-kitchen/ingredients/article/marrow-bones
- ↑ https://youtu.be/4SFgBD3StzM?t=157
- ↑ https://youtu.be/4SFgBD3StzM?t=37
- ↑ https://youtu.be/4SFgBD3StzM?t=132
- ↑ https://youtu.be/4SFgBD3StzM?t=174
- ↑ https://youtu.be/4SFgBD3StzM?t=190
- ↑ https://www.seriouseats.com/2012/07/how-to-eat-cook-bone-marrow.html
- ↑ https://www.bonappetit.com/test-kitchen/ingredients/article/marrow-bones
- ↑ https://www.bonappetit.com/test-kitchen/ingredients/article/marrow-bones
- ↑ https://www.bonappetit.com/recipe/roast-bone-marrow-and-parsley-salad
- ↑ https://www.bonappetit.com/recipe/roast-bone-marrow-and-parsley-salad
- ↑ https://www.bonappetit.com/test-kitchen/ingredients/article/marrow-bones
- ↑ https://www.bonappetit.com/recipe/roast-bone-marrow-and-parsley-salad
- ↑ https://www.bonappetit.com/test-kitchen/ingredients/article/marrow-bones
- ↑ https://youtu.be/4SFgBD3StzM?t=43
- ↑ https://www.seriouseats.com/2012/07/how-to-eat-cook-bone-marrow.html
- ↑ https://www.bonappetit.com/test-kitchen/ingredients/article/marrow-bones
- ↑ https://www.seriouseats.com/2012/07/how-to-eat-cook-bone-marrow.html
- ↑ https://www.seriouseats.com/2012/07/how-to-eat-cook-bone-marrow.html
About This Article