This article was written by Isabelle Garson and by wikiHow staff writer, Nicole Levine, MFA. Isabelle Garson is a Social Media Expert based in the San Francisco Bay Area. With 10 years of experience, she works in social media strategy and content production. She specializes in music and cannabis marketing and has worked with international touring artists. Isabelle studied graphic design at the Academy of Art University. Additionally, she holds a certification from Sprinklr Research Analyst Pro.
This article has been viewed 73,049 times.
This wikiHow teaches you how to use Snapchat to trim, split, and add special effects to videos on your phone or tablet. If you record a video that's longer than 10 seconds but shorter than 60 seconds, you can use some simple tools to remove parts of the video you don't want, as well as break the video into pieces you can edit separately. You can also add cool special effects to your videos, including Augmented Reality (AR) Lenses, speed effects, and location-based filters.
Steps
Trimming and Splitting
-
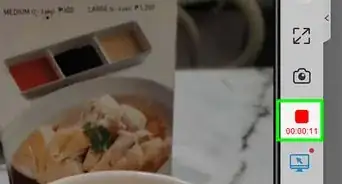
1Open Snapchat. It's the yellow icon with a white ghost. Snapchat videos used to have a 10-second maximum length. Now, if you want to record a video for a longer period of time, you can hold down the record button to create a Long Snap, which can be up to 60-seconds long.[1] When you create a Long Snap, you can trim off the parts you don't want to keep, as well as split it into segments that you can edit separately or remove entirely.
- You’ll use Snapchat’s integrated editing tools for this. It’s not the most complex stuff of all time, but it’ll get the job done!
-
2Upload a video from your Camera Roll (optional). Skip this step if you want to record a new video using Snapchat's built-in camera. If you want to upload a video you've already created (that's less than 60-seconds long, but more than 10-seconds long), you can trim (but not split it up into separate segments) in Snapchat. To do so:
- Instead of recording, tap the two overlapping images to the left of the large circle.
- Tap the Camera Roll tab at the top.
- Tap the three dots at the top-right corner.
- Tap Edit Video. After the video loads, you will see a preview, as well as some creative tools for editing.
Advertisement -
3Tap and hold the large circle icon to record a new video. If you uploaded a video from your Camera Roll, you can skip this step. Otherwise, as you record, a line will move around the circle. Once it makes a full rotation (ten seconds), the next segment of the recording will automatically begin. Release your finger when your video is complete, and you will see a preview, as well as some tools for editing.
-
4Tap the smaller preview of the video at the bottom-left corner. Now you'll see a timeline of your video. All of the 10-second segments are joined together as one long video.
- Remember, the fewer edits you make the more organic and genuine your video will feel, so don’t trim arbitrarily. It’s okay to publish more than one video!
-
5Drag the oval handles to surround the part of the video you want to keep. To trim or crop a video, drag the handle on the left to the place you'd like the video to begin, and the handle on the right to where it should end. Everything outside of the selected area will dim, which means it won't be in your final Snap.
-
6Drag the scissors upward to split the video at the desired point. You can't use this feature on a video you upload from the Camera Roll, but you can use it if you used the Snapchat camera to record. The Split feature is used to break the video into sections that you can edit separately, as well as cut out parts of the video you don't want to keep.
- To split the video in two at a certain point, wait until the tiny scissors appear at the correct moment, and then drag them upward. Now you'll see two separate video previews.
- You can tap either of the two videos to edit or trim it separately.
- If there's a part of the video you want to remove, you'll want to split the video right where that part begins and ends. Once you have that part isolated in its own segment, tap the segment, and then tap the X at the top-right corner.
-
7Apply text, stickers, music, and other fun features to your video. If you broke your video into segments, you can add different features to each segment. Even when you make each segment different, they'll still all appear as though they were one video with different editing tricks applied.
- For example, if you want to add text to just one segment, tap that segment, tap the T to open the text tool, and then add your text. The text will only show up in the video when that segment plays.
- To add a filter, swipe left or right on the large preview to cycle through the options. Stop swiping when you find the one you like.
-
8Share your Snap. After you're finished editing, tap Send To or the paper airplane icon to send the Snap to friends or share it to your Story.


Adding Special Effects
-
1Open Snapchat. It's the yellow icon with a white ghost. If you're creating a new video on Snapchat, you can choose from a variety of AR lenses before recording your video, as well as choose from as series of filters when you're finished.
-
2Tap the smiley face. It's in the lower-right area of the camera screen. This displays a carousel of Lenses you can apply to your video.
-
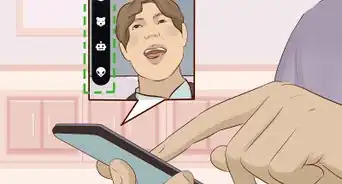
3Select the Lens you want to use. If you're recording yourself, you'll want to make sure to tap the icon of two squared-off arrows in the upper-right corner to switch to the selfie camera first. Then, move the camera back so your whole face is in the frame, and swipe across the carousel at the bottom to try on the Lenses.
- If you don't see a Lens you like, tap Explore at the bottom-right to see a gigantic gallery of Lenses that are categorized by type.[2]
- Some lenses require you do to different things, like tap the screen to identify your eyes, or open your mouth.
-
4Tap and hold the large circle icon to record a new video. As you record, a line will move around the circle. Once it makes a full rotation (ten seconds), the next segment of the recording will automatically begin. You can record for up to 60 seconds.
- Release your finger when your video is complete, and you will see a preview, as well as some tools for editing.
-
5Swipe right or left to add special effects. As you swipe, different filters will appear on your video. You can stop swiping when you find one you like.
- The snail plays your video in slow motion, while the rabbit speeds it up.
- The three backwards arrows plays your video in reverse.
- Some filters change the color or brightness of the video.
- If prompted, tap Enable to enable Location Filters (if you're okay with sharing your location) to experiment with filters specific to your area. For example, if you're at a baseball game and are using Location Filters, there may be a special filter for that stadium, or even that specific game. You can also tap a location to bring up other close-by locations, in case that one doesn't match.
- To layer multiple filters, swipe to one you like, and then tap the stack of papers with a plus symbol on the right side of the screen. Now you can swipe through the filters again and select another.
-
6Share your Snap. After you're finished editing, tap Send To or the paper airplane icon to send the Snap to friends or share it to your Story.


References
About This Article

1. Tap and hold the Record button for more than 10 seconds (up to 60 seconds).
2. Tap the preview at the bottom-left corner.
3. Drag the handles to crop out parts you don't want.
4. Drag the scissors up to split the video at a certain point.
5. Tap separated video segments to edit them separately.