X
This article was co-authored by wikiHow Staff. Our trained team of editors and researchers validate articles for accuracy and comprehensiveness. wikiHow's Content Management Team carefully monitors the work from our editorial staff to ensure that each article is backed by trusted research and meets our high quality standards.
This article has been viewed 116,295 times.
Learn more...
Greeting cards are lovely gifts to receive on holidays, birthdays or just because. But store bought greeting cards can be generic and oftentimes expensive. Lucky for you, you can easily find materials at home or in stores that you can use to create beautiful and personal greeting cards for your friends and family.
Steps
Method 1
Method 1 of 3:
Constructing the Base of Your Greeting Card
-
1Use construction paper. Construction paper is a great option for creating your card base; packs of construction paper include multiple color options and the paper itself is thicker than normal computer paper.[1]
- For a larger card, fold your construction paper in half, one time.
- For a smaller but sturdier card, fold your construction paper in half, then fold it in half again.
- Check your house – many people have construction paper hidden amongst their art supplies.
- If not, construction paper can be purchased at craft stores and drug stores.
-
2Consider basic sketching paper. Sketching paper is ideal for card making because it is fairly sturdy and also absorbs color well, making it easy to decorate by drawing with colored pencils, markers, crayons or by using paint.[2]
- If you have a drawing on sketch paper that you love, you can scan this drawing into your computer, then print it out on heavier paper, like cardstock.
- Sketching paper can be purchased at craft stores and at big-box retailers like Wal*Mart.
Advertisement -
3Try scrapbook paper. Scrapbook paper is great for card making because it is usually sold in books and each book contains many different sheets, each with different patterns and designs.[3]
- Scrapbook paper is thinner than some of the other paper options, so you’ll want to fold your paper in half two times to construct a sturdier card.
- You can also cut shapes out of scrapbook paper and use them to decorate the card you’re constructing.
- Scrapbook paper can be purchased at specialty arts and crafts stores.
-
4Experiment with cardstock. Cardstock is one of the most preferred options for creating greeting cards because it’s heavy enough that it can stand on its own without toppling over. The thicker and smoother the cardstock, the more high quality your finished card will look.[4]
- Score your cardstock by running a blunt piece of metal down the center of your card; this will make folding your card easier and will make your card look more professional.
- You can also purchase card making kits that have pre-cut cards made of cardstock. The benefit to using pre-cut cards is you’ll be able to start decorating your card faster.
- Cardstock and card making kits can be purchased at specialty craft stores.


Advertisement
Method 2
Method 2 of 3:
Decorating Your Card Using Things Found in Your Home
-
1Use your scrap paper to create greeting cards. If you’re a painter, chances are you use scrap paper to remove excess paint from your brush while painting. Instead of throwing out these scraps of paper, save them and use them as decoration for your greeting cards.
- Use cardstock to clean your brush in between paint colors.
- Cut the cardstock paint designs into squares and paste them onto your greeting card base.
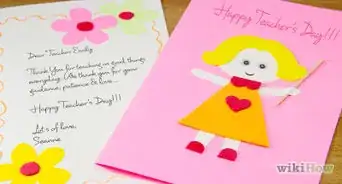
- Use a Sharpie marker to write your message across the design (try “Thank You” or “Happy Birthday”).
- Use the Sharpie Marker to create a scalloped edge for your design.
-
2Incorporate real flowers. If you have a beautiful bouquet of flowers in your home that are going to waste, try pressing them and using them to decorate your greeting card. Place your flowers facedown in a telephone book lined with parchment paper and allow them to press for a week before removing them.
- Attach the flowers to your card using dry adhesive dots.
- Make sure your flowers are completely dry before using them in your project.
-
3Create a grid of stickers. Most people have stickers lying around their art supply area. Take your card base and use the stickers to create a grid by laying them out in three rows of three stickers each. Attach the stickers and decorate the rest of the card however you please.
- Use a ruler to find the center of your card before attaching the stickers.
- Place an unusual material like a flower in the center of the grid to give the card some additional visual interest.
-
4Decorate your card with sewing supplies. If you have a sewing kit, the contents of that kit are perfect for decorating your greeting card. Create a flower out of safety pins by stringing beads onto your safety pins, then gluing the safety pins on the card base in a circular formation to create the flower’s petals.
- Glue a button in the center of the safety pin circle to create the flower’s pistil.
- Glue a piece of ribbon along the bottom of the card to add some more texture.
-
5Use paint chip samples to decorate the card. If you’ve recently painted your home, you probably have some paint chip samples lying around. Cut the paint chips into interesting shapes and glue them onto your card for a unique design.[5]
- Try cutting a green paint chip card into a triangle to make an ombre Christmas tree for the holidays.
- Cut small triangles out of a variety of different paint chip colors and use the triangles to create a banner to glue on your greeting card.
- If you don’t have paint chip samples lying around, you can go to your neighborhood paint store to request some.


Advertisement
Method 3
Method 3 of 3:
Decorating Your Greeting Card Using Store Bought Materials
-
1Try chalking. Chalking is a soft coloring technique involving a chalk palette, a dazzle sticker and a Q-tip. To try chalking, take a dazzle sticker and stick it on the greeting card. Dip the Q-tip into your color of choice on the chalk palette, then use the Q-tip to lightly color in the dazzle sticker.[6]
- A dazzle sticker is a raised sticker you can use to create an embossed effect.
- Chalk palettes and dazzle stickers can be purchased at specialty arts and craft stores.
- You can also just stick the dazzle sticker on your card without coloring it in.
-
2Experiment with inking. Inking is a technique used to make the edges of a greeting card more defined. Take an ink pad and gently run it around the perimeter of the card. This should darken the edges of the greeting card.[7]
- For a more distressed look, let the ink spill over onto the front of the card.
- For tricky edges, use a Q-tip to spread the ink on the card.
- Ink pads can be purchased at office supply stores and craft stores.
-
3Use brads. Brads are paper fasteners that come in both circles or other decorative shapes. To use a brad on your greeting card, make a small hole in your card using a needle or pin. Stick the prongs of the brad through the hole, then spread the prongs to attach the brad to the card.[8]
- Apply pressure on the legs of the brad to fold them into place.
- Brads can be purchased in specialty craft stores.


Advertisement
Community Q&A
-
QuestionWhat type of markers should I use to write on the paper?
 Community AnswerAny marker will work fine as long as the marker color stands out against the paper color.
 -
QuestionWhat kind of glue to use to attach pictures to front of card?
 HumanBeingTop AnswererMost glue sold in stationery shops or craft shops will stick pictures to cards. Try a glue stick or a PVA glue.
Advertisement

-Step-17.webp)
References
- ↑ https://www.youtube.com/watch?v=rOFlNUnFAbw
- ↑ https://www.youtube.com/watch?v=rOFlNUnFAbw
- ↑ https://www.youtube.com/watch?v=bVhybKqXNps
- ↑ https://www.youtube.com/watch?v=N_N6SuXcGNk
- ↑ https://www.youtube.com/watch?v=xqDZY_S5eXI
- ↑ http://www.paperwishes.com/cardmaking101/articles/basic-card-making-supplies.html
- ↑ http://www.paperwishes.com/cardmaking101/articles/basic-card-making-supplies.html
- ↑ http://www.paperwishes.com/cardmaking101/articles/basic-card-making-supplies.html
About This Article

wikiHow Staff
wikiHow Staff Writer
This article was co-authored by wikiHow Staff. Our trained team of editors and researchers validate articles for accuracy and comprehensiveness. wikiHow's Content Management Team carefully monitors the work from our editorial staff to ensure that each article is backed by trusted research and meets our high quality standards. This article has been viewed 116,295 times.
Co-authors: 9
Updated: February 26, 2023
Views: 116,295
Categories: Homemade Cards
Advertisement