This article was co-authored by Ryaan Tuttle. Ryaan Tuttle is a Home Improvement Specialist and the CEO of Best Handyman, Inc. in Boston, Massachusetts. With over 17 years of experience, he specializes in building home service businesses, focusing on creating scalable and efficient brands. With the help of his global team, the companies have achieved over 10+ million in sales and received recognition through magazine features, and enjoy partnerships with wikiHow and Jobber field service software. Boston Magazine and LocalBest.com have named Best Handyman Boston the Best Handyman in Boston. Ryaan holds Construction Supervisor and Home Improvement Contractor Licenses.
This article has been viewed 49,761 times.
If your old pine stairs are looking a little rough, you may be thinking about finishing them. Even though pine can be tricky to work with, there are ways to ensure that your treads are finished properly.
Steps
Sanding and Filling the Holes
-
1Use a power sander and a medium-grade disc to sand the treads. Attach a medium-grade sanding disc to a power sander, plug it in, and turn it on. Go over the entire surface of each tread to start smoothing out the roughness of the wood.[1]
- It's necessary to sand the surface of your treads before doing anything else. This should remove the unsightly orange tint of the pine, buff out scratches, and also allow the pine to better accept the stain.
- If you don't already have a power sander, purchase or rent one from your local home improvement store.
-
2Turn off the sander and switch to a fine-grade disc. Once you've gone over all of the treads, turn the sander off and unplug it. Remove the medium-grade sanding disc and attach a fine-grade sanding disc to the sander.[2]Advertisement
-
3Go over the treads again with the sander. Plug the power sander back in and turn it back on. Sand all of the treads again so that they achieve an even smoother texture.[3]
-
4Hand sand the corners and edges with sandpaper. You likely won't be able to reach the entire surface of the tread with a power sander. Get a few pieces of fine-grain sandpaper from a home improvement store. Roll a pencil up into a piece of the sandpaper and hand sand all of the corners, edges, and crevices that the power sander missed.[4]
-
5Fill all holes and cracks in the treads with wood filler. Get some wood filler from a home improvement store and squirt it into any little holes or cracks you notice in your treads. These can occur naturally in the grain, or as a result of staples and/or tacks that have held carpet to the stairs in the past.[5]
-
6Wait 24 hours for the wood filler to dry. Stay off of the stairs for at least 1 day after filling the holes and cracks so that the filler can dry all the way. Once you think the filler may be dry, touch a couple of the holes or cracks and see if the filler feels wet or sticky at all. If not, the filler has dried completely.[6]
-
7Sand the treads again. Sand the treads again with all of the holes filled in. Go over the treads with the power sander until they're smooth to the touch and then hand sand the tight spots again. This should ensure that the filler is flush with the tread surface.[7]


Cleaning the Treads
-
1Vacuum up excess sanding dust. After you're done sanding, go over the treads with a hand-held vacuum or use an attachment on your upright vacuum. Go over the entire surface area of the treads to ensure that no sanding dust is left behind.[8]
-
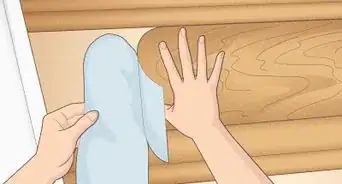
2Wipe down the treads with a tack cloth. Go to a paint store or a home center and buy a tack cloth. This is a special cloth that is sticky enough to pick up sanding dust, but doesn't leave moisture behind. Go over the surface of each tread with the cloth to remove all dirt, dust, and sanding dust.[9]
- You can also use a cheese cloth to wipe away the dust.
- If you'd rather make your own tack cloth, soak a piece of cotton fabric in water, wring it out, and then wet it lightly with turpentine. Drip some varnish onto the cloth and then wring it out to distribute the varnish evenly throughout the cloth.
-
3Fill in and buff out left behind holes and scratches. Wiping the treads with a tack cloth should give the treads a shiny quality, which will highlight any scratches or holes that you may have missed while sanding. If you find that you did miss some scratches, buff them out with sandpaper. If you notice any holes that you didn't see before, fill them with wood filler.[10]
- If you end up having to sand and fill in left behind scratches and holes, wait 24 hours before you vacuum each tread and wipe them down with a tack cloth as you did before.


Staining and Sealing the Treads
-
1Apply a coat of wood conditioner and wipe it away after 15 minutes. It can be challenging to stain pine uniformly, but wood conditioner allows for a more even application. Read over the product's instructions, and then wipe the conditioner onto each tread with a foam brush. Then, wait about 15 minutes for the conditioner to soak into the wood. When the time has passed, wipe away any excess with a rag.[11]
- You can get wood conditioner from a home improvement store.
- For best results, apply the conditioner in horizontal strokes.
-
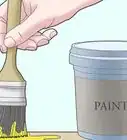
2Brush a coat of wood stain onto each tread. Get a wood stain from a home improvement store and brush it onto the stair treads with a bristle brush. Follow the directions on the can of wood stain, and make sure that you cover the entire surface of each stair by moving in long strokes and going with the grain as you apply.[12]
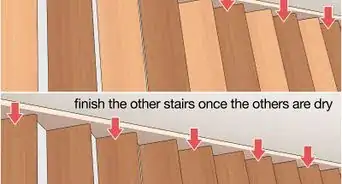
- If you need to get up and down the stairs, only stain every other tread for now. Once they're completely dry, stain the remaining treads.
-
3Wait a few minutes and then wipe off the stain. It's best to wipe it off with a rag right away if you want a light stain and to wait about 10 minutes if you want a dark stain. If you wait 10 minutes before you wipe off the excess and it's still not dark enough, apply a second stain and wait another 10 minutes or so before you wipe it off.[13]
-
4Let the treads dry for 24 hours. After you're done staining, the treads need a full day to dry. Be sure to stay off of the stairs during this time so that the stain isn't smudged or accidentally wiped away.[14]
-
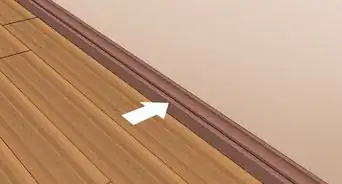
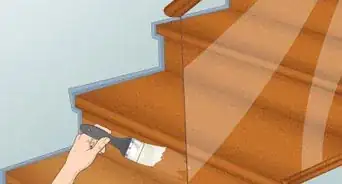
5Seal the stain with a coat of polyurethane for protection. Polyurethane is what seals your tread and keeps it from getting scratched or damaged. Use a large fine paintbrush to apply an oil-based or water-based polyurethane all over each tread. Apply the polyurethane in long, horizontal strokes.[15]
- You can find polyurethane at a home improvement store.
- For best results, follow the directions on the polyurethane and stir it right before you dip the brush into the can each time.
-
6Wait 24 hours and then apply a second coat of polyurethane. Give the treads at least a day to dry. Then, apply another coat of polyurethane just as you did before.[16]
- Add a third coat of polyurethane for a more protected seal.
- Return to using the stairs as usual 24 hours after the final coat.


Warnings
- Be very careful when working with power tools. If you don't follow safety precautions, you can get hurt.⧼thumbs_response⧽
Things You'll Need
- Power sander
- Medium-grade sanding disc
- Fine-grade sanding disc
- Sandpaper
- Pencil
- Wood filler
- Vacuum cleaner
- Tack cloth
- Wood conditioner
- Foam brush
- Wood stain
- Bristle brush
- Rags
- Polyurethane
- Paintbrush


References
- ↑ https://www.realhomes.com/advice/how-to-restore-a-pine-staircase
- ↑ https://www.realhomes.com/advice/how-to-restore-a-pine-staircase
- ↑ https://www.realhomes.com/advice/how-to-restore-a-pine-staircase
- ↑ https://www.realhomes.com/advice/how-to-restore-a-pine-staircase
- ↑ https://www.jennaburger.com/2012/06/staircase-makeover-filling-holes-and-staining-treads/
- ↑ https://www.jennaburger.com/2012/06/staircase-makeover-filling-holes-and-staining-treads/
- ↑ https://www.jennaburger.com/2012/06/staircase-makeover-filling-holes-and-staining-treads/
- ↑ https://www.realhomes.com/advice/how-to-restore-a-pine-staircase
- ↑ http://www.nytimes.com/1999/02/28/nyregion/home-clinic-pine-an-easy-wood-that-s-difficult-to-finish.html
- ↑ http://www.nytimes.com/1999/02/28/nyregion/home-clinic-pine-an-easy-wood-that-s-difficult-to-finish.html
- ↑ https://www.youtube.com/watch?v=pjimNAXsW0A&feature=youtu.be&t=1m59s
- ↑ https://www.jennaburger.com/2012/06/staircase-makeover-filling-holes-and-staining-treads/
- ↑ https://www.jennaburger.com/2012/06/staircase-makeover-filling-holes-and-staining-treads/
- ↑ http://www.nytimes.com/1999/02/28/nyregion/home-clinic-pine-an-easy-wood-that-s-difficult-to-finish.html
- ↑ https://www.jennaburger.com/2012/06/staircase-makeover-filling-holes-and-staining-treads/
- ↑ https://www.jennaburger.com/2012/06/staircase-makeover-filling-holes-and-staining-treads/
About This Article

To finish pine stair treads, attach a medium-grade disc to a power sander and sand the treads. Then, replace the medium-grade disc with a fine-grade disc and sand them again. Roll a pencil up into a piece of fine-grain sandpaper and hand sand all of the corners and edges. Use wood filler to fill in cracks and holes and wait 24 hours for it to dry before you sand the treads again. Then, vacuum up the sanding dust and wipe the stairs down with a tack cloth. To learn how to stain your treads with wood stain and protect them with polyurethane, scroll down!