This article was co-authored by Tanglewood Sue. Tanglewood Sue is a DIY and Upcycling Specialist and the Owner of Tanglewood Works out of Hyattsville, Maryland. With over nine years of experience, Sue specializes in upcycled painted furniture and other handmade, personalized, and sustainable goods. With her passion for art and reinvention, marketing experience, and Bachelor’s Degree in Broadcast Media, Sue has been able to create a business that not only provides quality pieces but empowers customers to create their works through her library of DIY tutorials and live demos as well as DIY supplies.
There are 15 references cited in this article, which can be found at the bottom of the page.
This article has been viewed 352,645 times.
Wood furniture is prized for its durability and timeless beauty. Unfortunately, the same warm, soft finish that makes it so attractive also makes it susceptible to scuffs, scratches, chips, and gouges. But there’s an upside—you can easily repair minor damage at home by using products like touch-up markers and wax filler sticks to restore the missing color. If you don’t feel like making a trip to the hardware store, you may also have some luck concealing the scratch with an everyday item like tea, coffee, iodine, or even a walnut.
Steps
Hiding Small Scratches with a Touch-up Marker
-
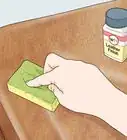
1Clean the damaged area thoroughly with a mild soap solution. Combine 1–2 teaspoons (4.9–9.9 mL) of mild liquid dish soap with about 1⁄2 gallon (1.9 L) of warm water in a large container. Dampen a soft, clean cloth with the soap solution and use it to remove dust, dirt, grime, and leftover polish from the area around the scratch.[1]
- After cleaning, wipe up any standing water and allow the surface to air dry completely.
- A microfiber or terry cloth towel will be perfect for cleaning wood furniture. Both materials are ultra-soft, which means you won't be risking further scratches.[2]
-
2Choose a marker in a color that matches the piece’s finish. Visit your local hardware store or home improvement center and head to the paint and finish aisle. There, you’ll find furniture touch-up markers in a wide variety of colors. Pick out a shade that most closely resembles the tone of the damaged wood.[3]
- If you’re not sure which color to go with, consider getting more than one. That way, you’ll have a better chance of finding a good match and spare yourself a second trip.
- Some furniture stores may also carry touch-up markers for DIY home repairs.
Tip: Snap a clear, well-lit picture of the scratched piece and take it to the store with you. It will help you track down just the right color.
Advertisement -
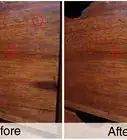
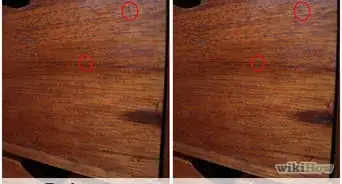
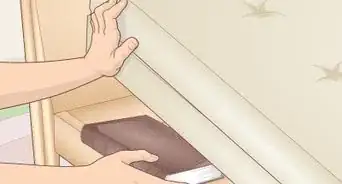
3Glide the tip of the marker over the scratch until it disappears. Touch-up markers work just like any other marker. Go over the spot as many times as needed to cover up the damage completely. It can help to move the marker in multiple directions from several different angles.[4]
- Allow the ink to soak into the exposed wood for at least 20-30 seconds before moving on to the next step.
- Be careful not to spread the ink to any part of the surrounding finish. If you accidentally get ink somewhere it’s not supposed to be, wipe it up immediately with a damp cloth to keep it from staining.[5]
-
4Blot the repaired scratch with a paper towel to remove excess color. When you’re satisfied with the coverage you’ve achieved, fold a paper towel and use it to lightly dab at the freshly recolored area. Doing so will soak up any ink standing on the surface of the wood, preventing it from running, bleeding, or causing moisture-related complications.[6]
- Dispose of the paper towel right away after use. Be sure to keep it away from other nearby objects and surfaces to avoid transferring the color.


Repairing Deep Gouges with a Wax Filler Stick
-
1Purchase one or more wax filler sticks designed for use on wood surfaces. Most home improvement centers and hardware stores stock these handy little items with paint and other finishing products. Select a stick in a color similar to that of the piece you’re rescuing.[7]
- If you’re torn between two colors, it’s usually safer to go with the darker one, as shades that are a bit too light tend to be more noticeable than those that are a bit too dark.
- While you're at it, go ahead and pick up a canister of paste wax, as well. You'll be using this wax to seal the newly-repaired finish.
Tip: You can also blend two or more separate colors inside the scratch to better approximate the exact shade of your piece’s finish.[8]
-
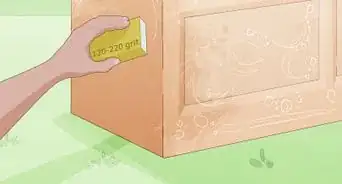
2Sand rough, uneven scratches with high-grit sandpaper before filling them. Some nicks and gouges have raised edges on one or both sides. Run your finger over the scratch. If there’s a marked textural difference, take a sheet of sandpaper and buff the area lightly until it’s completely level.[9]
- For best results, use a sheet that’s at least 600-grit. Coarser sandpapers are more likely to leave scratches, which is exactly the issue you’re trying to fix.
- Restrict your sanding to the scratch itself. Otherwise, you may inadvertently harm the finish on an adjacent part of the piece.
-
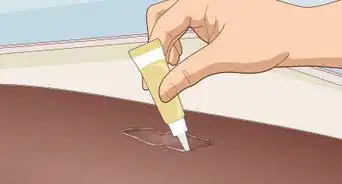
3Rub the stick over the gouge until it’s slightly overfilled. Hold the stick against the surface of the piece at an angle and push it back and forth over the scratch. Work your way along the length of the scratch until the wax builds up into a layer with a uniform texture and the exposed wood is no longer visible.[10]
- Moving the stick across the scratch rather than parallel with it will force the wax down deeper into the damaged area.
- If the stick you bought came with an applicator, use it to chip off a small piece of the wax and spread it over the scratch.[11]
-
4Scrape off the excess wax using a credit card or similar object. Drag the edge of the card over the filled scratch repeatedly with a light sweeping motion. Use only as much pressure as needed to remove the upper layer of wax. Although a standard credit card is somewhat flexible, it’s still rigid enough to cause scratches if you’re not careful.[12]
- Pause periodically and perform a touch test to see whether the area is smooth.
-
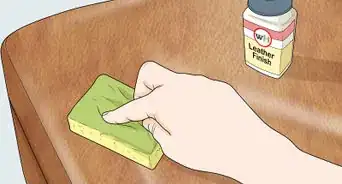
5Apply a thin, even coat of paste wax over the repaired area. Scoop up a pea-sized glob of the soft wax with a soft, non-shedding cloth. Dab the wax directly onto the filled scratch, then use small, smooth circular motions to buff it to a lustrous finish. You may need to spread on a second coat if you're up against an especially large gouge or chip.[13]
- Paste wax is derived from the wax of the Brazilian Carnauba tree and is completely safe to use on all types of wood furniture.
- In addition to sealing the scratch, the wax will also guard the wood against moisture and give it a like-new shine.[14]


Using Common Household Items
-
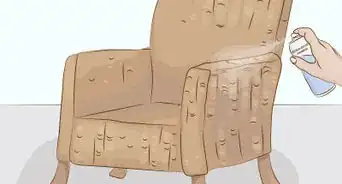
1Even out shallow surface scratches with mineral oil and pumice powder. In a small container, combine equal parts oil and powdered pumice to form a thin paste. Apply a conservative amount of the abrasive paste to the affected area before buffing it thoroughly with extra-fine steel wool scrubbing pad. As you polish, the scratch will vanish before your very eyes.[15]
- You can snag a bag of powdered pumice for just a few dollars from any major hardware store, as well as some beauty supply stores.
- The abrasive action of the steel wool and pumice together will gently wear away inconsistencies in the outermost part of the finish while the mineral oil nourishes and protects the wood.
-
2Use coffee or tea to mask thin scratches. Pour 3–4 tablespoons (44–59 mL) of hot water into a mug, then add a bag of strong black tea or a scoop of instant coffee. Let the liquid steep for about 5 minutes, then soak up a small amount with a cotton swab and press it firmly into the scratch.[16]
- When applied to bare wood, natural compounds in the coffee or tea known as tannins will essentially act as a natural stain, darkening the exposed wood by a few shades.[17]
- Only black tea will produce the desired effect—green, herbal, and other varieties of tea won’t impart enough color to disguise most scratches.
Tip: Wood stains made from tea and coffee are also great for bringing out the unique grain patterns in lighter woods.
-
3Hide scratches in dark wood surfaces with iodine. Saturate a cotton swab or small sponge brush with iodine and coax it into the heart of the scratch. Iodine dries to a dark brown color that’s ideal for camouflaging imperfections in woods like cherry, mahogany, rosewood, walnut, and teak.[18]
- Concentrate the iodine inside the scratch itself as best you can. It could stain if it ends up on a neighboring section of the piece.
-
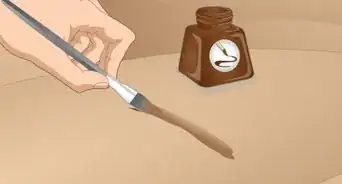
4Rub a shelled walnut onto the scratch to magically erase it in seconds. This one couldn’t be easier. Just take a walnut, remove the shell, and work it back and forth over the scratch with about the same pressure you would use to erase a pencil mark. Walnuts are rich in earthy oils that can make a fine substitute for finishes of a similar color.[19]
- You’ll get the best results cracking your own raw walnuts, which typically contain higher concentrations of natural oils.
- If you don’t happen to have any walnuts on hand, another type of oily nut, such as pecans or peanuts (or even peanut butter), may also do the trick.[20]


Expert Q&A
-
QuestionHow do you fix thin scratches without wood filler?
 Tanglewood SueTanglewood Sue is a DIY and Upcycling Specialist and the Owner of Tanglewood Works out of Hyattsville, Maryland. With over nine years of experience, Sue specializes in upcycled painted furniture and other handmade, personalized, and sustainable goods. With her passion for art and reinvention, marketing experience, and Bachelor’s Degree in Broadcast Media, Sue has been able to create a business that not only provides quality pieces but empowers customers to create their works through her library of DIY tutorials and live demos as well as DIY supplies.
DIY & Upcycling SpecialistIf the scratch isn't particularly deep, you can just sand the wood around the scratch down so that it reaches the same level as the bottom of the indentation. That way, the wood will be uniform. -
QuestionHow do I repair dents on a white mirror frame?
 Community AnswerFill the dents with caulk or tiny bits of plaster, sandpaper it down flat, and repaint the mirror.
Warnings
- No matter which method you go with, it’s important to make sure that you don’t leave any excess material on the scratch or any part of the surrounding finish. Most woods don’t take well to moisture, harsh oils, acids, and similar substances, which could contribute to premature deterioration.⧼thumbs_response⧽
Things You’ll Need
Hiding Small Scratches with a Touch-up Marker
- Mild liquid dish soap
- Warm water
- Microfiber or terry cloth towel
- Small container
- Furniture touch-up marker
- Paper towel
Repairing Deep Gouges with a Wax Filler Stick
- Wax filler stick
- Credit card or similar flexible plastic card
- High-grit sandpaper (optional—600-grit or higher)
- Hair dryer or heat gun (optional)
- Paste wax
- Non-shedding cloth
Using Common Household Items
- Mineral oil
- Powdered pumice
- Black tea
- Instant coffee
- Iodine
- Cotton swab
- Extra-fine steel wool scrubbing pad
- Sponge brush (optional)


References
- ↑ https://www.thisoldhouse.com/how-to/how-to-fix-furniture-finish
- ↑ https://www.realsimple.com/home-organizing/cleaning/how-to-clean-wood-furniture
- ↑ https://www.today.com/home/these-touch-markers-made-my-furniture-look-brand-new-t160382
- ↑ https://www.youtube.com/watch?v=wF7VFx6Djmg&feature=youtu.be&t=48
- ↑ https://www.thisoldhouse.com/how-to/how-to-fix-furniture-finish
- ↑ https://www.blueistyleblog.com/TouchUpStainWoodTrimFloorsFurniture/
- ↑ https://www.youtube.com/watch?v=xjDqlTxg2do&feature=youtu.be&t=37
- ↑ https://www.thisoldhouse.com/how-to/how-to-fix-furniture-finish
- ↑ Tanglewood Sue. DIY & Upcycling Specialist. Expert Interview. 24 March 2021.
- ↑ https://www.youtube.com/watch?v=Dnc2k8ZnMKk&feature=youtu.be&t=70
- ↑ https://www.youtube.com/watch?v=eyNUPhMh4F8&feature=youtu.be&t=43
- ↑ https://www.thisoldhouse.com/how-to/how-to-fix-furniture-finish
- ↑ https://www.thisoldhouse.com/how-to/how-to-fix-furniture-finish
- ↑ https://www.woodworkersjournal.com/understanding-oil-wax-finishes/
- ↑ https://www.thekitchn.com/fix-scratches-on-wood-22932271
- ↑ https://newengland.com/today/living/home-repair-diy/wood-furniture-scratches/
- ↑ https://sawsonskates.com/tea-stain-wood-furniture/
- ↑ http://www.dvo.com/newsletter/weekly/2013/04-12-558/fix-furniture-scratches.html
- ↑ https://www.thekitchn.com/fix-scratches-on-wood-22932271
- ↑ https://housewifehowtos.com/clean/fix-scratches-in-wood-furniture/
About This Article

To fix scratches in your wooden furniture, try using a wood-colored felt tip. You can find felt tips in a variety of wood tones to match your furniture in home improvement and hardware stores. Just rub the marker on the scratch to blend it in with the wood. Or, use a shelled walnut, which works great on light scratches. To use instant coffee to cover up scratches, just mix 1 tablespoon of coffee granules with a little hot water to make a thick paste. Then, rub the paste onto the scratch with a cotton ball and wipe away an excess with a dry cloth. For more tips, including how to cover up furniture scratches with black tea, read on!