This article was co-authored by Patrick Johns. Patrick Johns is a Home Improvement Specialist and the Owner of CatchAll Handyman Services. With more than 28 years of experience, he has worked on a variety of home improvement projects, such as carpentry, plumbing, and door and window installations in both commercial and residential properties.
There are 9 references cited in this article, which can be found at the bottom of the page.
This article has been viewed 65,589 times.
A drafty window lets in outside air, which can make it feel cold near the window. The loss of heat and the cold air getting in through a draft can also wreak havoc on your heating bills! You can use a quick fix if you need to fix a drafty window in a hurry, cover the window with plastic to seal out the draft, or try a more permanent fix such as caulking the window. Fixing a drafty window is an easy project no matter what option you choose.
Steps
Using Quick Fixes
-
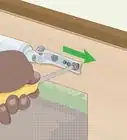
1Insulate the window with a strip of rope caulk. Rope caulk is a flexible putty-like caulk that you can press and mold into the edges of a window to seal drafts. Purchase rope caulk at a hardware store and press it into the edges of the window to seal it.[1]
- You can also try using V-seal weather stripping to seal the edges of the window. This is a special type of weather stripping that you can press into the edges of the window to seal up a draft.
-
2Fill in a crack in a window with clear nail polish. If a crack in the window is causing the draft, then you will need to replace the window to fix the draft. However, a temporary way to fix the draft is to paint over the crack with clear nail polish. Allow the nail polish to dry completely and add another coat if needed.[2]
- You may need to paint on 2 to 3 coats to ensure that the crack is fully covered.
- Keep in mind that you will still need to replace the window eventually. The nail polish will only hold for 1 to 2 months at most.
Advertisement -
3Place a weighted sock along the bottom edge of the window. You can purchase or make a weighted sock for blocking gaps in doors and windows. Place the sock along the bottom edge of the window or where the top and bottom pane meet to seal in more air and prevent drafts.[3]
- Check online or in a department store to purchase a window or door sock.
- Although a window sock won’t actually fix a drafty window permanently, this is the quickest and easiest way to stop a draft.
Tip: If you want to make your own window sock, get an old knee-length sock and fill it with rice or sand. Then, tie or sew the opening closed to keep the contents inside of the sock, and it’s ready to use!
-
4Put up thick curtains to cover the drafty window. Heavy curtains or specially made insulating curtains will also help to quickly reduce the effects of a draft. The curtains will not fix the problem, but this is a good option if you need to stop the draft in a hurry.[4]
- Light and noise blocking curtains are usually thick enough to provide some draft protection.
- You can also layer 2 curtains over the window or use fabric blinds, such as roman blinds.
-
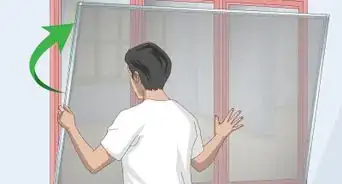
5Purchase and install interior storm windows. If you already have a storm window, then cover your interior windows with it to keep out drafts. If not, measure your window and purchase a storm window to fit it. Then, place the storm window over your regular window to easily seal out the draft.[5]
- Storm windows can be an expensive fix for drafty windows, but you can use them again and again.


Covering Windows with Plastic
-
1Purchase a plastic shrink wrap window kit. You can purchase a window insulation kit from a hardware store. These kits have everything you need to cover a drafty window. You can purchase kits with extra materials for covering multiple windows.[6]
- The kit should include double-sided tape and plastic for covering your windows. You can buy these items separately if you prefer.
-
2Apply 1 strip of double-sided tape along the edges of the window. Start by pressing the end of the tape into the edge of the window just outside of the glass. Dispense the tape and continue pressing it until you have covered 1 side of the window. Then, cut the tape when you get to the end of the edge.[7]
-
3Remove the covering on the double-sided tape after 10 to 15 minutes. Letting the tape sit for 10 to 15 minutes will allow it to get tacky and improve its bond with the window. After time is up, peel off the cover on the tape strips surrounding the window.[10]
- Discard the covering you remove from the tape strips.
-
4Press the plastic wrap onto the double-sided tape. Take 1 of the plastic pieces included with your kit and line up the corner with the corner of the window where you applied the tape. Then, press the plastic onto the double-sided tape. Slide your hands down the edge of the window over the plastic to secure it to the tape.[11]
- Repeat this for the top edge of the plastic. Then, pull the plastic taut and secure the other side and bottom edge of the plastic by pressing down on it.
Tip: For an extra layer of insulation, apply a layer over bubble wrap over the window first, and then apply the plastic over that. This will create a frosted glass effect and prevent you from being able to see through the windows, but it will provide more insulation and potentially save you even more on heating bills.
-
5Use a hair dryer to tighten the plastic. Once the plastic is secured on the window with the double-sided tape, plug in a hair dryer and turn it on. Hover the dryer’s nozzle over the plastic anywhere that it looks loose. This will help to shrink the plastic and create a tight fit with the window.[12]
- Make sure to keep moving the hair dryer around over the plastic. Avoid holding in one spot for more than 5 seconds as this may make a hole in the plastic.
-
6Trim the excess plastic to the size of your windows. After you have tightened up the plastic with the hair dryer, use a pair of scissors to cut off the excess plastic along the edges of the window. Be careful not to cut inside of where you applied the double-sided tape or you may break the seal.[13]


Sealing Drafts with Caulk
-
1Hold a candle up to the window to find the source of the draft. Light a candle and hold it up next to the window. Move it around the edges of the window and watch the candle to see if it flickers. If you notice the candle moving like it is being blown in the wind, then this is probably a drafty part of the window. Mark it with a piece of chalk or tape.[14]
- If you are not sure where the air is coming in from and you only want to seal up the drafty portion of a window, check to find the draft first.
Warning: Be cautious with the flame around curtains or blinds. You may want to remove them before you do this to prevent the possibility of starting a fire.
-
2Remove the old caulk and peeling paint from the window’s edges. Use a paint scraper to take all of the old caulk off of the edges of the window. Press the scraper against the edge of the window, and then move it upwards to loosen the caulk.[15]
- If there is any peeling paint, scrap this off as well since it will interfere with re-caulking the window.
-
3Wash the edges of the window with a scrub brush and soapy water. Fill a small bucket with soapy water and dip a scrub brush into it. Then use the scrub brush to wash along the edges of the window. Replace the soapy water with plain water and use the brush to rinse the soap away. Then, pat the window dry with a clean dry towel or paper towels.[16]
- Washing the window’s edges first will help to ensure that you get a tight seal with the new layer of caulk.
-
4Seal the edges with a new layer of caulk. Depress the plunger on the caulk tube to push it out as you run the tip of the caulk gun down the edge of the window. Continue to do this until you have completely covered 1 edge of the window. Then, repeat for the other 3 sides of the window. Allow the caulk to dry overnight, or for at least 8 hours to ensure that it is set.[17]
- Make sure to follow the manufacturer’s instructions for how to use the caulk properly.


Expert Q&A
-
QuestionWhat kind of windows will prevent cold drafts?
 Kevin TurnerKevin Turner is a handyman and the owner of Red Gator Maintenance, a handyman business based in Fresno, California. Working on handyman-related projects since the age of 12, Kevin specializes in a wide variety of home improvement projects such as (but not limited to) lighting/electrical, plumbing, deck staining, drywall repairs, cabinet installation, air conditioning, trash removal, and window, roof, and appliance repairs.
Commercial HandymanDual-pane windows are going to be your best bet. They're more energy-efficient, and they have a gap inside the 2 panes that acts as a barrier against cold air.
Things You’ll Need
Using Quick Fixes
- Rope caulk or weather stripping
- Clear nail polish
- Window sock
- Thick curtains
- Interior storm windows
Covering Windows with Plastic
- Double-sided tape
- Plastic window covering
- Hair dryer
- Scissors
Sealing Drafts with Caulk
- Candle and lighter
- Paint scraper
- Bucket
- Soap
- Water
- Scrub brush
- Clean towel or paper towels
- Paint scraper
- Caulk


References
- ↑ https://www.houselogic.com/organize-maintain/diy-repair/how-to-fix-drafty-windows/
- ↑ https://www.houselogic.com/organize-maintain/diy-repair/how-to-fix-drafty-windows/
- ↑ https://www.bobvila.com/slideshow/drafty-windows-solutions-for-every-budget-48200#bubble-wrap-diy-window-insulation
- ↑ https://www.bobvila.com/slideshow/drafty-windows-solutions-for-every-budget-48200#bubble-wrap-diy-window-insulation
- ↑ https://www.bobvila.com/slideshow/drafty-windows-solutions-for-every-budget-48200#bubble-wrap-diy-window-insulation
- ↑ https://www.bobvila.com/slideshow/drafty-windows-solutions-for-every-budget-48200#bubble-wrap-diy-window-insulation
- ↑ https://www.youtube.com/watch?v=3PkFKG4b7ic&feature=youtu.be&t=54
- ↑ Patrick Johns. Home Improvement Specialist. Expert Interview. 26 October 2021.
- ↑ Patrick Johns. Home Improvement Specialist. Expert Interview. 26 October 2021.
- ↑ https://www.youtube.com/watch?v=3PkFKG4b7ic&feature=youtu.be&t=74
- ↑ https://www.youtube.com/watch?v=3PkFKG4b7ic&feature=youtu.be&t=130
- ↑ https://www.youtube.com/watch?v=3PkFKG4b7ic&feature=youtu.be&t=148
- ↑ https://www.youtube.com/watch?v=3PkFKG4b7ic&feature=youtu.be&t=154
- ↑ https://www.bobvila.com/slideshow/drafty-windows-solutions-for-every-budget-48200#bubble-wrap-diy-window-insulation
- ↑ https://www.popularmechanics.com/home/how-to/a9582/how-to-winterize-drafty-windows-16024743/
- ↑ https://www.popularmechanics.com/home/how-to/a9582/how-to-winterize-drafty-windows-16024743/
- ↑ https://www.bobvila.com/slideshow/drafty-windows-solutions-for-every-budget-48200#bubble-wrap-diy-window-insulation
- ↑ https://www.houselogic.com/organize-maintain/diy-repair/how-to-fix-drafty-windows/
About This Article