This article was co-authored by Howard Fleischmann. Howard Fleischmann is an Automotive Tire and Repair Specialist and the CEO of Community Tire Pros & Auto Repair, with ten locations throughout Phoenix, Glendale, Yuma, and Casa Grande, Arizona. Howard specializes in full-service auto repair and tire replacement and care for domestic/imported vehicles and large trucks. Howard’s dedication to Community Tire Pros & Auto Repair has earned their team multiple awards and features including the 2021 Phoenix Magazine AZ State 48 “Best of the Best!”, the 2020 “Best of Phoenix” in Auto Repair, the 2013 Master SBD award, the 2013 National “Top Shop” award by Tire Review, the 2012 Diversity Champions Phx Business Journal, the 2009 BBB Ethics award, the 2008 Phx Chamber of Commerce Impact Award -” Small Business of the Year”, and the 2008 ASU Spirit of Enterprise award. Howard is often referred to as “The Car Guy” for local TV stations and is a regular on TV’s Channel 3 Sunday, Good Morning Arizona monthly.
wikiHow marks an article as reader-approved once it receives enough positive feedback. In this case, several readers have written to tell us that this article was helpful to them, earning it our reader-approved status.
This article has been viewed 416,709 times.
Having a flat tire is one of the major inconveniences of driving. When a good spare is unavailable, you either have to call a tow truck or fix the tire yourself. Luckily, the process of fixing it yourself is relatively straightforward and requires only a few tools.
Steps
Finding the Leak
-
1Inflate the tire. In order to find a leak the tire must be properly pressurized. You should inflate your tire with air until it reaches the appropriate pressure (measured in psi) specified in your vehicle's service manual.
-
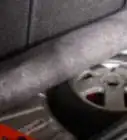
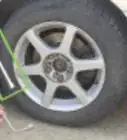
2Visually inspect the tire. Before moving on to more time consuming techniques, you should take a moment to look at your tire. If you notice any holes, cuts, or objects protruding from tire then you have found your leak.Advertisement
-
3Listen for a hissing sound. Even if you aren't able to see the problem right away you might be able to hear it. A hissing sound is a clear sign that air is leaking from your tire, and can help you locate the leak.
-
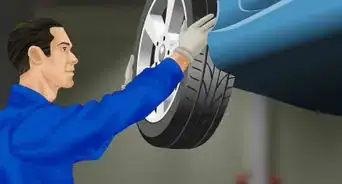
4Feel around the tire for air. If you run your hands over the tire carefully you may feel the leak even if you can't hear or see it.
-
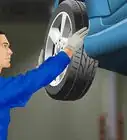
5Mix soap and water. If you followed the steps above and you were not able to easily find the leak don't fear. Spraying the tire with a little soapy water or window cleaner may help. If you see bubbling at any place on the surface of the tire then you have found your leak.[1]
-
6Cover the tire with the soap and water solution. You can use a spray bottle to spray the tire, or if a spray bottle isn't available you can just pour the mixture over the tire.
-
7Watch for bubbles. As air escapes the tire and encounters the soapy water mixture it will form soap bubbles. If you notice the soapy water bubbling at any particular place on the tire, you have found your leak.


Fixing the Leak with Tire Puncture Sealants
-
1Read the directions on the can of sealant you have brought. Various manufacturers have slightly different steps and required amounts you should put in. However, there are some steps that are generally the same.
- Keep in mind that newer tire models usually have tire pressure monitoring systems. Using tire puncture sealants can sometimes damage or destroy these systems.[2]
-
2Pull out any object that has punctured your tire. This may or may not be necessary depending on why your tire is flat.
-
3Turn the wheel until the valve is at the top of the wheel. Unscrew your valve cap. You will put the sealant in the same way that you would inflate your tire with air.
-
4Attach the nozzle of the product to the valve stem. Once you have it on securely, press a button to release the contents.
-
5Drive your car. You need to drive your car to rotate the tire. This allows the sealant to be distributed evenly inside the tire and prevents it from forming a heavy lump inside the tire.
-
6Replace your tire. Tire sealants are great to bail you out in a major crisis. Unfortunately they are only good for 3 days or 100 miles, whichever comes first. You should replace your tire before then to avoid possible problems.


Using a Tire Plug Kit
-
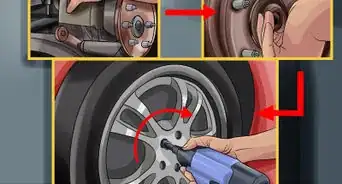
1Loosen the lug nuts with a lug wrench (tire iron) or impact wrench. It is important to remember to loosen, or break, the lug nuts before you jack up the vehicle. This way the weight of the vehicle is still on the wheels and it prevents them from spinning dangerously while you turn the lugs.
-
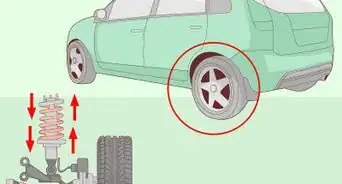
2Jack up the car. Once the lugs have been loosened, it will be necessary to jack the car up so that the wheels can be removed.[3] As mentioned above, this should be done on level concrete or some other hard, level surface. Some important things to remember when jacking up the car are:
- Your service manual will recommend jacking points
- The most common way to elevate the car is a floor jack, or trolley jack. If you are unsure how to use one visit Lift a Car Using a Trolley Jack.
- You should use jack stands to stabilize the car. A good tutorial on jack stands can be found at Use Jack Stands.
- If you have access to a hydraulic lift it will save you time.
-
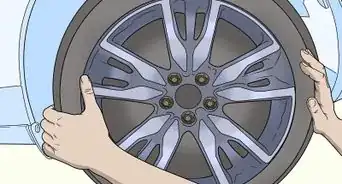
3Remove the lug nuts and pull the wheel off of the hub. At this point, the lugs may be loose enough to remove by hand. If not, finish removing the lugs with the lug wrench or impact wrench. Once the lugs are removed, pull the wheel off of the wheelbase.[4] If you are uncomfortable removing a wheel, read about how to Remove Lug Nuts and Tires.
-
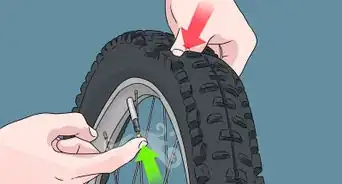
4Pull out any protruding object with a pair of pliers. It is also good practice to mark the spot with chalk or markers.
- When there's no protruding item, follow the above steps for locating a leak.
-
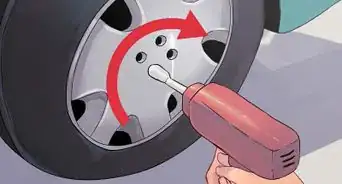
5Clean the hole with the rasp tool contained in the tire plug kit. This is done by inserting the tool in and out of the hole quickly. This also roughens the area so the fix will hold.
-
6Thread the plug through the center of the insertion tool. Both of these pieces can be found in your tire repair kit. This is sometimes difficult and requires squeezing down one end to make it fit though the hole first.[5]
-
7Use the insertion tool to force the plug into the hole. There should be roughly ½” of plug protruding from the tire.[6] If your kit came with an adhesive, such as rubber cement or glue, apply it to the plug before inserting. This will lubricate the plug, making it easier to push in. The adhesive will also promote a better seal.
-
8Cut away the excess plug material from the tire surface. Before doing this, you should let any adhesives used dry for at least one minute.
-
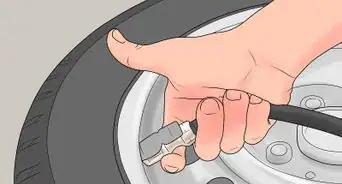
9Pump air into the tire. Use a tire gauge to check that the tire is at the manufacturer recommended air pressure.
-
10Apply some soap mixture onto the plug. This will allow you to check the seal to make sure it is holding. If it isn't holding, add a little cement or retry using another plug.
-
11Re-install wheel. You should slide the wheel back onto the wheelbase and thread the lug nuts on tight enough to hold wheel in place while the car is still on the jackstands.
-
12Lower the vehicle to the ground. Use the floor jack to lift the vehicle off of the jackstands. Remove the jackstands and lower the vehicle with the floor jack.
-
13Tighten the lugs to the specified torque. Once the weight is back on the wheels, use a lug wrench or impact wrench to tighten the lugs to the proper torque specifications in your service manual. Be sure to tighten lugs in a star pattern.
-
14


Community Q&A
-
QuestionShould I pull out the nail on the drive to the mechanics?
 Community AnswerNo, absolutely not! Removing the nail or screw allows the air pressure inside the tire to escape much faster, and you will end up driving on a flat tire. Do not remove the puncture item until you are at the place of repair.
 -
QuestionWhere can I get air when I'm at home?Community AnswerIdeally, use an air compressor. Otherwise, you can use a bicycle tire pump, but it will take longer.
-
QuestionWhen should I replace my tires?Community AnswerWhen there are visual signs of wear and tear, such as cracking on the tires or if the tires are releasing a lot of air.
Warnings
- Using commercially available sealants can void warranties on your tire. Check your warranty before using one of these products.⧼thumbs_response⧽
- Do not continue driving with a flat tire. This can cause irreversible damage to the tire's rubber and steel threads.⧼thumbs_response⧽
Things You'll Need
- Commercial tire sealant
- Tire plug kit
- Jack
- Jackstands
- Tire wrench
- Sponge or rag
- Pliers
- Chalk or marker
- Water
- Soap

References
- ↑ http://knowhow.napaonline.com/how-to-patch-a-tire-and-identify-air-leak-causes/
- ↑ Howard Fleischmann. Automotive Tire & Repair Specialist. Expert Interview. 4 June 2021.
- ↑ Howard Fleischmann. Automotive Tire & Repair Specialist. Expert Interview. 4 June 2021.
- ↑ Howard Fleischmann. Automotive Tire & Repair Specialist. Expert Interview. 4 June 2021.
- ↑ http://autorepair.about.com/od/fixityourself/ss/tire_plug.htm#step6
- ↑ http://autorepair.about.com/od/fixityourself/ss/tire_plug.htm#step7
- ↑ http://www.carsdirect.com/car-repair/tire-repair-tire-patch-vs-plug
- ↑ Howard Fleischmann. Automotive Tire & Repair Specialist. Expert Interview. 4 June 2021.
About This Article

The easiest way to fix a flat tire is to use a sealant product made for tire punctures. Inspect the tire for holes or protruding objects to locate where the air is escaping. If you don't see anything, inflate the tire and listen for a hissing sound. Use pliers to pull out any objects, then turn the wheel until the valve is at the top and unscrew the valve cap. Attach the sealant's nozzle to the valve stem and release the contents. Drive your car a few feet to distribute the sealant and be sure to replace your tire within 3 days! If you want to learn how to use a tire plug kit, keep reading the article!