X
wikiHow is a “wiki,” similar to Wikipedia, which means that many of our articles are co-written by multiple authors. To create this article, 58 people, some anonymous, worked to edit and improve it over time.
This article has been viewed 821,853 times.
Learn more...
Looking for a way to impress people with your money? Try folding a dollar bill into a fashionable ring. This ring has the number 1 faced out as the "gem," and if it's folded correctly it won't come apart. You can also create a ring out of a five, ten, or twenty dollar bill, though you might want to be careful flashing it around. If you want to learn how to make a folded dollar bill ring, keep reading.
Steps
-
1Place the bill on a flat surface, face up. It should have no wrinkles. Smooth it out as much as possible. This works best with a new, crisp dollar bill. If it’s old and wrinkly, consider ironing it first.
-
2Fold the top margin down. Do it so that the fold falls just under the white edge. Crease the fold with your fingernail. This covers the white edge and makes the finished ring a bit slimmer.Advertisement
-
3Fold the bottom margin up. Do it the same as the top fold, to cover the white edge. Crease the fold with your fingernail.
-
4Fold the bill in half lengthwise. Bring the top and bottom edges you created together. Crease the fold.
-
5Fold the bill in half lengthwise again. Run your fingernail or a pen over the fold to make it crisp and clean.
-
6Check the folds. Be sure they are all creased neatly.
-
7Orient the bill so that the numerals are facing out. Position it so they are right side up in front of you.
- You can fold under the white margins on either side if you'd like. Crease them right where the white part meets the green.
-
8Fold the right third of the bill upwards. Form a 90-degree angle with the fold. The placement of this fold can be adjusted to make the ring larger or smaller.
-
9Wrap the tab around the bill. Fold the part of the bill that is sticking up straight down behind the bill, making a crease along the edge.
-
10Turn the folded bill over.
-
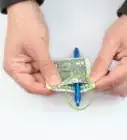
11Loop the end around. Take the long end that is now sticking out to the right, and curl it in a loop around the back. Pass the free end under the tab that is sticking down.
-
12Create the "gem." Take the short part of the bill that's sticking out behind the tab, fold it across, over the angled fold on the outside of the ring.
- Arrange the number so it's on the outside, then tuck the end underneath. This is the "stone" or "gem" part of the ring.[1]
-
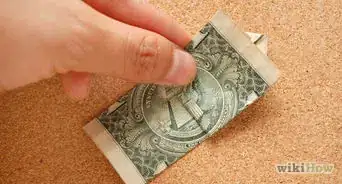
13Finish the ring. Fold the loose end that's still sticking down under and tuck it in under the "stone".
-
14Finished.
Advertisement
Community Q&A
-
QuestionWill folding down and under and tucking into the opposite side in the last step hold the ring together better than folding up and back?
 Community AnswerYes, it will. It will make the ring sturdier.
 -
QuestionCan you show this being done with a 20 dollar bill?
 Community AnswerA 20 dollar bill would be folded the same way. People usually do this kind of stuff with one dollar bills so that they're not wasting too much money on silly party tricks. You get the same effect with a one dollar bill as with a 20 dollar bill.
 -
QuestionHow long does it take to get really good at it?The amount of time it will take to get really good at it varies from person to person. Practicing will help with this.
Advertisement
Things You'll Need
- Any US-denomination bill will work, but if you have a choice, try to find a crisp, new bill rather than an older one.

About This Article
Advertisement