This article was co-authored by wikiHow Staff. Our trained team of editors and researchers validate articles for accuracy and comprehensiveness. wikiHow's Content Management Team carefully monitors the work from our editorial staff to ensure that each article is backed by trusted research and meets our high quality standards.
There are 22 references cited in this article, which can be found at the bottom of the page.
The wikiHow Video Team also followed the article's instructions and verified that they work.
This article has been viewed 252,179 times.
Learn more...
For kids and adults alike, paper rings are a fun, easy DIY jewelry project. But how can you craft the makeshift ring of your dreams? Don't worry, we've got you covered. By the end of this guide, you'll be able to express your unique style and enjoy getting a little arty, right from the comfort of your own home. Or, you can give a friend your ring as a sweet gift! Whether you want to make a simple wrapped paper ring, an intricate origami ring, or a ring made from a dollar bill, this article will show you everything you need to know. Keep reading to learn how to make your own paper rings at home!
Things You Should Know
- Create a simple wrapped paper band ring using two contrasting colors of paper.
- Use origami to craft a paper ring that includes a 3D jewel on the top. And the best part: complete your ring with folding alone, no glue needed.
- Fold a dollar bill to create an intricate, beautiful ring with a square face.
Steps
Making a Wrapped Paper Ring
-
1Cut two narrow strips of paper. Make two strips that are about 11 inches (28 cm) long by ¼ inch (.64 cm) wide. Cut them from two contrasting colors of paper. You can either use colored copy paper, or you can color plain paper with markers or crayons.[1]
-
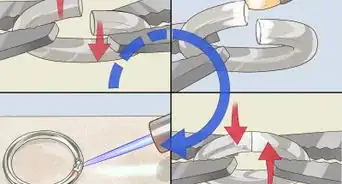
2Wrap a strip around a cylindrical object. Hold one end of the paper strip flat against the side of the object, then wrap the strip around so it meets in the middle.[2] Add a dab of glue at the end of the strip, then press the longer side of the strip on top to adhere.[3]
- Depending on your finger size, the cylindrical object might be the cap from a marker, chapstick, or glue stick. Try to find an object that’s similar to the size of your finger.
Advertisement -
3Roll and glue the paper. Continue rolling the strip on the cylindrical object, layering the paper directly on top of itself. Then adhere the loose end of the strip with a bit of glue. Slide the paper ring off of the object.[4]
-
4Weave the other strip around the ring. Add a dab of glue to the end of the second strip, then adhere it to the outside of the ring band at a 90° angle. Pull the loose end of the strip through the ring’s circle, the back to the outside. Keep wrapping the strip at a slight diagonal so the color of the ring peeks through.[5]
-
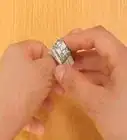
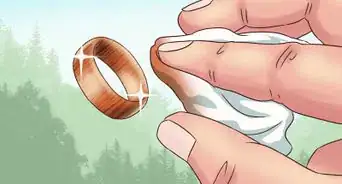
5Trim and secure the strip after wrapping. Shorten the strip once you’ve wrapped the entire ring and arrived back at your starting point. Adhere the loose end of the strip with a little glue.[6]
Creating a “Jeweled” Origami Ring
-
1Cut a piece of paper into a rectangle.[7] Make the rectangle about 4 inches (10 cm) long by 2 inches (5 cm) wide. You can use notebook paper, origami paper, colored copy paper, or even a chewing gum wrapper.
- Construction paper doesn’t work well for this project; it’s too thick and rips easily.
-
2Fold the rectangle in half lengthwise. Bring the bottom long edge up to the top long edge, making your rectangle about 4 x 1 inches (5 x 2.5 cm). Open it, revealing the center fold.[8]
-
3Fold the paper lengthwise, so the left and right edges meet in the middle. Fold the long sides of the paper all the way to the center fold and crease. The rectangle will be about 4 x 1 inches (5 x 2.5 cm) with a center seam.[9]
-
4Fold the paper in half widthwise, creating a shorter rectangle. Fold one short end of the rectangle over to meet the other short end, making a rectangle that’s about 2 x 1 inches (5 x 2.5 cm).[10]
- Apply a lot of pressure on this crease so it’s nice and crisp.
-
5Crease the corners of the folded edge inward. Bend the two corners of the short folded edge inward so they meet at the middle seam. Crease well to form a point at one short end of the rectangle. Unfold the two triangles, then unfold the rectangle widthwise so it’s long once again.[11]
- This step is similar to the process of folding a paper airplane.
-
6Push the center triangles inward. Note how the corner folds you made earlier have created triangle creases on each side. Push those triangles inward to make the rectangle collapse in half. Now the paper is open on one end and pointed on the other end.[12]
-
7Fold the long edges to meet in the middle. Notice how your paper has a top and a bottom layer. Fold up the long side of one layer to the center line and crease. Repeat for the other long side, folding it down to the center line. Flip the paper over without unfolding and repeat on the other side, folding the long sides to meet in the middle.[13]
- Your paper is getting smaller and smaller as you fold.
-
8Form the ring’s “jewel.” Gently pull the two ends of the rectangle apart. Grasp the unpointed ends of your paper and tug. The center of the ring will be 3-dimensional. Insert the eraser end of a pencil to pop the jewel out a bit more.[14]
-
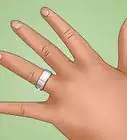
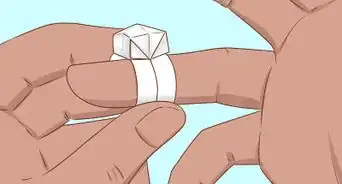
9Curl and secure the ring band. Lay your pencil on one of the rectangle’s short ends. Tuck the edge of the paper around your pencil and roll it toward the center to curl it. Repeat on the opposite side of the rectangle. Slide one end of the rectangle inside of the middle crease to create the band.[15]
Turn a Dollar Bill into a Ring
-
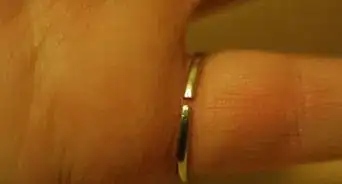
1Fold back the top white edge of the bill. Use a crisp dollar bill if possible. Place the bill facedown on the table, then crease the top border of the bill backwards.[16]
-
2Fold the bill in half lengthwise. Flip the bill over so it’s face up. Fold in in half lengthwise, then tuck the bottom edge of the bill beneath the white border flap.[17]
-
3Make another lengthwise fold. Bring the bottom edge up to the top edge and crease. Turn the bill so the words “The United States of America” are along the top.[18]
-
4Create a square with the number 1 in the center. Fold back the white border that's close to the 1 on the left short edge of the bill. Then, fold the portion with the 1 backward, forming a square. The 1 should be centered within the square.[19]
-
5Fold the ring band. On the side that says “The United States of America,” fold the right end of the strip upward at a 90° angle between the O and the F in the word “of.” (This creates a diagonal edge at the right bottom corner of the bill.) Roll the right side of the bill toward the left to form the band of the ring.
-
6Secure the vertical strip. Open the square flap towards the right and fold down the vertical strip. Lay the square back in place so it rests on top of the strip. Tuck the border flap of the “1 square” behind the left edge of the strip to secure it.[22]
-
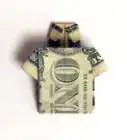
7Tuck in the excess strip. Weave the bottom of the vertical strip upward through the center of the ring. Tuck the remainder of the strip inside the pocket opening at the top of the square.[23] Wear the ring as-is, or fold the edges of the band inward to make the band narrower. Now you have a cha-ching ring!
- If the strip is difficult to tuck into the pocket, use a paperclip or the tip of a pencil to push it inside.
-
8Share the wealth. Make these rings as birthday gifts, or leave some origami dollar bill rings as a tip at a restaurant.

Craft an Origami Butterfly Ring
-
1Cut a rectangle and fold it in half lengthwise. Make a rectangle that’s about 6 inches (15 cm) long by ¾ inch (2 cm) wide. Fold the bottom long edge up to meet the top long edge and crease. Unfold the paper.[24]
-
2Crease the corners of the folded edge inward. Bend the two corners of the short folded edge inward so they meet in the middle. Crease well to form a point at one short end of the rectangle. Unfold the two corners, then unfold the rectangle widthwise so it’s long once again.[25]
-
3Push the center triangles inward. The corner folds you just made formed triangle creases on each side of the strip. Push those triangles inward to make the rectangle collapse in half. Now the paper is open on one end and pointed on the other end.[26]
-
4Fold the strip layers over the point on each side. Hold the pointed end of the paper and fold the top layer of the strip vertically over the point. Make the fold even with the base of the pointed triangle. Flip over the paper and repeat on the other side, folding the strip vertically to cover the point.[27]
-
5Create corner folds on the upper layer. Fold the corners of the closed end inward so they meet in the center. Then lift the bottom of the strip up so it covers the triangle corner folds, crease it, and let it fall back down to its original position.[28]
- The paper has multiple layers at this point; only work with the top layer throughout this step.
-
6Make a crease that covers half of the corner folds. Grab the upper layer of the strip on its left and right sides and bend it upward, creating a small “hill,” or bump, in the paper. Align the bump so it covers the triangle folds halfway, then press down to crease it.[29]
-
7Fold the top layer. Bend down the corners of the top layer and crease. Only fold them halfway to the center point; these corners do not meet in the middle.[30] Unfold the corners, then fold both long edges of the top layer inward. Crease at the center line.[31]
- The top layer will now resemble something close to a blunt arrow.
-
8Repeat on the other side. Flip over the paper, and repeat the 3 previous steps, starting with creating corner folds. The paper should now look the same on the front and back.[32]
-
9Open the strip by gently pulling the ends apart. Tug on each end of the strip to create the butterfly shape in the center. Trim an even amount off each end of the strip so that the paper will wrap around your finger with about ½ inch (1.27 cm) to spare.[33]
-
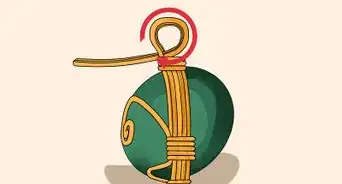
10Slide one end of the strip inside the other. Tuck one end of the strip into the slot on the other side of the strip. Slide it in about ½ inch (1.27 cm) to secure the ends of the ring.[34]

Community Q&A
-
QuestionCan you only make a money ring out of a dollar bill?
 Community AnswerNo, of course not! Any country's paper currency will work! You can also use American dollars in other denominations.
 -
QuestionCan I use white plain paper?Community AnswerYes, you can use any paper that you would like.
-
QuestionCan you use construction paper?
 Community AnswerNo, because it won't fold as easily. Paper rings require a lot of folding.
Things You'll Need
- Pair of scissors
- Pencil
- Paper
- Glue


References
- ↑ https://youtu.be/Gdqvasi1qKY?t=20
- ↑ https://youtu.be/Gdqvasi1qKY?t=32
- ↑ https://youtu.be/Gdqvasi1qKY?t=38
- ↑ https://youtu.be/Gdqvasi1qKY?t=88
- ↑ https://youtu.be/Gdqvasi1qKY?t=158
- ↑ https://youtu.be/Gdqvasi1qKY?t=257
- ↑ https://www.ccplonline.org/blog/childrens/diy-origami-ring/
- ↑ https://www.ccplonline.org/blog/childrens/diy-origami-ring/
- ↑ https://www.ccplonline.org/blog/childrens/diy-origami-ring/
- ↑ https://www.ccplonline.org/blog/childrens/diy-origami-ring/
- ↑ https://www.ccplonline.org/blog/childrens/diy-origami-ring/
- ↑ https://www.ccplonline.org/blog/childrens/diy-origami-ring/
- ↑ https://www.ccplonline.org/blog/childrens/diy-origami-ring/
- ↑ https://www.ccplonline.org/blog/childrens/diy-origami-ring/
- ↑ https://www.ccplonline.org/blog/childrens/diy-origami-ring/
- ↑ https://www.pbs.org/video/full-time-kid-dollar-bill-origami-ring/
- ↑ https://www.pbs.org/video/full-time-kid-dollar-bill-origami-ring/
- ↑ https://www.pbs.org/video/full-time-kid-dollar-bill-origami-ring/
- ↑ https://www.pbs.org/video/full-time-kid-dollar-bill-origami-ring/
- ↑ https://youtu.be/gyx6kmu4pOw?t=525
- ↑ https://www.pbs.org/video/full-time-kid-dollar-bill-origami-ring/
- ↑ https://youtu.be/gyx6kmu4pOw?t=524
- ↑ https://youtu.be/gyx6kmu4pOw?t=583
- ↑ https://youtu.be/tKbrluvGxHM?t=14
- ↑ https://youtu.be/tKbrluvGxHM?t=46
- ↑ https://youtu.be/tKbrluvGxHM?t=67
- ↑ https://youtu.be/tKbrluvGxHM?t=86
- ↑ https://youtu.be/tKbrluvGxHM?t=104
- ↑ https://youtu.be/tKbrluvGxHM?t=133
- ↑ https://youtu.be/tKbrluvGxHM?t=155/
- ↑ https://youtu.be/tKbrluvGxHM?t=169
- ↑ https://youtu.be/tKbrluvGxHM?t=218
- ↑ https://youtu.be/tKbrluvGxHM?t=271
- ↑ https://youtu.be/tKbrluvGxHM?t=283
About This Article