This article was co-authored by wikiHow staff writer, Jessica Gibson. Jessica Gibson is a Writer and Editor who's been with wikiHow since 2014. After completing a year of art studies at the Emily Carr University in Vancouver, she graduated from Columbia College with a BA in History. Jessica also completed an MA in History from The University of Oregon in 2013.
There are 7 references cited in this article, which can be found at the bottom of the page.
The wikiHow Video Team also followed the article's instructions and verified that they work.
This article has been viewed 45,952 times.
Learn more...
If you long for the delicate flavor of pears all year, preserve the ripe fruit in the freezer. To keep their color and texture, you'll need to peel the pears and soak them in vitamin C. Then, decide if you want to process them in a sweet syrup or freeze them in dry pieces. Either way, you'll be rewarded with delicious pears picked at the peak of freshness!
Steps
Choosing and Processing Pears
-
1Pick or purchase ripe pears. To determine if a pear is ready to pick or buy, gently squeeze near its neck. The flesh near the stem should be a little soft. If it's too hard, look for a different pear.[1]
- Avoid pears that are soft around the middle because these are probably already mushy.
Did You Know? Most pear varieties, such as Anjou, Bosc, Comice, and Seckel, don't change color as they ripen. If you get Bartlett pears, they should turn from green to yellow when they become ripe.
-
2Rinse the pears and peel them. Hold the pears under cool tap water to rinse away dirt. Then, place them on the counter and use a swivel or Y-peeler to remove the peels. You can discard the peels or use them to flavor liqueur.[2]
- If the pear is too soft to peel, it's probably too ripe to freeze.
Advertisement -
3Cut each pear in half and scoop out the core. Use a knife to carefully cut a pear in half lengthwise. Then, use a spoon or melon baller to remove the core with the seeds. You can also pull away the stem. Repeat this for each pear you want to freeze.[3]
- Try not to remove too much fruit from the center of the pear as you remove the core.
Tip: At this point, you can slice the pears or chop them into pieces according to your preference.
-
4Soak the pears in a vitamin C solution to prevent them from discoloring. Get out a large container and put 1 teaspoon (2 g) of crystalline ascorbic acid (vitamin C) into it. Pour in 1 gallon (3.8 L) of cold water and stir until the vitamin C dissolves. Then, add your peeled pears to the solution.[4]
- Let the pears soak while you prepare the syrup. If you aren't making syrup and would rather dry pack the pears, soak the pears for at least 10 minutes.
- If you can't find crystalline ascorbic acid, crush 6 500-mg vitamin C tablets.

Freezing Pears in Syrup
-
1Put the pears into a pot with sugar and water. You can customize how sweet or heavy you want the syrup to be. Place all of the pears you want to freeze into a large pot and add the syrup ingredients. To make:[5]
- Light syrup: use 1 2/3 cups (333 g) of granulated sugar and 4 cups (950 ml) of water
- Medium syrup: use 2 2/3 cups (533 g) of granulated sugar and 4 cups (950 ml) of water
- Heavy syrup: use 4 cups (800 g) of granulated sugar and 4 cups (950 ml) of water
-
2Boil the pears in the syrup for 1 to 2 minutes. Turn the burner to medium-high and stir the mixture gently. The sugar should dissolve as it begins to boil. Let the pears cook in the syrup for 1 to 2 minutes.
- You can skim off foam if it floats to the surface.
-
3Chill the pears in the syrup until they're cool. Turn off the burner and place the pot with the pears into the refrigerator. You could also transfer them to a different container if you'd like them to cool faster. Refrigerate the pears until the fruit and syrup are cool.
-
4Fill your containers and leave 1⁄2 to 1 inch (1.3 to 2.5 cm) of headspace. Spoon cooled pears into clean freezer-safe containers and pour in enough syrup to cover the fruit. If you're using wide-mouthed containers, leave 1⁄2 to 1 inch (1.3 to 2.5 cm) of headspace. If you're using narrow-top containers, leave 3⁄4 to 1 1⁄2 inches (1.9 to 3.8 cm) of headspace.[6]
- Remember to wipe the rims of the containers before you seal them shut.
Tip: Figure on using 1⁄2 to 2⁄3 cup (120 to 160 ml) of syrup for every 2 cups (450 g) of pears.
-
5Label the containers and store the pears for up to 10 to 12 months. Use a permanent marker to write on each container so you know that they have pears inside. Then, write the date you initially froze them.[7]
- When you're ready to defrost the pears, transfer a container from the freezer to the refrigerator and let it thaw overnight.

Dry-Packing Pears
-
1Line a sheet with parchment paper. Get out a baking sheet that will easily fit inside your freezer. Tear off a sheet of parchment paper and lay it on the sheet. The silicone in the parchment paper will prevent the pears from freezing to the sheet.[8]
- If you don't have parchment paper, you can use a silicone baking mat.
-
2Drain the pears and lay them on the sheet. If you're freezing just a few pears, use a slotted spoon to lift the pears out of the vitamin C solution. To drain a large number of pears, place a strainer in the sink and slowly pour the pears into it. Then, arrange the pears on your parchment-paper lined sheet so there's at least 1⁄4 inch (0.64 cm) of space between each.[9]
- If the pears are touching while they freeze, they'll freeze in a clump that's difficult to separate.
Variation: If you'd like to lightly sweeten the pears, mix 1/2 cup (100 g) of sugar into every 1 US quart (0.95 L) of pears after you've drained them.
-
3Freeze the pears on the sheet until they're hard. Place the sheet into the freezer and leave them until they're frozen solid. Depending on the size of the pear pieces, this could take 1 to 2 hours.[10]
- It's fine to leave the pears on the sheet in the freezer overnight.
-
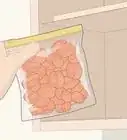
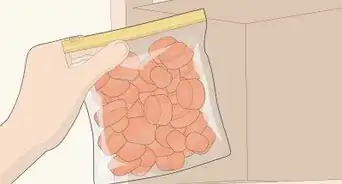
4Pack the frozen pears into sealable freezer bags. You can use any size freezer bags as long as they seal well. Fill your bag completely full of the frozen pears and squeeze out as much air as possible before you seal it shut.[11]
- If you'll be using the pears for different purposes, consider dividing them into different size bags. For example, fill a few sandwich bags with frozen pears so you can quickly measure out fruit for a smoothie.
-
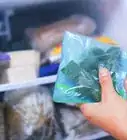
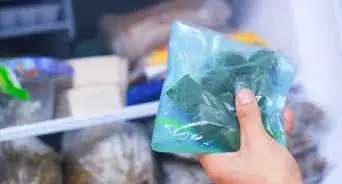
5Label the bags and store the pears in the freezer for up to 10 to 12 months. Use a permanent marker to label the bags with what's inside and the date you processed the pears. Then, place the bags of pears in the freezer and use them within 10 to 12 months.[12]
- You can use the pears while they're still frozen or thaw them overnight in the refrigerator.


Things You'll Need
Choosing and Processing Pears
- Peeler
- Paring knife
- Cutting board
- Crystalline ascorbic acid
- Large container
- Melon baller, optional
Freezing Pears in Syrup
- Measuring cups
- Pot
- Spoon
- Freezer-safe containers with lids
- Permanent marker
- Slotted spoon or strainer
Dry-Packing Pears
- Baking sheet
- Parchment paper or silicone baking mat
- Permanent marker
- Slotted spoon or strainer
- Freezer bags


References
- ↑ https://usapears.org/fun-facts-faqs/
- ↑ https://www.craftybaking.com/howto/pears-how-to-peel-and-core
- ↑ https://extension.psu.edu/lets-preserve-pears
- ↑ https://extension.psu.edu/lets-preserve-pears
- ↑ https://apps.chhs.colostate.edu/preservesmart/produce/freezing/pears/
- ↑ https://apps.chhs.colostate.edu/preservesmart/produce/freezing/pears/
- ↑ https://www.bhg.com/recipes/how-to/how-to-freeze-fresh-pears/
- ↑ https://www.hgtv.com/outdoors/gardens/garden-to-table/freezing-pears
- ↑ https://extension.psu.edu/lets-preserve-pears
About This Article