This article was co-authored by Bianca Cox. Bianca Cox is a Hair Stylist, Licensed Cosmetologist, Owner of The Hair Throne, and Co-Owner of Bianchi Salon. Her salons pride themselves on their modernity, individuality, art, and professional services. You can check out The Hair Throne and more of Bianca's hairstyling on Instagram @hairthrone and on her personal Instagram @biancajcox.
This article has been viewed 678,108 times.
Getting wavy hair does not always have to involve curling irons and other heat-based tools. It can be as simple as getting your hair damp and styling it a certain way before you go to sleep. This article will show you a few ways to get wavy hair overnight. Keep in mind, however, that if your hair does not hold curls or waves well, you might need to use some hair styling products, and the results may not last for very long.
Steps
Using a Headband
-
1Start with slightly damp, but not wet, hair. This is important; if your hair is too wet, it won't dry all the way overnight. You can dampen your hair by lightly misting it with some water.
- You can also add a little bit of hair product, such as mousse, light gel, or styling cream. This will help the wave hold better.
-
2Make sure that your hair is tangle-free and parted how you want it to be. Once you have the headband on, you won't be able to part your hair. It won't be a good idea to part your hair after you get the waves in. Doing so might disrupt the wave pattern.Advertisement
-
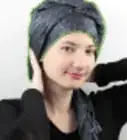
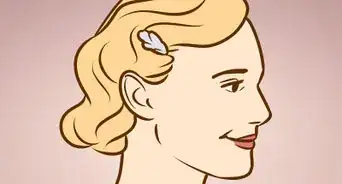
3Place a thin, stretchy headband over your hair and around your head. The headband should be no more than an inch (2.54 centimeters) thick. If you have one of those really wide headbands, then try folding it over inward. You can also make your own by wrapping a piece of elastic around your head and knotting it.
-
4Gather a small section of hair from the front of your head. The section should be no more than a few fingers wide.
-
5Twist the section away from your face, then tuck it under the headband. Pull the section up, over, and through the headband. Gently slide it back towards your face to make room for more sections.
-
6Pick the section up again and gather some more hair. You will be adding hair to the section after each time you wrap it around the headband. Gather your sections and incorporate them in the same way you would when French braiding your hair.
-
7Wrap the now-thicker section once around the headband. Be sure to tuck it under the headband. Also, try to keep the hair fairly loose as you wrap it. If you wrap the hair too tightly, it will end up being curly instead of wavy.
-
8Keep going until you reach the back of your head. Continue to gather and wrap sections of hair around the headband until you reach the back of your head. You'll stop halfway around your head. You should have half of your hair wrapped at this point.
-
9Repeat the process on the other side of your head. Repeat the gathering and wrapping process for the other side of your head, and stop when you reach the back of your head. You will likely have a long tail left over. That is okay. You will tuck it in during the next step.
-
10Twist the remaining hair into a rope. Reach around to the back of your head and find the extra hair strands that you didn't tuck in. Twirl them into a rope. If you have enough room in your headband, you can try wrapping that rope around the headband. If you do not have enough room, roll the rope into a bun, then secure it to the back of your head with bobby pins.
- You should also tuck or pin any flyaway strands or loose strands the managed to escape the wrapping process.
-
11Adjust the headband if necessary. If the headband is tight, it may leave an imprint on your forehead the next day. To prevent this from happening, simply slide the headband up on your forehead until it reaches your hairline.
-
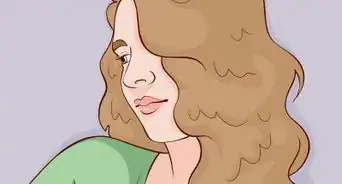
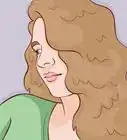
12Remove the headband in the morning and style your hair. Start by pulling out any bobby pins. Gently slide the headband up and out of your hair. If it does not come off easily, you may have to unwind the strands of hair from around it. Do not pull too hard, however; if you do, you may end up stretching the waves out. Once you have the headband and bobby pins out, you can comb your fingers through your hair to soften the waves.
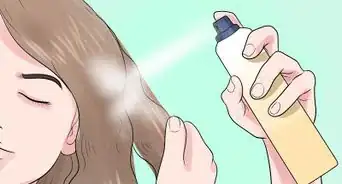
- For extra hold to make your style last longer, set your waves with some hairspray or styling cream.


Using a Sock Bun
-
1Find a sock you don't care about. Choose a sock that still has plenty of elasticity or "stretch" to it. If you choose an old sock that is too loose, the ring might not hold later on. Make sure that the sock is clean, but not one that you will wear again. You will be cutting this sock.
-
2Cut the toes off the sock using a pair of scissors. You will end up with a tube that has an opening at both ends.
-
3Roll the sock into a ring. Take the cut part of the sock, and fold the first inch (2.54 centimeters) or so inward. Keep rolling and the sock like this until you get to the other end. You should end up with a sock doughnut.
-
4Pull your hair up into a high ponytail. Try to make the ponytail right on top of your head. Secure it with a hair tie.
- If you need help getting your ponytail so high bend forward so that the top of your head is pointing towards the ground. Your hair will be hanging straight down. Pull your hair together and wrap a hair tie around it. Straighten yourself back up.
-
5Spray your ponytail with just enough water to make it slightly damp. Try not to make your hair too wet, or it will not be able to dry overnight.[1] You do not need to spray the hair on the top of your head.
- Try adding a little bit of mousse, light gel, or styling cream into your hair. It may help the wave last longer the next day.
-
6Slip the ponytail through the sock ring. Pull the sock ring up to the top of your ponytail, leaving just a little room between the sock ring and your head.
- You need this extra space so that you can feed the ends of your hair through the ring in a later step.
-
7Tuck the hair around the sock evenly. Spread the hair coming out through the top of the sock ring all the way around the ring, making it look like the petals of a flower. Bring sections of your hair over the sock ring before tucking them securely under the sock.
- Make sure that the hair is spread out evenly so that the waves will be even later on.
- All the ends need to be tucked under the sock before you can press on.
- If your hair is very long, you may need to slide the sock up your ponytail some so that you can comfortably fold the ends into the sock.
-
8Roll the hair onto the sock. Hold the sock with two hands, and roll it in a downward motion. As you roll, your hair will feed through the hole, upward, and around the sock. Use your fingers to help guide the hairs around the sock.
-
9Continue until you reach the base of your ponytail. Roll your hair around the sock until you reach the base of your ponytail, directly next to your head. As you roll, keep your ponytail straight up so that the hair remains taut.
- You should not need to pin the bun in place. It will usually be secure enough on its own thanks to the elasticity of the sock.
- Consider slipping another sock or bun wrap over your sock bun. This will keep the hair in place while you sleep. If you use another sock, make sure that you slide it all the way onto the bun, so that the sock doesn't flop around.
-
10Remove the sock bun in the morning and style your hair. Carefully unroll your hair the next morning and take out the sock ring. Make sure that you don't pull too hard, or you may stretch out the waves. Pull out the hair tie and let your hair fall down naturally.
- If your hair is not quite the way you want it, you can work with it to try to increase the wave. You can add more styling products, such as mousse, gel, or styling cream, and then scrunch. This may add more waves.
- If your waves are too tight, try running your fingers through them, or brushing them gently. This will help soften the wave.


Twisting Your Hair
-
1Add styling product to damp hair. Damp hair is easier to work with and will help your style hold longer. If your hair is dry, lightly mist your hair with some water. Try not to get it too wet, or it won't dry all the way and the waves won't stay.
- For better hold, apply a mousse, light gel, or styling cream.[2]
-
2Part your hair how you normally would part it. You will end up with two sections: a left and a right. Since you will be working with one section at a time, you can keep the other one out of the way by wrapping a hair tie around it.
- You don't have to part your hair down the middle; you can also part it to the left or right.
-
3Take one of the sections and start twisting it away from your face.[3] Keep twisting it until you get to the end of your hair. You will end up with a sort of rope.
-
4Secure the twisted hair to your head. Wrap a thin, elastic band around the end of the hair rope. Pull the hair rope up and around your head, like a headband. Place the end of the rope on top of your head, right above the forehead. Clip it to the rest of your hair using some bobby pins. Try making an X shape with your bobby pins; this will create the most secure hold.
- You can also wrap your hair into 1 or more buns at the nape of your neck. This may be easier if you have thick, heavy hair.
-
5Repeat the process for the other side. If you kept the hair out of the way with a hair tie, then remove the hair tie first. Twist your hair away from your face until you get a rope. Then, pull the rope up and over your head, and secure it to the rest of your hair with some bobby pins. Try to keep it either just in front or just behind the first rope.
-
6Add more bobby pins, if necessary. If you have thick, heavy hair, you might need more bobby pins to secure it. Secure the ropes to the sides of your head with two or three more bobby pins per side; you do not need any more pins on the top of your head.
-
7Wait until morning before unraveling your hair. Pull out the bobby pins and unravel your hair. Use your fingers to comb out the twist, and break up the waves a little. If you need to, add some hairspray or styling cream to make the waves last longer.
Making Mini Buns
-
1Apply your styling product to damp hair. Make sure that your hair is not soaking wet, however, or it may not dry all the way by the next morning. Lightly coat your hair with mousse, light gel, or styling cream. This will help your waves last longer.
-
2Divide your hair into at least 3 sections, and secure each one with a hair tie. Start by pulling your hair into a half-up half-down ponytail. Wrap a hair tie around the ponytail. Next, separate the bottom part of your hair into two pigtails. Secure each one with a hair tie. You will be removing the hair ties later; they are in there to keep your hair out of the way.
- You can divide your hair up into more sections. For example, you can have two sections at the top, and two at the bottom. The more sections you have, the wavier and curlier your hair will be.[4]
EXPERT TIPBianca Cox is a Hair Stylist, Licensed Cosmetologist, Owner of The Hair Throne, and Co-Owner of Bianchi Salon. Her salons pride themselves on their modernity, individuality, art, and professional services. You can check out The Hair Throne and more of Bianca's hairstyling on Instagram @hairthrone and on her personal Instagram @biancajcox.Professional Hair Stylist Bianca Cox
Professional Hair StylistOur Expert Agrees: If you want to curl your hair overnight without heat, you can put your hair into two big braids, or you can wrap your hair in several buns before you go to bed. Then, when you wake up, take your hair down, and you'll have soft waves.
-
3Remove the hair tie from the top section and twist it into a rope. Keep twisting tightly until you get to the end of your hair.
-
4Roll the hair rope into a bun and pin it in place. Continue gently twisting the section of hair until you feel it begin to roll into a bun. Wind the hair around itself naturally until a small bun form. Secure it in place with bobby pins. You may also need to wrap a hair tie around it to keep it in place.
-
5Repeat with the bottom two sections. Do each section one at a time. Take the hair tie off of the left section, twirl the hair into a rope, and roll it into a bun. Secure it with bobby pins before moving onto the right section.
-
6Remove the buns in the morning. Sleep on your hair and remove the pins and hair ties in the morning. Gradually unwind and untwist your hair, brushing your fingers through the waves to create a more natural look.
- You can also use a little gel, mousse, or hairspray to give your waves extra hold, if needed.
Expert Q&A
-
QuestionIf your hair is too wet in the morning, will it not work as well?
 Laura MartinLaura Martin is a Licensed Cosmetologist in Georgia. She has been a hair stylist since 2007 and a cosmetology teacher since 2013.
Licensed CosmetologistYour hair must be completely dry in the morning for any of these techniques to work, as wet hair cannot hold the style. For thick hair, it's best to dampen it with a spray bottle rather than starting with wet hair. If you do wake up with hair that's still wet, you can dry it with a diffuser. -
QuestionIs there a way to make your hair wavy without twisting it?Laura MartinLaura Martin is a Licensed Cosmetologist in Georgia. She has been a hair stylist since 2007 and a cosmetology teacher since 2013.
Licensed CosmetologistYou can use a double barrel curling iron to create waves. As another alternative, put your damp hair in boxer braids, then let it dry. When you unbraid it, your hair should retain waves. -
QuestionDoes this work with thick hair?
 Community AnswerYes. Just use a bit more water.
Warnings
- This may not work on all hair types. If your hair does not hold curls or waves easily, this style may not last for very long.⧼thumbs_response⧽
Things You'll Need
Using Sock Bun[6]
- Long sock
- Scissors
- Hair tie
- Spray bottle
Using a Headband
- Spray bottle
- Elastic headband
- Bobby pins
Making Twists and Buns
- Spray bottle
- Elastic hair ties
- Bobby pins
References
- ↑ A Spotted Pony, How to Use a Sock Bun to Get Beautiful Curly Hair Without Heat
- ↑ Brit + Co., Hair Hacks: 3 Foolproof Ways to Make Waves
- ↑ Allure, 3 Ways to Fake Beach Waves
- ↑ At the Pink of Perfection, Effort-less Hair Part II: Mini-bun Technique
- ↑ Allure, 3 Ways to Fake Beach Waves
- ↑ A Spotted Pony, How to Use a Sock Bun to Get Beautiful Curly Hair Without Heat
- Videos provided by Vivian V
About This Article
To get wavy hair overnight, start by putting a thin, stretchy headband around the top of your head like a crown. Next, take a section of damp hair in the front and twist it away from your face before tucking it into the headband and pulling it through from the bottom. Then, add more hair to the section you just pulled through, twist it, and tuck it through the headband again. Repeat this step until all the hair is at the back of your head, then twist the ends into a bun. In the morning, remove the headband and run your fingers through your hair to separate the waves. For tips from our Beauty reviewer on how to get wavy hair using a sock bun, read on!


-Step-10-Version-4.webp)