This article was co-authored by Maggie Moran. Maggie Moran is a Professional Gardener in Pennsylvania.
There are 7 references cited in this article, which can be found at the bottom of the page.
wikiHow marks an article as reader-approved once it receives enough positive feedback. In this case, several readers have written to tell us that this article was helpful to them, earning it our reader-approved status.
This article has been viewed 102,660 times.
There are many varieties of birch trees – paper, gray, yellow, river, and white birch – though the paper birch is perhaps the most distinctive, with its curling white bark. If you want to grow this classic tree in your yard, collect and store the seeds in the fridge over the winter, then follow a few simple steps to germinate, plant, and care for your seedling.
Steps
Collecting and Storing Birch Seeds
-
1Pick a birch tree that is suitable for your climate. Paper, white, and gray birches are a good selection for cold climates, while the river birch does well in warmer climates. Keep this in mind if you order seeds from an online seller or purchase them at a garden store.[1]
- If you're foraging for seeds near your home, you can assume they're coming from birch trees that have been successful in your climate.
-
2Capture seed pods from a birch tree in late summer. The seed pods, or catkins, start fluttering to the ground in the early fall, and may lose their seeds in the process. Collect a catkin straight from the birch tree in late summer to ensure you get a seed.[2]
- Catkins are slim, cylindrical flower clusters that have no noticeable flower petals. They look somewhat like small, soft pinecones.
Advertisement -
3Dry out the catkin on a sunny windowsill. Place the catkin in a paper bag or on a paper towel. Then let it rest on a sunny windowsill for a couple days while it dries out. Allowing it to dry will make it easier to get the seed out.[3]
-
4Remove the seeds from the dried-out catkin. Break the dried catkin by snapping it in half between your fingers and emptying the seeds out onto a plate or piece of paper. If the catkin breaks into a bunch of small pieces, just try to keep track of where the seeds are as you pull the shell apart.
-
5Place the seeds in a container with well-rotted compost. Buy a small plastic plant pot with drainage holes in the bottom and fill it with a few inches of compost. Sprinkle the seeds across the top of the compost, spacing them as evenly apart as possible. Try to give each seed 1 to 2 square inches (2.5 to 5 square cm) of space just in case they begin to germinate in the container.[4]
-
6Cover the seeds with a little compost and water. Sprinkle less than a centimeter of compost or soil over the seeds, and don't pack it down. The seeds should remain somewhat loose in the container. Then pour a small amount of water over the seeds to dampen, but not drench, the soil.[5]
-
7Place the container in a plastic bag. Find a plastic bag that will be large enough to hold the container and close with a seal. A plastic freezer bag with a zip closure would work well. Slip the container inside without tilting it and close the bag.[6]
-
8Place the plastic-wrapped container in the fridge until spring. The seeds need a period of cold rest time until they're ready to be germinated in the late winter. Place them in an out-of-the-way spot in your fridge for several months. Avoid pushing it to the back of the fridge since temperatures may be too cold back there.[7]
- An unheated garage is also a good place to store the seeds over the winter.
-
9Check the bag periodically for adequate moisture. Peek in at your seeds every couple of weeks to make sure there's still enough moisture in the container. If it seems to be drying out, add a little more water. But never pour in enough that there's standing water anywhere.
- If a seed begins to sprout during this time, immediately move the container to a windowsill.[8]


Germinating the Seedlings
-
1Move the container to a sunny window in late winter. Germinate the seeds in the late winter so that you have a strong seedling by late spring, when they can safely be planted. Move the container to a sunny window and remove the plastic. Dampen the soil if it feels dry to the touch, and keep it damp while you wait for the seedlings to grow.[9]
-
2Prune the seedlings down to the sturdiest one. Seedlings will begin to pop up within a few days. After a week or two, look for the strongest, sturdiest one, and prune all the others away. If you wanted to plant more than one, keep the strongest two or three seedlings.[10]
-
3Repot when the roots outgrow the container. When you see the roots of your seedling begin to stretch along the surface of the container or out the drainage holes, it's time to repot. Find a pot that's at least twice as large as the one it's in and fill it halfway with a mixture of potting soil and compost.
-
4Transfer the seedling and fill in the soil. Carefully scoop the root ball out of its current container and place it into the new one. Fill in the rest of the pot with the soil-compost mixture and water thoroughly.[11]
-
5Adjust the seedling to outdoor temperatures gradually. Once the danger of frost has passed, start leaving your seedling outside for longer periods of time. Start with a couple days in a shady spot, then try a few days outside in partial sun before moving to full sun. Avoid leaving it outside in any extreme conditions during this time.[12]


Planting the Birch Tree
-
1Select a planting location with full sun. Birch tree leaves need sun all day long, so find a spot in your yard that gets full morning and midday sun. The northern and eastern sides of your home are acceptable as long as the tree won't be shaded by your house. Avoid western and southern exposure, since the late-afternoon sun may dry out the soil.[13]
-
2Choose a planting location with moist, slightly-acidic soil. Birch trees have shallow roots that require lots of moisture, so search your property for areas where the soil doesn't dry out easily. Be sure that the soil around the tree is shaded in the late afternoon. And avoid areas with compacted soil since these won't allow your seedling roots proper drainage.[14]
- A handheld PH-meter can help you determine the acidity of your soil. You can purchase one at your local garden store or online.
-
3Plant the seedling when it reaches 15 to 20 inches (40 to 50 cm) tall. Once your seedling reaches 15 to 20 inches (40 to 50 cm) tall it's ready to be planted in the ground. To get it out of the container, insert a spade into the soil a few inches out from the seedling. Scoop the seedling out, being careful not to break any of the roots.[15]
-
4Dig a shallow, wide hole in the ground. Whether you grew your own seedling or bought one, dig a hole in the ground that's as deep as the root ball and about three times as wide. Use a spade or a small shovel to displace the soil and set it off to the side.
-
5Place the seedling in the hole and replace the soil. Gently place the seedling with its root ball intact into the hole. Be sure that the seedling is straight up and down, and then refill the hole with the displaced soil.
-
6Soak the seedling roots with water. Aim a hose at the base of the seedling and run water over the roots for several minutes. Stop when you begin to see standing water that's not draining away.
-
7Mulch with wood chips, leaf compost, or shredded bark. Add mulch around the base of the seedling to help the soil maintain moisture. You can use wood chips, leaf compost, or shredded bark. Apply 2 to 4 inches (5 to 10 cm) around the base of the seedling, but avoid letting it come in direct contact with the trunk.[16]


Maintaining Your Birch Tree
-
1Fertilize only if a soil test determines that nutrients are lacking. You can purchase a nutrient test to determine if your soil is lacking any necessary nutrients for a healthy tree. If you do fertilize, use only a slow-release fertilizer and don't apply the fertilizer after August.[17]
-
2Water the birch tree roots once a week during growing season. Keep the soil thoroughly moist to about 18 inches (0.5 m) deep. If you are not getting sufficient rainfall for this to happen naturally, use a hose or sprinkler to give it an hour-long soak once or twice a week until the fall.[18]
-
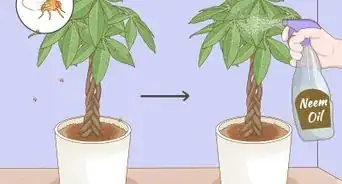
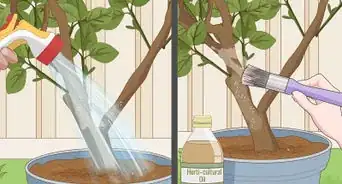
3Use an insecticide spray to fight borers and leaf miners. Birch trees are susceptible to some pests, particularly leaf miners and bronze birch borers. Purchase an insecticide spray to apply to the bark or the soil around your birch tree once a season.[19]
- Signs of borers include holes in the bark and winding galleries just beneath it.
- Look for brown splotches on the leaves to know if you have leaf miners.
-
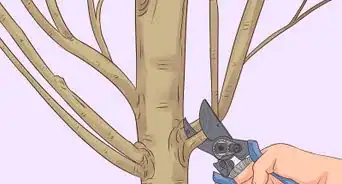
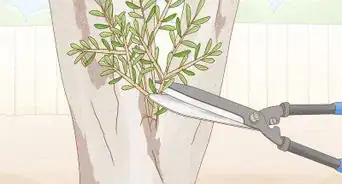
4Prune the branches as they approach other trees or structures. Birch trees can grow 40 to 60 feet (12.2 to 18.3 m) (12 to 18 m) tall, with a canopy spread of 20 to 25 feet (6.1 to 7.6 m) (6 to 7 m). As you see the branches growing toward other trees, buildings, or power lines, prune them back with pruning shears to avoid entanglement.[20]


Expert Q&A
Did you know you can get expert answers for this article?
Unlock expert answers by supporting wikiHow
-
QuestionWhere do birch trees grow best?
 Maggie MoranMaggie Moran is a Professional Gardener in Pennsylvania.
Home & Garden SpecialistIn the U.S., they grow best in the northern, cooler climates from Alaska all the way to Maine. They only extend south to around Virginia and Oregon.
Support wikiHow by unlocking this expert answer.
-
QuestionHow long does it take for a birch tree to grow?Maggie MoranMaggie Moran is a Professional Gardener in Pennsylvania.
Home & Garden SpecialistWith a quick growth of about 1.5 feet a year, it only takes about 20 years for the tree to reach 30-40 feet in height.Support wikiHow by unlocking this expert answer.
-
QuestionHow long does a birch tree live for?Maggie MoranMaggie Moran is a Professional Gardener in Pennsylvania.
Home & Garden SpecialistIn the wild, they live for about 80-140 years old, while the cultivated variety only lives 30-40 years.Support wikiHow by unlocking this expert answer.


References
- ↑ https://www.na.fs.fed.us/spfo/pubs/howtos/ht_birch/ht_birch.htm
- ↑ http://www.wildchicken.com/nature/garden/ga014_collecting_drying_storing_seed.htm
- ↑ http://www.wildchicken.com/nature/garden/ga014_collecting_drying_storing_seed.htm
- ↑ http://www.gardenguides.com/95030-grow-birch-trees-seeds.html
- ↑ https://www.youtube.com/watch?v=EAG5YLj7OOc&feature=youtu.be&t=227
- ↑ https://extension.tennessee.edu/publications/Documents/SP629.pdf
- ↑ https://extension.tennessee.edu/publications/Documents/SP629.pdf
- ↑ https://permacultureapprentice.com/permaculture-growing-trees-from-seeds/
- ↑ http://www.gardenguides.com/95030-grow-birch-trees-seeds.html
- ↑ http://www.gardenguides.com/95030-grow-birch-trees-seeds.html
- ↑ https://permacultureapprentice.com/permaculture-growing-trees-from-seeds/
- ↑ https://permacultureapprentice.com/permaculture-growing-trees-from-seeds/
- ↑ https://www.na.fs.fed.us/spfo/pubs/howtos/ht_birch/ht_birch.htm
- ↑ https://www.na.fs.fed.us/spfo/pubs/howtos/ht_birch/ht_birch.htm
- ↑ https://permacultureapprentice.com/permaculture-growing-trees-from-seeds/
- ↑ https://www.na.fs.fed.us/spfo/pubs/howtos/ht_birch/ht_birch.htm
- ↑ https://www.na.fs.fed.us/spfo/pubs/howtos/ht_birch/ht_birch.htm
- ↑ https://www.na.fs.fed.us/spfo/pubs/howtos/ht_birch/ht_birch.htm
- ↑ https://www.na.fs.fed.us/spfo/pubs/howtos/ht_birch/ht_birch.htm
- ↑ https://www.hunker.com/13428875/spacing-for-birch-trees
About This Article

Growing a birch tree from a seed is relatively easy. You’ll need to germinate your seeds in the late winter so they’ll be ready to plant in the spring. Plant them in a container by a sunny window and keep the soil damp. When a seed’s roots outgrow the container, repot the biggest one in its own pot and prune the rest. Gradually leave the pot outside for longer periods of time as the weather warms up to acclimatize it to the outside conditions. Once the seedling is 15 inches tall, replant it in the ground. Cover its soil with mulch to protect it and water it once a week. Only use fertilizer in the late summer if it seems to be lacking nutrients. For more tips from our Gardening co-author, including how to collect birch seeds from a tree, read on!