This article was co-authored by wikiHow Staff. Our trained team of editors and researchers validate articles for accuracy and comprehensiveness. wikiHow's Content Management Team carefully monitors the work from our editorial staff to ensure that each article is backed by trusted research and meets our high quality standards.
wikiHow marks an article as reader-approved once it receives enough positive feedback. In this case, 96% of readers who voted found the article helpful, earning it our reader-approved status.
This article has been viewed 134,720 times.
Learn more...
If you’d like to grow some garlic but don’t have the space for a garden or a large potting container, you can try growing garlic in water. Growing garlic in water is a great way to have fresh garlic available whenever you like, without the hassle and expense of going to the grocery store. Be aware that when you grow garlic in water, you won’t be able to grow entire new cloves. Rather, you’ll be able to grow leaves (also called garlic sprouts) out of the top of a garlic clove. These sprouts have the texture of green onions but with a mild garlicky flavor.
Steps
Placing the Garlic in Water
-
1Purchase 1 or more garlic cloves that have begun to sprout. When garlic sprouts, the clove—still covered in its protective white wrapping—will produce a small green sprout out of its top.[1] Inspect a few different cloves until you find some that have sprouted. While you can try growing un-sprouted garlic in water, you’re more likely to be successful if you use cloves that have sprouted.
- You can find suitable garlic cloves at your local grocery store. However, for higher-quality garlic that will produce larger and more flavorful sprouts, visit your local farmer’s market.[2]
-
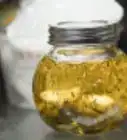
2Set the sprouted clove in an 8 oz (230 g) glass jar. Orient the garlic so that the sprouting end of the clove points upward.[3] It’s best to grow the garlic sprouts in a container made of clear glass, so that you can watch as the garlic puts out roots and begins to grow.
- If you don’t have a glass jar, you can use a drinking glass or a shot glass instead, if that’s more convenient.
Advertisement -
3Pour water into the jar until the bottom of the garlic clove is covered. You can use lukewarm tap water. Depending on the size of your garlic clove, you’ll need to put about 1⁄2 inch (1.3 cm) of water into the jar.[4] Avoid using extremely hot water, or you will damage and maybe kill the clove.
- If you completely submerge the garlic under water, it will die and rot.
-
4Leave the jar on your windowsill for 4-7 days. Make sure that the sprouting garlic clove gets plenty of sunlight.[5] If the tops of the growing garlic sprouts start to turn brown or wilt, move the glass out of the sun for 1-2 days.
-
5Change the water if it turns murky brown. Brown, clouded water will be unhealthy for the garlic and may stunt the sprouts’ growth. To change the water, take the garlic out of the jar with 1 hand and use your other hand to dump out the water from the jar. Then, place the clove back into the jar and refill it with water. Make sure not to over-fill the jar with water.[6]
- You should only need to change the water 1 or 2 times before the sprouts are ready to harvest.


Harvesting the Sprouts
-
1Let the garlic sprouts grow until they’re at least 3 inches (7.6 cm) tall. Keep an eye on the garlic as the green sprouts start to emerge from the top of the clove. The thin sprouts will emerge and grow quickly. When the sprouts are between 3–7 inches (7.6–17.8 cm), they’re ready to harvest.[7]
- If you harvest the garlic sprouts prematurely, they’ll be bitter and have an unpleasant taste.
-
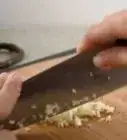
2Cut off the top 1/3 of the garlic sprout with a pair of kitchen scissors. So, if your sprout is 3 inches (7.6 cm) tall, snip off the top 1 inch (2.5 cm). This will be the tastiest and least bitter part of the garlic sprout.[8]
- In most cases, you’ll only be able to harvest garlic sprouts once. It’s unlikely that the garlic clove will grow new sprouts after the harvest.
- Only cut off the amount you’re planning to use for a specific meal. If you try to store already-cut garlic in your fridge, it will dry out and lose its taste.
-
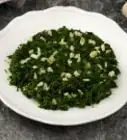
3Add the garlic sprouts to savory dishes. Once you’ve harvested the tops of the garlic sprouts, use your scissors to snip them into small 1⁄4 inch (0.64 cm) pieces. Then, add the sprouts to any savory dish you’d like, including baked potato, soup, or scrambled eggs.[9]
- Also try adding raw cut-up garlic sprouts to salads, salsas, or dips.[10]


Community Q&A
-
QuestionWhat should I do with the rest of the garlic after harvesting the tops of the sprouts? Could I plant them in soil?
 Mike CiaCommunity AnswerYou can definitely plant them in soil. Just plant the bulb in dirt, with only the sprout above soil. Keep the soil moist for the first week or so, and then water as you would any outdoor plant.
 -
QuestionWhere can I find a garlic clove with a sprout?
 Himanshu ChopraCommunity AnswerJust moisten a clove, put it in a damp paper towel and place in warm location. You will see buds on it after 2 days.
 -
QuestionCan I still eat the clove once I have harvested the sprouts?
 Community AnswerYes, you can still eat the clove if you choose to do so.
Warnings
- Be careful when using sharp scissors so that you don’t accidentally cut yourself.⧼thumbs_response⧽
Things You’ll Need
- Sprouted garlic cloves
- 8 oz (230 g) glass jar
- Water
- Scissors


References
- ↑ https://lifehacker.com/kitchen-scraps-you-can-regrow-with-nothing-but-water-1531011995
- ↑ https://myheartbeets.com/how-to-grow-garlic-scapes-indoors/
- ↑ https://lifehacker.com/kitchen-scraps-you-can-regrow-with-nothing-but-water-1531011995
- ↑ https://myheartbeets.com/how-to-grow-garlic-scapes-indoors/
- ↑ https://myheartbeets.com/how-to-grow-garlic-scapes-indoors/
- ↑ https://www.sproutabl.com/garlic-sprouting/
- ↑ https://www.sproutabl.com/garlic-sprouting/
- ↑ https://lifehacker.com/kitchen-scraps-you-can-regrow-with-nothing-but-water-1531011995
- ↑ https://myheartbeets.com/how-to-grow-garlic-scapes-indoors/
About This Article