This article was co-authored by wikiHow Staff. Our trained team of editors and researchers validate articles for accuracy and comprehensiveness. wikiHow's Content Management Team carefully monitors the work from our editorial staff to ensure that each article is backed by trusted research and meets our high quality standards.
There are 8 references cited in this article, which can be found at the bottom of the page.
This article has been viewed 24,432 times.
Learn more...
A variety of different types of nuts can be grown relatively easily on a personal, non-commercial scale. Nuts that can be grown relatively easily on a small scale include the walnut, hazelnut, macadamia nuts, almonds, and pecans. Nuts that grow on trees (e.g. walnuts, cashews and pecans) will require more time to yield a harvest than nuts that grow on bushes (e.g. hazelnuts), since the trees themselves must mature before bearing nuts. Whilst technically not nuts, there are also instructions here for growing peanuts.
Steps
Growing Peanut Plants
-
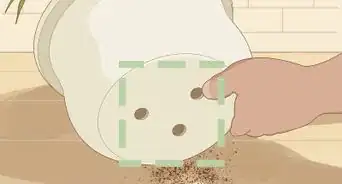
1Bury fresh, unroasted peanuts in loose, well-drained soil. Use a hoe or rake to turn over the soil before planting, so that you don’t have to force the peanut into the soil. Plant each peanut about 2 inches (5.1 cm) deep. Place each of the peanuts about 8 inches (20 cm) apart from one another in a row.[1]
- If the soil is tightly packed, add a combination of aged compost and sand to loosen the soil up. Sand and compost can be purchased at a local hardware store.
- If you’d rather start with a more mature plant, purchase a peanut bush from a local plant nursery. Be sure to still plant the peanut bush in moist soil.
-
2Locate the peanut plants in full sun. While peanuts are typically associated with the American south, they can actually be grown anywhere that’s sunny and warm during the summer. Peanuts thrive in hot, sunny environments, so plant them in a location that receives plenty of sun each day.[2]
- If you live in a cool, temperate zone, plant your peanuts on a south-facing slope to maximize the amount of sun they’ll receive.
Advertisement -
3Plant the peanuts 4 weeks following the last frost. Peanut plants can be delicate and may be killed by a late frost. Play it safe and wait a full month after the last frost before planting your peanuts outdoors.[3]
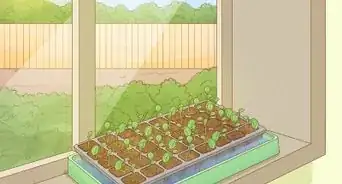
- If you live in a cool climate, you may be concerned that the peanuts may not have enough of a growing season between 4 weeks after the last frost and the first frost of winter. In this case, plant your peanuts indoors 5-8 weeks earlier and then transplant them outside.
-
4Loosen the soil around the plants with a trowel or spading fork. When the plants reach 6 inches (15 cm) high, prod and loosen the soil surrounding each of your peanut plants. This will make it easier for the pegs to elongate and enter the soil.[4]
- The pegs of a peanut plant are the long stalks which push into the soil and eventually develop into the peanuts themselves.
-
5Hill each peanut plant by forming a mound of soil around it. Once you’ve loosened the soil around the plants, take a trowel or shovel and form a dome-shaped mound around the stalk of each peanut plant. Each mound should be about 3 inches (7.6 cm) high. These “hills” will help the peanut plants make air and nutrients more accessible to the plants.[5]
- You can also add grass clippings or loose straw into the mounds to increase their porosity.
-
6Pull the plants out of the ground to harvest the peanuts. The peanuts will be mature when the plant begins to turn yellow. This usually happens early in the fall. Although the bushes grow aboveground, the peanuts themselves grow underground. To harvest the peanuts, uproot the entire plant with a spading fork, which you can purchase at your local hardware store. Shake all of the soil off of the roots.[6]
- It’s unwise to wait much later than early fall to harvest your peanuts, especially if you live in an area with cold winters and early frosts. The peanuts could freeze and die underground.
- Since the peanut bushes are relatively small (compared to nut-bearing trees), you should have a peanut harvest in your first year of growing.
-
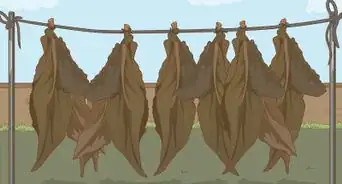
7Hang the peanut plants indoors for 1 month. The peanuts need to fully dry out before being eaten raw, salted, or roasted. Hang them in a cool, dry room, like a cellar or basement, where the peanut plants won’t be disturbed while they’re drying.[7]
- Once the plants have dried, pluck the peanuts off of the plant husks. Discard the plants. You can eat the peanuts raw.
- Store uneaten peanuts in an airtight container. Keep the container in your kitchen pantry.


Planting and Harvesting Hazelnuts
-
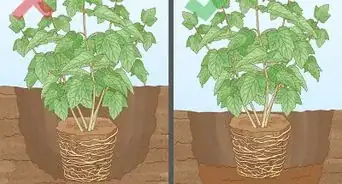
1Plant hazelnuts in well-drained, nutrient-rich soil in full sun. The easiest way to grow hazelnuts is by purchasing young plants—or immature root balls—from a nearby nursery. These bushes thrive when given plenty of nutrients and when planted in direct sunlight. So, if you’re planting hazelnuts outdoors, you may need to mix some potting soil and sand into the outdoor soil to increase the porosity and nutrient quality.[8]
- A mature hazelnut bush will grow to be roughly 10 feet (3.0 m) tall, and equally wide.
-
2Dig out a hole that’s twice the size of each root ball. Young hazelnut bushes need a generous amount of loose soil to spread their roots in. So, if your root ball has a diameter of 8 inches (20 cm), dig a hole that’s 16 inches (41 cm) wide and deep.[9]
- Also use your shovel or trowel to loosen the soil at the bottom of the hole, so the roots can grow downwards.
-
3Space individual hazelnut bushes out by at least 20 feet (6.1 m). Be sure to plant at least 2 bushes, since the plants fertilize one another, and a bush planted in isolation will not bear nuts. Give the separate bushes plenty of room to grow—but do not plant them farther than 40 feet (12 m), or they won’t be able to interpollinate.[10]
-
4Wait for 5-7 years for the bushes to bear nuts. Typically, it will take the hazelnut bushes 3-4 years to grow to their mature size, and an additional 2-3 years for them to begin bearing nuts. During this time, you shouldn’t need to water the bushes, since hazelnuts are very resistant to dry conditions.[11]
- As part of caring for the hazelnut bushes during these years, cut away all young suckers that emerge from the base of the trunk and roots.
- Once the 5-7 years have passed, you can expect to begin seeing hazelnuts forming in late spring.
-
5Harvest hazelnuts in fall months by pulling the burrs apart. Individual hazelnuts grow in clusters called burrs, which contain anywhere from 1-12 nuts. In fall, the burrs will turn brown, indicating that they’re ready to be harvested. Pull the burrs off of the bushes, and collect them in a bucket or basket.
- Then, pull the individual burrs apart and allow the nuts inside to fall out. In most cases, the force of gravity should be enough to draw the nuts out of the burrs.
-
6Dry the nuts on newspaper for 3-4 days. Once you’ve broken the nuts out from the burrs, they need time to dry out. Set them on a newspaper on a flat surface, like tabletop or clean floor. Make sure to set the nuts in an area where they won’t be disturbed by kids or pets while drying.
- Once the nuts have dried, you can either roast them or store them. Store hazelnuts in an airtight container in your kitchen pantry. (Un-roasted hazelnuts are unpleasant to eat.)


Planting and Maintaining Almond Trees
-
1Choose a location with full sun and fertile, well-drained soil. Almond trees won’t thrive if they are not planted in a location with less than 6-8 hours of sunlight each day. They also need soil with good drainage.[12]
- If you notice that the soil where you plan to plant the almond trees frequently forms puddles, try adding peat or sand to the soil before planting the trees.
-
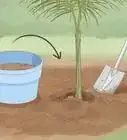
2Dig a hole deep enough to accommodate the tree’s root structure. When the tree has been planted, the soil should come up to the already-existing soil line that’s present on most nursery-grown almond trees. If you’re planning to plant more than 1 almond tree, space the individual trees out by 15–20 feet (4.6–6.1 m).[13]
- If you plant the almond trees too closely together, their branches and roots may collide with those of the adjacent trees.
-
3Spread out the roots when placing the almond tree in the ground. If the trees’ roots are bundled up, unpack them a little before planting the tree. Also take care to not bend or damage the tree’s large taproot when you plant it.[14]
- To ensure that your almond tree grows well, pour 2–3 cups (470–710 mL) of water over the roots before planting.
- Pour another 2-3 buckets of water over the almond tree once it’s planted to ensure the roots remain moist.
-
4Water the young almond tree by letting water trickle from a hose. If your almond tree hasn’t received any rain for 14 days (2 weeks), take it upon yourself to water the tree. Rather than drenching it with water, turn a garden hose on to release a trickle of water, and set the end of the hose at the base of the tree. Let the hose run until the ground is soaked.[15]
- After the first 2 years, your almond tree will not need to be watered any more, unless it undergoes severe drought conditions.
-
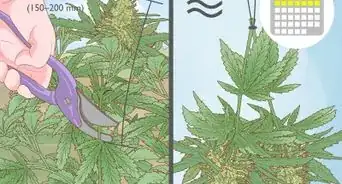
5Prune almond trees in the winter. While the trees are dormant, you can remove unneeded branches without damaging the almond trees. Use a sharp pair of garden shears to lop off any branches that are dead or broken, or that have bent to grow towards the tree’s center. Prune branches near the center of each almond tree so air and light can get through.[16]
- Your almond trees will need to mature for 2-4 years before they begin producing almonds.
-
6Harvest the almonds in the fall by knocking them from the trees. The almonds themselves will grow inside of large, wood-colored hulls. They’ll be ready to harvest once the hulls have opened completely on their own. Shake the tree in order to knock the almond hulls to the ground.[17]
- Once the nuts have fallen, leave them on the ground for 2 or 3 days to dry out.
-
7Pry the shells from the hull, and pry the nuts from the shell. You’ll need a good nutcracker for this part of the harvesting process. Snap the hull open until you can extract the almond shell. Then, crack open the shells until the almond nut itself emerges.[18]
- Store the almonds in an airtight container or plastic bag. Keep the nuts in your pantry or a kitchen cabinet.


Things You’ll Need
Growing Peanuts
- Unroasted peanuts
- Trowel
- Spading fork
- Aged compost (optional)
- Sand (optional)
Growing Hazelnuts
- Hazelnut root ball
- Potting soil (optional)
- Sand (optional)
- Shovel
- Basket
- Newspaper
Growing Almonds
- Almond seedlings
- Shovel
- Bucket
- Hose
- Pruning shears
- Nutcracker


References
- ↑ https://www.almanac.com/content/how-grow-your-own-peanuts
- ↑ https://www.almanac.com/content/how-grow-your-own-peanuts
- ↑ https://www.almanac.com/content/how-grow-your-own-peanuts
- ↑ https://www.almanac.com/content/how-grow-your-own-peanuts
- ↑ http://www.gardenersnet.com/atoz/hillingplants.htm
- ↑ https://www.almanac.com/content/how-grow-your-own-peanuts
- ↑ https://www.almanac.com/content/how-grow-your-own-peanuts
- ↑ http://www.gardeningblog.net/how-to-grow/hazelnuts/
- ↑ https://www.starkbros.com/growing-guide/how-to-grow/nut-trees/almond-trees/location
- ↑ http://www.gardeningblog.net/how-to-grow/hazelnuts/
- ↑ http://www.gardeningblog.net/how-to-grow/hazelnuts/
- ↑ https://www.starkbros.com/growing-guide/how-to-grow/nut-trees/almond-trees/location
- ↑ https://www.starkbros.com/growing-guide/how-to-grow/nut-trees/almond-trees/planting
- ↑ https://www.starkbros.com/growing-guide/how-to-grow/nut-trees/almond-trees/planting
- ↑ https://www.starkbros.com/growing-guide/how-to-grow/nut-trees/almond-trees/watering
- ↑ https://www.starkbros.com/growing-guide/how-to-grow/nut-trees/almond-trees/pruning
- ↑ https://www.starkbros.com/growing-guide/how-to-grow/nut-trees/almond-trees/planting
- ↑ https://www.starkbros.com/growing-guide/how-to-grow/nut-trees/almond-trees/planting
- ↑ https://www.almanac.com/content/how-grow-your-own-peanuts
- ↑ https://www.hobbyfarms.com/8-nuts-to-grow-on-your-farm/
About This Article