This article was co-authored by Jason Phillip. Jason Phillip is a handyman specializing in mounting and hanging objects onto walls. With over five years of experience professionally mounting and installing objects through his company, Jason's Handyman Services, Jason's work includes working with mounting window AC units, designing art gallery walls, installing kitchen cabinets, and replacing light fixtures on drywall, brick, and plaster. He has been rated a "Top Pro" every year since 2016 by Thumbtack for being one of the highest-rated, most popular professionals on Thumbtack.
wikiHow marks an article as reader-approved once it receives enough positive feedback. In this case, several readers have written to tell us that this article was helpful to them, earning it our reader-approved status.
This article has been viewed 71,720 times.
Hanging a pot rack from the ceiling helps alleviate storage problems by giving you more space. You should usually hang the rack from ceiling joists, which are horizontal supports that the ceiling is attached to, to hang the pot rack to make sure it does not fall. If ceiling joists are not located where you want to hang the rack, you can make use of ceiling anchors to hold it up.
Steps
Installing a Pot Rack Using Ceiling Joists
-
1Measure the area where you want to hang the pot rack. You want to make sure you select a pot rack that fits in the space you have chosen. Before purchasing a pot rack, get a tape measure and measure the area where you're planning to hang the rack. Most people hang pot racks somewhere in the kitchen, often above a stove or counter. See how much space you have and select a pot rack that will fit within that space.
-
2Use a stud finder to locate the ceiling joists. After measuring your area, you'll need to find ceiling joists. These are horizontal supporting members above your ceiling. You will need to install screws to fasten the pot rack into the ceiling joists. A dry wall ceiling, on its own is not strong enough to support a pot rack. To find ceiling joists, you can use a stud finder, which you can purchase at any hardware store.
- A stud finder is a small handheld device that you run across a surface like a wall or ceiling. When a stud or joist is located, the stud finder usually lights up or makes a noise.
- Run your stud finder along the ceiling until you locate a ceiling joist. When it lights up, you've found a joist. You should find at least two joists, as you'll be drilling four or more holes in a rectangular shape to hang your pot rack.
- If you don't have ceiling joists, you'll need to use anchors to attach the rack to your ceiling.[1]
Advertisement -
3Mark the location of the joists. Once you've located the ceiling joists, mark their location. You can use a pencil or place a line of masking tape running along the joists.
-
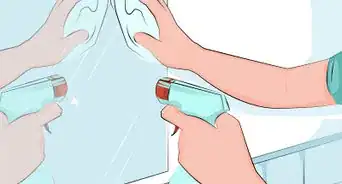
4Place your rack on a piece of cardboard. Take your pot rack out of the its box. Get a large piece of cardboard and place the rack on top of the cardboard. Make sure the piece of cardboard is big enough to fit the entire rack.
-
5Make holes on the cardboard where the chains will be hung. From here, you want to basically create a template of the rack on the cardboard. You will use this template as a guide to drill holes in your ceiling. Trace the outline of the rack with a pencil. There should be four or more hooks on your pot rack, which is where the chains are hung to secure the rack from the ceiling. Mark where the hooks are located on the cardboard. Use a sharp object, such as a knife or a pair of scissors, to make a small hole where each chain will be hung.
-
6Place the cardboard against the ceiling and mark where the holes should go. Take your cardboard template and place it against the ceiling. Make sure to line the template up on the ceiling so the holes fall on the ceiling joists. Use a pencil to lightly mark where you'll be drilling.
-
7Drill the holes. Remove the template from the ceiling. Now, you can drill four holes into the ceiling.
- You will probably need to use a power drill to drill the holes. If you don't have one, you can purchase one at a local hardware store or borrow one from a friend.
- You will need to insert an appropriate sized drill bit into your power drill. Refer to the instructions manual that came with your pot rack to see what size drill bit you need. There is no standard size drill bit for hanging pot racks. In depends on your specific rack.
- Once you've drilled the holes, you can screw the hooks that came with the pot rack into the ceiling. You may be able to get by using a screw driver, but if the hooks don't go in easily, use pliers to give yourself a better grip.
-
8Attach the chains and hang the rack. Once you've drilled the holes, the process of hanging the pot rack is fairly quick. Attach the chains to the hooks. Then, lift your pot rack up and attach it to the chains.
- Pot racks can sometimes be very heavy. You may have to get someone to assist you in lifting the pot rack.


Making Use of Ceiling Anchors
-
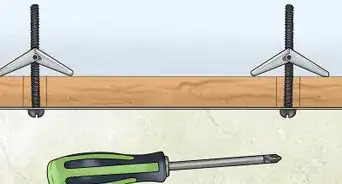
1Get toggle wall anchors. Sometimes, you may be unable to find ceiling joists where you want to hang the pot rack. In this case, you can use toggle bolts to secure the pot rack. These are bolts that anchor through dry wall, allowing you to hang the rack without the support of joists. Toggle bolts are a type of anchor recommended for hanging a pot rack as they can support a fair amount of weight and are fairly easy to install. Most hardware stores sell toggle bolts.[2]
- Check how much weight toggle bolts can support before making a purchase. It should say on the package how much weight a specific type of toggle bolt can hold. Make sure the bolts are strong enough to support your pot rack. It's a good idea to use anchors that will hold a lot more weight than you thing you'll need.[3]
- For this to be accurate, you will need to also determine the type of ceiling you have. Some ceilings are 1/2 inch thick dry wall, others 5/8 inch, the latter will hold much more weight than the former. Other ceilings may not be suitable for any installation, such as acoustic tile.
-
2Mark where the pot rack will be hung. In order to install a toggle bolt, you'll first need to see where the chains on the rack will be hung. To do so, lay your pot rack on a piece of cardboard. Trace the rack, making a template. Mark where the chains fall and use a sharp object, like a pair of scissors or a knife, to cut small holes where the chains fall.
- Place your template against the spot on the ceiling where you intend to hang the rack. Use a pencil to draw a small dot where each chain will fall.
-
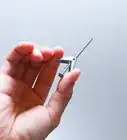
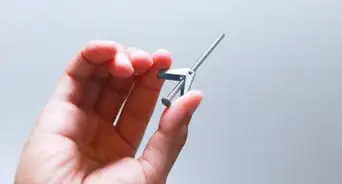
3Place any hinges or brackets on the bolt. Your pot rack's hooks should come with some kind of bracket or hinges that the hooks or chains attach to. You should be able to stick one end of the toggle bolt into these hinges or brackets. Make sure to do so before installing the toggle nut.[4]
-
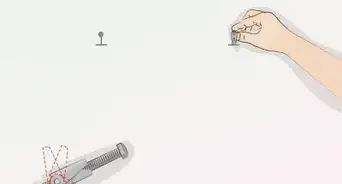
4Drill a hole large enough for the toggle hinge to pass through. The toggle opens and closes, like a pair of scissors. The idea behind a toggle bolt is that you'll push the toggle through the wall when it's closed. Then, it will open on the other side of the dry wall, anchoring itself to the ceiling. You want to drill a hole in the drywall big enough that the toggle can pass through closed. You should refer to the instructions on your toggle bolt package to figure out the precise size hole you'll need. Then, drill a hole of that size into your ceiling.[5]
-
5Pinch the toggle arms together and press the closed toggle through the hole. Once you've drilled your hole, pinch the toggle to get it to get it to close. Press the closed toggle all the way through the dry wall.[6]
-
6Listen to hear the toggle open inside the ceiling. You should hear a faint click when the toggle pushes through the ceiling. This noise indicates that the toggle has opened up above the ceiling. This process is vital as, once the toggle is opened, it can be anchored against the wall.[7]
-
7Pull out until the toggle presses against the inside wall. Now, you can pull the bolt out of the wall. Keep pulling until you feel the bolt stop. Once it stops, this means the toggle is pressed against the dry wall.[8]
-
8Tighten the bolt against the bracket, securing the toggle against the top of the ceiling dry wall. Now, use a screw driver or a pair of pliers to screw the bolt into the toggle nut. Keep screwing until the bolt is pressed tightly against the drywall ceiling. This will secure the toggle to the dry wall, anchoring the bolt to the ceiling.[9]
-
9Attach the pot rack's hook onto the bracket you installed with the toggle bolt. Now that your toggle is safely installed in the ceiling, you can screw your pot rack's hooks onto the toggle bolt. How you screw on the hooks varies from pot rack to pot rack, and depends on the types of brackets or hinges that came with your pot rack. Refer to the instructions that came with your rack.
-
10Hang your pot rack. Once the hooks are secure, hang the pot rack up on your wall. Toggle bolts are strong enough to hold a lot of weight. If you installed toggle bolts properly, your pot rack should hang securely from your ceiling.


Avoiding Pitfalls
-
1Do not nail a pot rack into the dry wall without an anchor. You should never nail a pot rack into dry wall. Dry wall cannot carry a lot of weight. If you simply nail a pot rack into dry wall, as you would nail it into a ceiling joist, the rack will inevitably fall. This can cause a lot of damage to your ceiling and kitchen and potentially hurt a pet or person standing near the rack when it falls. Always use ceiling anchors when attaching a pot rack to dry wall.
-
2Wear safety goggles. You should wear safety googles throughout the process of hanging up a pot rack. Safety goggles can protect your eyes from small bits of paint or debris that may fall from the ceiling during the installation process.
-
3Keep extra weight in mind. When checking how much weight a toggle can hold, do not just consider the weight of the pot rack on its own. Remember, you'll be hanging pots and pans from your pot rack. Make sure the toggle bolt can hold more weight than the total weight of the pot rack.


Expert Q&A
Did you know you can get expert answers for this article?
Unlock expert answers by supporting wikiHow
-
QuestionWhat size toggle bolt do I need?
 Jason PhillipJason Phillip is a handyman specializing in mounting and hanging objects onto walls. With over five years of experience professionally mounting and installing objects through his company, Jason's Handyman Services, Jason's work includes working with mounting window AC units, designing art gallery walls, installing kitchen cabinets, and replacing light fixtures on drywall, brick, and plaster. He has been rated a "Top Pro" every year since 2016 by Thumbtack for being one of the highest-rated, most popular professionals on Thumbtack.
HandymanThis depends on how much weight you want the toggle bolt to hold. Fortunately, toggle bolt packages are labeled with how much weight they can hold. Choose bolts that can hold more than the weight you plan to hang so you have some cushion.
Support wikiHow by unlocking this expert answer.
-
QuestionWhen should you use a ceiling joist versus a ceiling anchor?Jason PhillipJason Phillip is a handyman specializing in mounting and hanging objects onto walls. With over five years of experience professionally mounting and installing objects through his company, Jason's Handyman Services, Jason's work includes working with mounting window AC units, designing art gallery walls, installing kitchen cabinets, and replacing light fixtures on drywall, brick, and plaster. He has been rated a "Top Pro" every year since 2016 by Thumbtack for being one of the highest-rated, most popular professionals on Thumbtack.
HandymanIf you have ceiling joists, you should use them if you're hanging anything from the ceiling. However, if you live somewhere without them, like a condo with a concrete ceiling, just drill anchor holes.Support wikiHow by unlocking this expert answer.
Warnings
- Beware of hanging iron cooking pots or skillets on any rack that will present a danger to someone walking under it if it should fall.⧼thumbs_response⧽
- Be aware, also, that exposed electrical wires, ductwork, and possibly gas, water, telephone, or other items may be above the drywall ceiling.⧼thumbs_response⧽
- Be aware that if installing a toggle bolt into a ceiling, you may find insulation above the drywall that will make the operation very difficult.⧼thumbs_response⧽


References
- ↑ Jason Phillip. Handyman. Expert Interview. 2 July 2020.
- ↑ https://www.proreferral.com/experts/question/how-do-you-anchor-a-hanging-pot-rack
- ↑ Jason Phillip. Handyman. Expert Interview. 2 July 2020.
- ↑ http://www.todayshomeowner.com/video/how-to-use-a-wall-anchors-in-drywall/49/
- ↑ http://www.do-it-yourself-help.com/wall_anchors.html
- ↑ http://www.do-it-yourself-help.com/wall_anchors.html
- ↑ http://www.do-it-yourself-help.com/wall_anchors.html
- ↑ http://www.do-it-yourself-help.com/wall_anchors.html
- ↑ http://www.do-it-yourself-help.com/wall_anchors.html
About This Article

To hang a pot rack, start by using a stud finder to locate the studs in the ceiling. Then, place the pot rack on a piece of cardboard, and punch small holes in the cardboard at the points where the chains should hang so you create a template. Next, use your cardboard template to drill holes in the ceiling. Once the holes are ready, screw hooks into them and hang the chains on your rack from the hooks to secure it in place. For tips on how to install a pot rack using ceiling anchors, read on!