This article was co-authored by David Bitan. David Bitan is a roofing professional, licensed contractor, and the owner and founder of Bumble Roofing based in Southern California. With over 12 years of construction industry experience, David specializes in restoring, repairing, and maintaining residential, commercial, and industrial roofs. With over 60 years of combined experience, Bumble Roofing provides easy, friendly services to structures including residential, commercial, industrial, multi-family, and government buildings along with hospitals, hotels, and churches.
wikiHow marks an article as reader-approved once it receives enough positive feedback. This article received 14 testimonials and 94% of readers who voted found it helpful, earning it our reader-approved status.
This article has been viewed 653,459 times.
Installing new shingles yourself can save considerable time and money. You can follow the same steps they do to achieve the same professional look. Re-doing the shingles on your roof can help keep your house in good shape, keep your family safe, and protect you from the elements. Learn to prepare the roof for shingles, lay even courses, and install your ridge shingles like the experts do.
Steps
Preparing the Roof
-
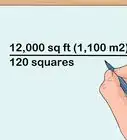
1Get the right number of shingles for the job. It generally takes three bundles of shingles to cover 100 square feet (9.29 square meters). Asphalt shingle "bundles" are actually sealed in packages (the term bundle comes from wooden shingles which actually came tied up with wire in bundles). Measure your roof and buy appropriately.
- Measure the length and width of the individual sections of the roof, multiplying them together to determine the area.[1] Add the areas of each section together, then divide by 100 to get the correct number of squares. Multiply this number by 3 to get the number of bundles you'll need to buy.
-
2Measure the length of a shingle as it lies across the roof. This will help determine how the shingles will lay on the roof width. Most asphalt shingles are 3 feet (91.4 centimeters) in length. If your roof's width is not an even multiple of the shingle's length, you will have a partial piece on one end of each row.
- The bottom row of shingles must hang past the edge of the roof. For a wood shingle roof you would have to cut the shingles that go on the edge to create a straight line to accommodate this.
Advertisement -
3Remove old shingles and flashing. Start removing the shingles at the peak farthest from the trash container or the corner you want to collect the shingles in. Use a garden fork or a roofing shovel to pull them off quickly, use the hammer-method and go by hand for a more thorough job. Make sure that you protect the sides of the house and the windows during this process, like by leaning a large piece of plywood against the house below where you are working. Otherwise you might break a window or damage the siding.
- Pry up the nails and loosening the ridge caps. It's okay if you don't get all the nails at first because you'll have a chance to go back through and remove them later.
- Remove the metal flashing around chimneys, vents, and valleys in the roof. Flashing in the valleys will almost always be trashed especially. Some roofers will keep some of the flashing that's in good shape but it's probably worth junking it all when you've got the chance.
-
4Clean the roof. Sweep the roof as clean as possible. Remove nails that didn't come up earlier. Reattach loose boards in the sheathing. Examine the sheathing for damage and rotted boards, replacing the damaged sections.[2]
-
5Install underlayment and new flashing.[3] Lay asphalt, felt-paper, or special waterproof underlayment, such as a self healing membrane, over the roof. Some roofers will use 15-pound (6.8 kg) roofing paper, which is an effective method, although the best method is a self sealing membrane with a rain screen. Staple this felt down, starting at the lowest point of your roof and working upward. Overlap each row at least 3 inches. Use plenty of staples and work carefully to avoid tearing the paper. Be generous with the staples while attaching the paper to the roof deck. Use "tin caps" under staples if the roof may be exposed to wind before shingles are to be applied.
- Use sticky back ice and water shield as underlayment where ice dams, leaf and twig dams are likely to build up, and at valleys or where the roof ends at a wall (wide metal flashing may also be used there).
- Install new flashing. Nail metal flashing called "drip edge" along the bottom edge of the roof deck near the gutters. You will also need rake edge flashing for the sides of the roof. Make sure to install flashing around the chimneys and walls. These types of flashing are known as step flashing and turn back flashing.
-
6Choose the kind of starter course you will use. You can use narrow tab-less starter shingles if you bought some (GAF Pro-Start is one such brand) or will be cutting your own starter shingles to fit the particular project. Some people like to only have to buy one variety of shingle and cut them to fit, while others prefer the ease of the pre-cut starter shingles without tabs.
-
7Use chalk lines to make a guide for yourself. Depending on the type of shingles you're using and the roof you're working on, you may need to marking a chalk guideline beginning 7 inches (17.8cm) from the bottom roof edge. In either case, the glue strip of the starter course is then placed along the drip edge and at the rake edges as well.[4]
- Mark from the left to right edge of the roof so the chalk line will be seen immediately above each course as a guideline. Continue to chalk additional guidelines based on the width of the shingle through at least four courses (rows) across the roof. When you are laying felt paper, make sure that the lines on the paper are running in a square pattern.


Installing Three-Tab Shingles
-
1Cut your starter-course shingles if necessary. If you are making your own starter shingles, cut the tabs off for the "starter course" (bottom row) of shingles. To prepare the tabs and lay the starter course, shorten the first starter shingle by 6 inches (or about a half of one tab).[5] Place the glue strip at and all along the drip edge as well as the rake edges. You will shingle over this starter course, so the bottom course will be double thickness.
- Instead of cutting off all three tabs, you can also reverse the shingles for a starter course so that the entire shingle with tabs turned upward are under your first course of shingles. With either method, putting the solid edge at the drip edge and cutting 6 inches off the length of first starter shingle prevents the slots between the tabs from lining up with the first regular course laid over the starter, thus not to expose the asphalt roofing paper through the slots of that bottom row.
- Nail the shingles with no tabs, such as precut Pro-Start shingles,[6] and apply asphalt cement from a caulk gun in many dots along the drip edge under the edge, then press the tab-less shingles down onto the line of asphalt cement dots with adequate spaces between the dots. A continuous bead of asphalt could trap condensation or windblown water under the roofing at some point.
-
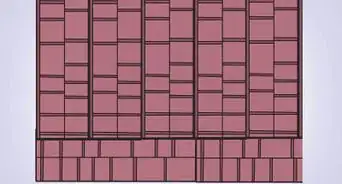
2Cut five different lengths for staggering slots. To make sure you've got the right sizes to lay courses correctly, cut several sizes of shingles from the three-tab variety you purchased. Cut off one-half tab-width of the first tab to start the first course. Each cut is needed to shift the slots of the shingles on the course of shingles a 1/2 tab from aligning with the slots in shingles above and below. Keep all scrap, especially any single tabs for use on the ridge cap shingles. Make the following cuts:
- Cut a half tab off for your first course shingles,
- Cut off a full tab for your second course shingles
- Cut one and a half tabs off of your third course shingles,
- Cut two tabs off your fourth course shingles
- For your fifth course, cut off half of the final tab
- Keep your sixth course tabs intact
-
3Start laying courses. Nail the "cut off shingle" into place, about 6 inches from its lower edge. Hammer in one nail about 2 inches from each end of each shingle and another nail about 1 inch above each cutout. Make sure to keep nails out of the tar strip as you work.
- The next shingles above should cover the nails by about 1 inch vertically. Horizontally, end nails will be covered by up to about 1/2 of a tab, of the shingle(s) above. Be sure that these nails will hold the top edge of the course of shingles immediately below.
-
4Put a full shingle up against the cut shingle and nail into place. Repeat this basic pattern, alternating shingles across the roof, working toward the right side, using the chalk line to keep the shingles straight horizontally.
- Use 4 nails per shingle and 6 nails on the prevailing windward sides of the roof, as wind resistance nailing. Some local codes require the 6 nails on all sides.
-
5Cut the last shingle to the size you need when you reach the end of the row. You can let the excess extend off the side end of the roof and trim it down after it is nailed on, if you like. Continue this process to the 5th row then begin the same process as the first row beginning with a full shingle and a chalk mark. Repeat all of the way to the ridge.
- If it is a hip roof, allow about a tab width to overhang onto the next section of roof at the hip to help strengthen the joint there.


Installing Ridge Shingles
-
1Install the last course. Bend the last course of shingles over the ridge, up to about 6 inches, and nail it onto the other side so that the roofing extends over the top of the ridge, where nails will be covered, leaving no exposed nails. However, do not do this if a ridge vent system is being installed as well. Nearly all modern roofs use ridge venting – the sheeting stops short on each side. End your final shingle row here, using the hook-blade for cutting. To cover the ridge, install vented cap shingles or continuous ridge vent.
- Bend single tabs (or special ridge shingles) over the ridge, beginning at the end putting a bead of asphalt under the first ridge shingle to hold down the tab. Nail it where the next ridge shingle will cover the nails about an inch horizontally and vertically.
-
2Install the ridge shingles. With the asphalt granules exposed, across to the other end, nail the shingles on both sides of the ridge as before. Cut off the asphalt nail line from a ridge shingle when you get to the other end.
-
3Apply a heavy bead of asphalt cement. Dot the cement under and around the edge of the last ridge shingle where you removed the nail line. Nail at the four corners to the end of the ridge and add a little dab of tar to cover the nail heads.
- Also apply asphalt cement over the nail heads exposed on the last ridge shingle to prevent water leaks.


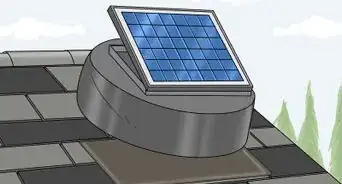
How Can I Extend the Lifespan of My Shingles?
Expert Q&A
Did you know you can get expert answers for this article?
Unlock expert answers by supporting wikiHow
-
QuestionWhat are common mistakes people make when installing new shingles?
 David BitanDavid Bitan is a roofing professional, licensed contractor, and the owner and founder of Bumble Roofing based in Southern California. With over 12 years of construction industry experience, David specializes in restoring, repairing, and maintaining residential, commercial, and industrial roofs. With over 60 years of combined experience, Bumble Roofing provides easy, friendly services to structures including residential, commercial, industrial, multi-family, and government buildings along with hospitals, hotels, and churches.
Roofing Contractor & Maintenance Professional -
QuestionShould I put an underlayment underneath my shingles?David BitanDavid Bitan is a roofing professional, licensed contractor, and the owner and founder of Bumble Roofing based in Southern California. With over 12 years of construction industry experience, David specializes in restoring, repairing, and maintaining residential, commercial, and industrial roofs. With over 60 years of combined experience, Bumble Roofing provides easy, friendly services to structures including residential, commercial, industrial, multi-family, and government buildings along with hospitals, hotels, and churches.
Roofing Contractor & Maintenance ProfessionalUnderlayments help prevent leaks from getting through your roof, so you should install a layer before you start putting on shingles.
Support wikiHow by unlocking this expert answer.
-
QuestionHow do I figure out how many shingles to buy?David BitanDavid Bitan is a roofing professional, licensed contractor, and the owner and founder of Bumble Roofing based in Southern California. With over 12 years of construction industry experience, David specializes in restoring, repairing, and maintaining residential, commercial, and industrial roofs. With over 60 years of combined experience, Bumble Roofing provides easy, friendly services to structures including residential, commercial, industrial, multi-family, and government buildings along with hospitals, hotels, and churches.
Roofing Contractor & Maintenance ProfessionalCalculate the area of each section of your roof by multiplying the length by the width. Then, add the area of each section of roof to find out how many total square feet you need.Support wikiHow by unlocking this expert answer.

Warnings
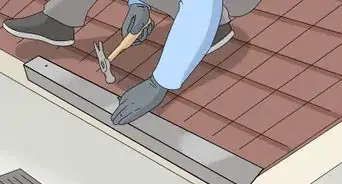
- On steep roofs, toe-steps should be nailed to the roof with metal strips holding the toe-steps, to keep you and supplies in place -- as well as using safety ropes and a harness.⧼thumbs_response⧽
- If your roof is too steep for walking (above a 7/12 slope), use roof jacks and planks for safety.⧼thumbs_response⧽
- Hot weather damage: Do not attempt to install asphalt shingles and walk, crawl or stand on them during really hot weather.[7] This could cause damage to the shingles. One can work half day starting early.⧼thumbs_response⧽
Things You'll Need
- Roof hammers
- Hammer tack/stapler
- Chalk box
- Speed square or framing square
- Caulking gun
- Ladders and/or scaffolding
- Air compressor
- Pneumatic coil roofing nail gun
- 5/8-inch (1.6 cm) tacks/staples
- 1-inch (2.5 cm) minimum roofing nails
- Tubes of asphalt cement
- 15-pound (6.8 kg) asphalt roofing paper
- Metal flashing or preformed drip molding for edges
- Enough 3- or 4-tab asphalt shingle bundles to complete the roof
- Premade asphalt ridge shingles


References
- ↑ David Bitan. Roofing Contractor & Maintenance Professional. Expert Interview. 14 July 2020.
- ↑ https://www.doityourself.com/stry/h2shingle#b
- ↑ David Bitan. Roofing Contractor & Maintenance Professional. Expert Interview. 14 July 2020.
- ↑ http://www.gaf.com/Roofing/Residential/Products/Starter_Strip_Shingles
- ↑ http://www.gaf.com/Roofing/Residential/Products
- ↑ http://www.gaf.com/Roofing/Residential/Products/Starter_Strip_Shingles
- ↑ David Bitan. Roofing Contractor & Maintenance Professional. Expert Interview. 14 July 2020.
About This Article

To install asphalt shingles, start by installing underlayment and new flashing on the roof. Once you've done that, cut your shingles to size if they're not already. Then, begin nailing the shingles to the roof, working in rows and starting at the edge of the roof. Install the shingles so that each one is overlapping the shingle directly below it, which will conceal the nails. When you reach the end of a row, cut the last shingle to size before installing it. To learn how to install shingles over the ridge on your roof, scroll down!