This article was co-authored by wikiHow Staff. Our trained team of editors and researchers validate articles for accuracy and comprehensiveness. wikiHow's Content Management Team carefully monitors the work from our editorial staff to ensure that each article is backed by trusted research and meets our high quality standards.
There are 11 references cited in this article, which can be found at the bottom of the page.
This article has been viewed 20,537 times.
Learn more...
Cable railing is perfect if you want a clean, modern look or don’t want your fence to obscure a view. Before starting, make sure your fence’s design, dimensions, and materials comply with local building codes. Some kits include prefabricated metal posts, but you can save money by building a wooden frame using 4x4, 4x6, and 2x6 wooden beams. If you’re using wooden posts, drill holes into each to accommodate the cables. Mount the posts, then run the cables through the holes. Install fasteners into the end posts according to your product’s instructions, and tighten the cables until you’ve eliminated all slack.
Steps
Purchasing a Cable Railing System
-
1Comply with your local building codes. Before installing a fence, make sure its design, dimensions, and materials comply with your jurisdiction’s building codes. To check your local codes, search online for your city government’s website.[1]
- For example, deck posts in most areas must be at least 36 inches (0.91 m) tall.
- Some areas don’t allow horizontal cables for deck or pool fences, since they might pose a safety hazard if children climb them.
-
2Measure the space where you're building the fence. Use a measuring tape to measure the perimeter of the space you're enclosing. For larger areas, such as a grazing paddock, lay out a length of string where you want to install fencing. Cut the string where the fence will terminate, then measure the entire length of string.[2]Advertisement
-
3Buy enough cable to enclose the area. Purchase a cable railing system online or at your local home improvement store. Kits include the cables themselves, fasteners that connect them to posts and, depending on the manufacturer, other required hardware. Decide how many cables runs your fence needs, and purchase enough cable to enclose your perimeter.[3]
- In almost all jurisdictions, cables for deck fences must be spaced less than 4 inches (10 cm) apart, but most builders space them at 3 inches (7.6 cm).
- Suppose your fence height will be 36 inches (91 cm). The fence will include top and bottom rails spaced 30 inches (76 cm) apart, with cables running between them. You'd need 9 runs of cable, so you'd multiply your perimeter measurement by 9.
-
4Choose a cable width that fits your needs. The right cable width depends on your application. A width of 1⁄8 inch (0.32 cm) is standard for decks, while 3⁄8 inch (0.95 cm) or 1⁄4 inch (0.64 cm) cables are standard for livestock enclosures. Check your local codes to see if you're required to use cables of a specific width.[4]


Building the Frame
-
1Build a frame using thick wooden posts to save money. Some cable railing kits come with prefabricated metal posts. They can cost 10 times as much as systems that only include cables and hardware, but they’re easier to install.[5] Making your own wooden frames or posts is more affordable, and is still relatively easy.
- If you opt for prefabricated metal posts, follow the kit's installation instructions.
-
2Cut 4x4 and 4x6 posts to a height that complies with your local codes. Use thicker 4x6 posts for your fence’s corners and 4x4 lumber for all other posts. You’ll need to space posts no more than 3 feet (0.91 m) apart, so purchase enough lumber for your space requirements.
- Alternatively, you could set 4x4 posts 6 feet (1.8 m) apart and set a 2x4 intermediate support between 2 full-sized posts. This could cut your costs while offering the necessary support and meeting the minimum 3 feet (0.91 m) spacing requirements.
- Be sure to meet your local height requirements. Keep in mind minimum height is measured between the ground or deck level and top of the guard rail. If you’re driving posts 5 inches (13 cm) into the ground, make your posts longer so they'll comply with code.
-
3Mount the posts to your deck or property line, if necessary. If your posts aren’t already installed, bolt them to your deck’s fascia, or the board that runs along the outer edge just below the deck floor. For a cleaner look, use a miter saw to bevel the posts, or cut their bottom end at a 90 degree angle.
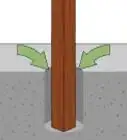
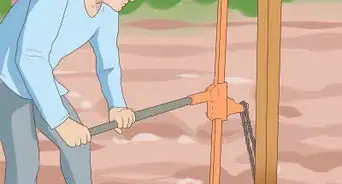
- If you’re driving posts into the ground, dig a hole approximately 5 inches (13 cm) deep, bury the post into the soil, then tightly back the soil around the post. For extra support, sharpen the bottom end of each post into a dull point with a hack or miter saw.[6]
-
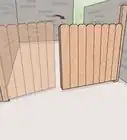
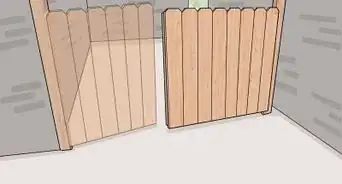
4Create continuous double corner posts if your fence includes corners. In a continuous corner, 2 posts are aligned on either side of the corner, and the cable runs continuously between them. This is the preferred method and is usually more aesthetically pleasing. If you use only 1 post at the corner, the cables from either direction must terminate instead of running continuously.[7]
- Since 2 lines of cable terminate at 1 corner post, you’ll need to offset the fasteners you’ll drive into the post to hold the cables in place. Instead of the cables running on continuous horizontal lines, 1 length of cables might have to sit 1⁄2 inch (1.3 cm) higher or lower than the other.
-
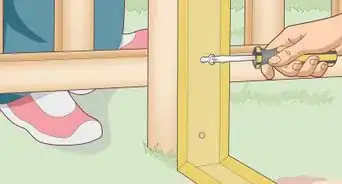
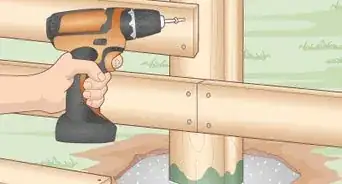
5Fasten the top guard rail to all posts. After mounting the posts, run a 2x6 board along the length of the fence. Drive 3 inches (7.6 cm) deck screws to fasten the top rail to each of the posts.[8]
- A top guard rail is required for deck fences and some livestock fences. If it’s not required, you can skip the top rail.
-
6Install a bottom rail, if desired. A bottom rail can add additional support and may be required in your jurisdiction. Cut notches in each post deep enough to hold a deck rail fastener, which you can purchase online or at a hardware store. Insert a fastener into each notch, and slide 2x2s through the fasteners to form the bottom rail.
- Drive 3 inches (7.6 cm) screws into each post in line with the bottom rail (or at designated points in the rail fasteners) to secure the 2x2 boards.
- The rail height must also meet building codes. Depending on your jurisdiction, it should be 3.5 to 4 inches (8.9 to 10.2 cm) higher than the deck floor.


Running the Cables
-
1Make a plywood template to accurately drill holes for the cables. Cut a plywood board to your posts’ exact height. Measure 3 inches (7.6 cm) from the top of the plywood board, then drill a hole. Your bit size will depend on your cables’ thickness, so check your installation guide. Continue drilling holes down the center of the board in 3 inches (7.6 cm) intervals.[9]
- If necessary, mark a spot on the plywood template for the bottom rail and center your cable holes between it and the top of the board.
-
2Drill holes for the cable runs into your posts. Clamp the template securely onto a post so the holes are centered. Drill a hole into the post for each hole drilled into the template. Repeat the process until you've drilled holes for the cable runs into each post.[10]
- Note that your corner posts are slightly wider than your standard posts. If your template is the same width as your standard posts, you’ll need leave some room on each side of the template when you center it onto a corner posts’ face.
-
3Install cable fasteners according to your product’s manual. The exact method depends on your product, so check your installation guide. Some fence cables have a bare end and a fastener already attached at the other end. Slide a bare end through the end post’s pre-drilled hole and pull it through until the fastener end cap sits flush on the post’s exterior face. The other fastener slides into the opposite end post, or where the cable will eventually terminate.[11]
- You might have to driller larger holes or counterbore the end posts to drive the fasteners into them. If necessary, check your instructions for the proper bore bit size.
- If both cable ends are bare, drive the fasteners that came separately in your kit into the posts where the cables will start and terminate. Then slide an end of each cable into a fastener on the first end post, which is the post where you’ll start running the cables.[12]
-
4Run cables through the pre-drilled holes. After anchoring 1 end of each cable to an end post, run them through your fence’s remaining posts. Slide cables 1 at a time through the holes you drilled into the posts. Be sure to line up the cables with the appropriate hole.[13]
- If you’re running cable through the second hole up from the bottom, make sure you’re sliding the cable through the correct hole in each post.
-
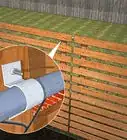
5Use protective sleeves in wooden posts with angled transitions. If you’re using wooden posts and your fence cables will descend stairs, the cables’ sloped angle could wear away at the wood. Wherever the cables transition at an angle, slide protective sleeves through the posts' drilled holes. These will hold the cables and protect the wood from abrasion.
- If protective sleeves weren’t included in your kit, purchase products designed for your cables’ thickness online or at a hardware store.
- You might have to drill larger holes into the posts to accommodate the protective sleeves.


Securing and Tightening the Cables
-
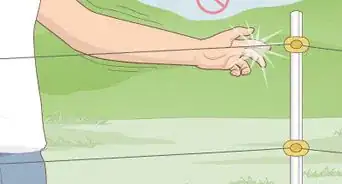
1Pull cables tightly and line them up with the fasteners. Use a pair of vice grips or locking pliers to pull a cable tightly so it meets the fastener installed in the end post. Some fasteners protrude from the end post and have a line about 1 inch (2.5 cm) from the tip. If you have this type of product, pull a cable tightly to remove all slack and align it with the line on the fastener.[14]
-
2Slide the cables through the fasteners, if necessary. For some products, you’ll pull the cable tightly, then slide it through the fastener on the end post. This locks the cable into the fastener, so all you'll need to do is cut excess cable. Continue to slide each cable through the fastener that matches its height.
-
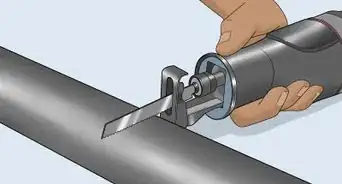
3Cut excess cable. If your fastener protrudes from the end post, cut the wire where it meets the line on the fastener's tip. If you ran the cable all the way through the fastener and end post, cut the excess wire that comes out of the other side of the post.
- Note that for fasteners that protrude, you'll cut the cable before attaching it to the fastener.[15]
-
4Attach the cables to the end connectors. If your fasteners protrude, attach the cables after you've cut them to the right length. Slide each cable into the end post fastener that matches its height. The cables will automatically lock into the fasteners.[16]
-
5Tighten the fasteners’ nuts. The cable slides into 1 end of the fastener, and the opposite end sits on the exterior face of the end post. Find the fastener’s tightening nut on this exterior end. Use an adjustable wrench to tighten the cable until you’ve removed all slack.[17]
- Both types of fastener include a tightening nut on the side opposite the cable sheath.
- Repeat the sequence to tighten the remaining fasteners.
-
6Trim excess threading and install end caps, if necessary. For some products, you’ll cut excess threading on the exterior side of the fastener after tightening the nut. Use a hacksaw, reciprocating saw, or electric grinder to trim excess threading so it’s approximately flush with the tightening nut. Then, if your kit included end caps, slide them over the tightening nut.[18]


Things You’ll Need
- Fence cables with fasteners
- Prefabricated metal posts, or 4x4, 4x6, 2x6 wooden beams
- Plywood beam
- Ruler or measuring tape
- Power drill
- Deck screws
- Hand saw
- Miter saw
- Adjustable wrench


References
- ↑ https://extension.tennessee.edu/publications/Documents/PB1541.pdf
- ↑ http://extension.uga.edu/publications/detail.html?number=C774
- ↑ https://extension.tennessee.edu/publications/Documents/PB1541.pdf
- ↑ http://extension.uga.edu/publications/detail.html?number=C774
- ↑ https://www.youtube.com/watch?v=cIm4qO6xTPQ&feature=youtu.be&t=47
- ↑ https://extension.tennessee.edu/publications/Documents/PB1541.pdf
- ↑ http://www.feeneyinc.com/site/Technical/CableRail/INSTALLATION%20INSTRUCTIONS/CableRail_Install_Wood_Metal.pdf
- ↑ http://www.feeneyinc.com/site/Technical/CableRail/INSTALLATION%20INSTRUCTIONS/CableRail_Install_Wood_Metal.pdf
- ↑ https://www.youtube.com/watch?v=kNFalmwg3nY&feature=youtu.be&t=134
- ↑ https://www.youtube.com/watch?v=kNFalmwg3nY&feature=youtu.be&t=138
- ↑ http://www.feeneyinc.com/site/Technical/CableRail/INSTALLATION%20INSTRUCTIONS/CableRail_Install_Wood_Metal.pdf
- ↑ https://www.youtube.com/watch?v=kNFalmwg3nY&feature=youtu.be&t=152
- ↑ https://www.youtube.com/watch?v=kNFalmwg3nY&feature=youtu.be&t=250
- ↑ https://www.youtube.com/watch?v=kNFalmwg3nY&feature=youtu.be&t=277
- ↑ https://www.youtube.com/watch?v=kNFalmwg3nY&feature=youtu.be&t=277
- ↑ https://www.youtube.com/watch?v=kNFalmwg3nY&feature=youtu.be&t=271
- ↑ https://www.youtube.com/watch?v=kNFalmwg3nY&feature=youtu.be&t=310
- ↑ http://www.feeneyinc.com/site/Technical/CableRail/INSTALLATION%20INSTRUCTIONS/CableRail_Install_Wood_Metal.pdf
About This Article