X
wikiHow is a “wiki,” similar to Wikipedia, which means that many of our articles are co-written by multiple authors. To create this article, volunteer authors worked to edit and improve it over time.
This article has been viewed 51,427 times.
Learn more...
Driving at night, music blasting, cool lights shining in your car. Doesn’t that seem like the perfect combination? This article will teach you how to install LED lights in your car, truck, or SUV. It’s affordable, quite simple, and sets the perfect mood!
Steps
Part 1
Part 1 of 3:
Gathering Parts and Planning
-
1Figure out how many lights you want. Depending on the size of your vehicle, 4 is adequate, but you can always buy more!
-
2Purchase the light kit. Installation kits are fairly inexpensive and include most of the parts needed to install the lights.
- Ordering online is the most affordable, but auto parts stores may also carry them for a little bit of a higher price.
Advertisement -
3Determine where you want to put your lights. Options include under the dash, under the seats, or both.
- Kits usually come with all that you need, but a fuse adaptor and some tools may also be required, depending on your vehicle. Kits usually come with the lights, zip ties, Velcro, and a power box.
-
4Determine the most efficient way for you to power the lights. The recommended way is to use the fuse box, which is normally under the driver side footwell. There are other methods as well for powering the lights, such as using a cigarette lighter.


Advertisement
===Installing===
Method 1: Using the Fuse Box
-
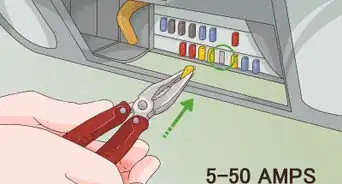
1Look for the fuse box diagram in your vehicle’s owner’s manual. It should state the location of each fuse, as well as what the fuse powers. Look for the accessory fuse location. This will allow the power of the lights to turn on when the car is on, so it doesn’t drain the car’s battery when the car is off.
-
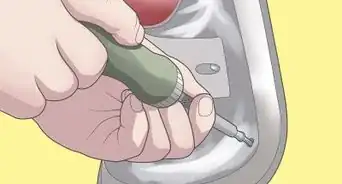
2Remove the existing accessory fuse from the fuse panel. Place the fuse in a fuse adaptor, and insert the fuse adaptor back into the original fuse spot.
-
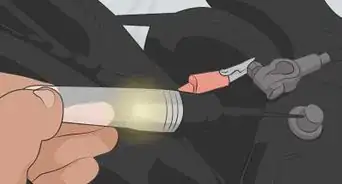
3Connect the other end of the fuse adaptor to the light’s power box. Connect the lights to the power box.
-
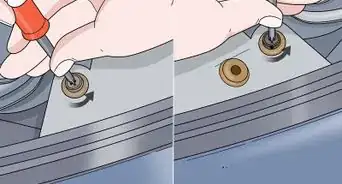
4Connect the black wire to a grounding point inside the vehicle. To do this, loosen up a bolt, put the wire under it, and tighten it back up. A grounding point is a metal part under the dash, such as the firewall. Without a proper grounding point, your lights will not turn on.


Advertisement
Method 2: Using the Cigarette Lighter
-
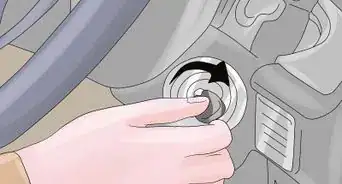
1Locate a 12-volt power outlet inside your vehicle. They are also known as a cigarette lighter, or car charger.
-
2Use a wire cutter to strip the red and black power wires. The wire should be exposed.
-
3Connect the exposed wires to butt connectors. Crimp the connectors so they are secured.
-
4Connect the butt connectors to the cigarette charger adapter. Plug the cigarette charger adapter into the 12 volt outlet.


Advertisement
Part 2
Part 2 of 3:
Connecting and Organizing
-
1Connect your light’s power box to the desired power source. Start routing your wires in a place where they will not be visible, such as under the dash or between the center console.
- Use zip ties to organize your wires so they look presentable and clean.
-
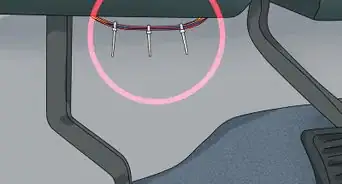
2Place a piece of Velcro under on each light. Mount the lights to your desired locations. It is recommended that you put one in the driver footwell, one in the passenger footwell, and one under each seat towards the back seats.
- Use electrical tape to tape the wires to a place under the dash, so they don’t fall while driving.
-
3Secure each light. Ensure all wires are hidden.
- If they are not secure, the lights can easily fall out when a car hits a bump, so this is a crucial step.


Advertisement
Part 3
Part 3 of 3:
Testing
-
1Test the lights to see if they work, using the included remote.
- If your lights don’t turn on, backtrack each step, and ensure that each connection is correctly fitted and tight.
-
2Set your desired light color and pattern. These type of lights are configurable to any liking.
- Change the pattern and color using the included remote.
-
3Enjoy the vibe that the lights add to your car!


Advertisement
Things You'll Need
- LED strips (number of your choice)
- 5-10 ft of red and black automotive wiring
- Zip ties (amount depending on how many lights)
- Velcro (amount depending on how many lights)
- Add-a-fuse
- Electrical tape
- Butt connectors (optional)
- Wire stripper


-Step-5-Version-2.webp)

About This Article
Advertisement