This article was co-authored by Norman Raverty. Norman Raverty is the owner of San Mateo Handyman, a handyman service in the San Francisco Bay Area. With over 27 years of experience, Norman has expertise in all five of the general building trades (carpentry, ceramic tile, drywall, electrical, plumbing).
This article has been viewed 52,856 times.
Installing your own cabinets is easier than ever, but always measure out your wall space first to get the best fit. It’s also good idea to also have a friend help lift the cabinets while you fasten them to the wall. Screw the cabinets together to keep them snug and even. Then you can fill in gaps with filler strip to complete your room’s fresh, new look.
Steps
Outlining the Wall Space
-
1Measure up from the floor to find where the cabinets will rest. Hold a level on the ground and against the wall to find the floor’s highest point. Measure up the wall about 48 in (120 cm) or 19 1⁄2 in (50 cm) above a lower cabinet. Mark this spot with a pencil and draw a straight line through it all the way across the wall.[1]
- Use a ruler to trace any lines. You want to keep them as straight as possible since you’ll use them as references when hanging the cabinets.
- When you’re finished tracing the line, you can use a level to check it.
-
2Outline where the 1st cabinet will hang. Using a tape measure, note the dimensions of the cabinets. The line you drew earlier represents their bottom edge. Measure up from it to sketch the cabinet’s height. Then, use the ruler to make a 2nd straight line all the way across the wall so you can keep the cabinets level later.[2]
- When hanging multiple cabinets, always start with the corner cabinet if there is 1. Otherwise, start with the leftmost cabinet.
Advertisement -
3Mark the stud locations on the wall. The cabinets need to be screwed into the wood studs in the wall. The easiest way to find them is with a stud finder purchased from a home improvement store. Mark these spots in pencil so you know where to hang the cabinets.[3]
- Another way to find the studs is to knock on the wall. You’ll hear a lower, fuller sound when hitting a stud instead of empty space.
- If you can’t find the studs, you can do it by drilling partway into the wall about every 16 in (41 cm). You’ll have to repair these spots with spackling or another substance before hanging the cabinets.
-
4Mark the length between studs on the cabinets’ backs. First, measure the length between the studs, then transfer this onto the cabinets. The cabinets will have a thick support rail on the top and bottom. There should be 1 mark on each of both rails.[4]
- Some cabinets will have another one of these thick support rails in the middle that you should also mark.
-
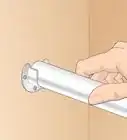
5Hang a ledger board on the bottom line you traced. At the home improvement store, pick up a 1 in × 4 in (2.5 cm × 10.2 cm) ledger board or wall cleat. Line the board’s top edge up with the bottom line you drew. Use 1 1⁄4 in (3.2 cm) drywall screws to secure it to the wall. This board ensures the cabinets are level upon installation.[5]
- If you have a friend who will hold the cabinets as you install them, you don’t need a ledger board.
- Instead of a ledger board, you may also use a cabinet jack. Set the cabinet on the jack and raise the jack up so you can reach the cabinets while you work.


Hanging the Cabinets
-
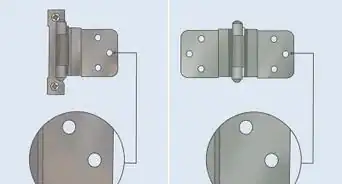
1Remove the doors from the cabinets. Removing the doors, along with any shelving or other extra features, makes the cabinets a lot lighter. Be sure to label the parts with tape after unscrewing them so you can reinstall them properly later.[6]
-
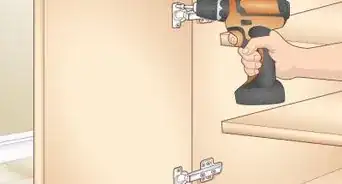
2Drill holes through the backs of the cabinets. Find the stud measurements you marked on the back of the cabinets. Drill all the way through them, making holes about 2 in (5.1 cm) wide. Make sure the holes are about 3⁄4 in (1.9 cm) from the cabinet’s edges.[7]
-
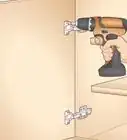
3Screw the cabinet to the wall. Start with the corner cabinet or leftmost cabinet if you’re not installing in a corner. Rest the bottom of the cabinet on the ledger board. Line it up with the studs, then fasten it in place with 3 in (7.6 cm) cabinet screws in each hole.[8]
- It’s best to leave the screws a little loose until you’ve finished shimming the cabinet.
-
4Shim the cabinet until it’s level. Check over the cabinet for uneven spots. Slip shims behind the cabinet’s sides to raise them. Continue adding and adjusting these wooden strips until the cabinet is plumb.[9]
- Shims are small, wooden strips used for positioning. They’re sold in packs at home improvement stores.
- You can test the cabinet with a level to make sure it looks perfect.
-
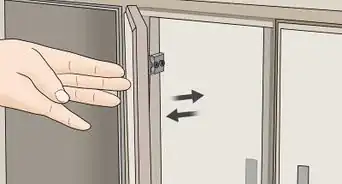
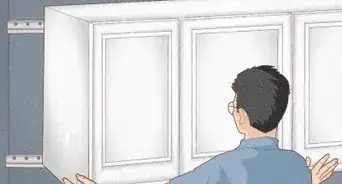
5Hang the second cabinet next to the first one. Secure 2 cabinets to the wall before trying to fasten them. First, get the cabinet as close to the first one as possible. Repeat what you did before, screwing the cabinet to the studs and shimming it until it’s level.
-
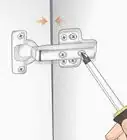
6Pre-drill holes from 1 cabinet to the other. Pick the cabinet where the screws will be least noticeable. The holes should be inside the cabinet on the front edge of the frame. Make sure you’re not drilling where the hinges lay. Drill a 1⁄8 in (3.2 mm) hole below the top hinge, then another hole above the lower hinge.[10]
- Hold the cabinets together with a pair of clamps to ensure they stay level.
-
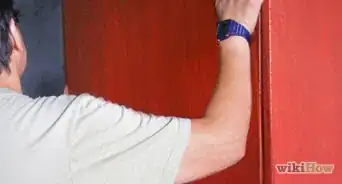
7Screw the cabinets together. Slide a 2 1⁄2 in (6.4 cm) screw into each hole. Use a cordless screwdriver to secure the cabinets together. Remove the clamps and check that the cabinets appear level.[11]
- If the cabinets aren’t level, undo the screws. Adjust the shims as needed, then push the cabinets closer together before putting the screws back in place.
-
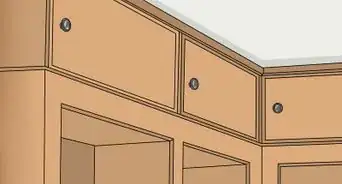
8Hang and secure the other cabinets together. Repeat the process with any other cabinets you want to hang. Hang them next to the last cabinet, securing them to the wall first before screwing them together. Always add the connecting screws where they’re least noticeable.[12]


Finishing the Cabinets
-
1Cut a filler strip if there’s a gap between the cabinet and wall. Spare filler strips or moulding can be purchased from a home improvement store. Lay masking tape over the strip, then pencil on the gap measurement either by using measuring tape or a scribing block. Cut the filler strip to size with a jigsaw.[13]
-
2Secure the strip to the cabinet with screws. Drill a pair of 1⁄8 in (3.2 mm) holes from the cabinet’s frame to the filler strip. Stick 2 1⁄2 in (6.4 cm) screws in the holes, then tighten them with a cordless screwdriver.
- Filler strips are placed beside the leftmost or rightmost cabinets, between the wall and cabinet. Keep in mind that it will be visible, so make sure it matches your cabinets.
-
3Remove the ledger from the wall. Make sure all the cabinets are tightly screwed to the wall first. Undo the screws in the ledger or wall cleat to remove it. The screws will leave holes that you’ll need to repair with spackling.
-
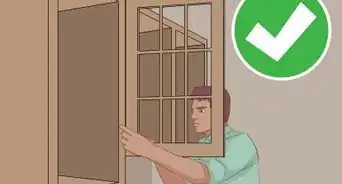
4Hang the doors on the cabinets. Reattach the doors, shelving, and other features you removed earlier. Line the hinges up over the cabinet’s frame. Place the screws and tighten them to finish installing the cabinets.


Things You’ll Need
- Level
- Tape measure
- Pencil
- Ledger board or wall cleat
- 2 1⁄2 in (6.4 cm) screws
- Cordless screwdriver
- Drill
- Clamps
- Filler strip
- Jigsaw


References
- ↑ https://www.thisoldhouse.com/how-to/how-to-hang-kitchen-cabinets
- ↑ https://www.familyhandyman.com/kitchen/diy-kitchen-cabinets/how-to-install-cabinets/view-all/
- ↑ http://www.finehomebuilding.com/2016/06/01/installing-upper-cabinets
- ↑ https://www.thisoldhouse.com/how-to/how-to-hang-kitchen-wall-cabinet
- ↑ http://www.finehomebuilding.com/2016/06/01/installing-upper-cabinets
- ↑ https://www.familyhandyman.com/kitchen/diy-kitchen-cabinets/how-to-install-cabinets/view-all/
- ↑ http://www.finehomebuilding.com/2016/06/01/installing-upper-cabinets
- ↑ https://www.thisoldhouse.com/how-to/how-to-hang-kitchen-wall-cabinet
- ↑ https://homesteady.com/how-6615456-install-upper-kitchen-wall-cabinets.html
- ↑ https://www.thisoldhouse.com/how-to/how-to-hang-kitchen-cabinets
- ↑ https://www.familyhandyman.com/kitchen/diy-kitchen-cabinets/how-to-install-cabinets/view-all/
- ↑ https://homesteady.com/how-6615456-install-upper-kitchen-wall-cabinets.html
- ↑ https://www.familyhandyman.com/kitchen/diy-kitchen-cabinets/how-to-install-cabinets/view-all/
About This Article

Upper cabinets are easy to install, even if you don’t have a lot of experience, but you will want to have someone help you. Before you install the cabinets, use a stud finder and mark where the studs are located on your wall. Then, drill a ledger board onto the wall, which will ensure the cabinets stay level. Once you’ve done this, drill holes through the backs of the cabinets so they line up with the studs in the wall. Then, rest the bottom of the cabinet on the ledger board and screw the cabinet into place. Use connecting screws to attach each cabinet to the one next to it as you work. To learn how to add filler strips to your cabinet, read on!