This article was co-authored by wikiHow Staff. Our trained team of editors and researchers validate articles for accuracy and comprehensiveness. wikiHow's Content Management Team carefully monitors the work from our editorial staff to ensure that each article is backed by trusted research and meets our high quality standards.
There are 10 references cited in this article, which can be found at the bottom of the page.
This article has been viewed 21,669 times.
Learn more...
Knit gloves are elegant, cozy, and an absolute must for cold weather! You can knit gloves that are simple or elaborate depending on your preference and skill level. Since gloves need to be slightly fitted to be comfortable, using a pattern is highly recommended. Choose a pattern and some yarn and needles, and then try knitting a pair of custom gloves for yourself or for a friend!
Steps
Designing Your Gloves
-
1Check out some patterns for inspiration. A knitting pattern can help you to create a pair of gloves in the color and style of your choice, and it will make it much easier to get the size right. Patterns range from beginner to advanced, so look for a pattern that is equivalent to your skill level.
- For example, if you are somewhat new to knitting, then opt for a pattern that is labeled as easy.
- You can find free patterns by searching online, or visit your local craft supply store and peruse the pattern books and magazines.
-
2Choose your yarn. You can make your gloves from just about any type of yarn, but a warm, soft yarn is ideal. You will need 1 ball of a light to medium-weight yarn. You may want to avoid using heavier weight yarns, such as chunky or super chunky, for making gloves because the fingers will end up being quite bulky.
- You can knit gloves in a single color or use multiple colors and switch the yarn as desired.[1]
Advertisement -
3Get a set of 5 double-pointed knitting needles. Double-pointed needles allow you to work the cuff of the gloves and the individual fingers. Make sure that the set of double-pointed needles you choose will work with the type of yarn you want to use. Check the yarn label for a recommendation.
- For example, if you want to make your gloves with a medium-weight yarn, then US size 7 to 9 (4.5 to 5.5 mm) double-pointed needles will work.[2]


Creating the Glove Cuff
-
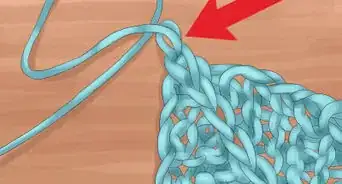
1Cast on an equal amount of stitches to 3 or 4 double-pointed needles. Create a slipknot and slip it onto your right-hand needle. This is your first cast on stitch. Then, cast on the rest of the stitches required for your pattern. This is a highly variable number of stitches depending on the size of the gloves you want to create, the type of yarn, and the size of your double-pointed needles.[3]
- To cast on, loop the yarn over the left-hand needle. Push your right-hand needle into the loop on the left-hand needle, and then yarn over the right-hand needle. Use the right-hand needle to bring this new loop through the loop on the left-hand needle. This will create another cast-on stitch on the right-hand needle. Continue casting on until you have the required number of stitches.[4]
- Make sure to distribute the stitches evenly among 3 or 4 of the double-pointed needles. Keep 1 needle empty to work the stitches. For example, if you need to cast on 36 stitches, then cast on 12 stitches per needle to divide them among 3 needles or 9 stitches per needle to divide them among 4 needles.
-
2Position the double-pointed needles to avoid twisted stitches. It is important to make sure that you keep all of the stitches straight on the needles. To help you do this, lay out the needles in the shape of an H if you are using 3 needles, or in the shape of a square if you are using 4 needles. Check all of the stitches to ensure that they are all pointed in the same direction and none of them are twisted.[5]
- You can do this after the first couple of rounds to ensure that the stitches are straight.
-
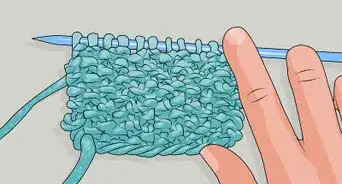
3Knit the first stitch. Insert your right-hand needle into the first cast on stitch on the first double-pointed needle. Bring the yarn over the end of your right-hand needle. Then, pull the yarn through the loop. Allow the old stitch to slip off the left-hand needle as the new stitch replaces it.[6]
- Try knitting 2 instead of 1 stitch for a wider rib pattern.[7]
-
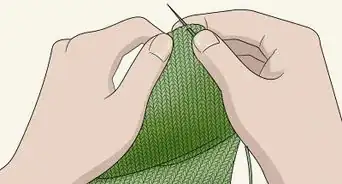
4Purl the next stitch. Purl by bringing the working yarn in front of your knitting. Insert the tip of the right-hand needle into the first stitch on your left-hand needle going from back to front. Then, loop the yarn over your right-hand needle. Pull the new loop through the stitch and allow the old stitch to slide off the left-hand needle.[8]
- Try purling 2 instead of 1 for a wider rib stitch pattern.[9]
-
5Alternate between knit and purl stitches for the entire round. Knit 1, purl 1 is a basic rib stitch pattern, but remember that you may also do a 2 by 2 pattern for a wider rib. Work the rib stitch for the entire first round and then place a stitch marker at the end of the round. This will make it easier to tell where the round begins and ends.[10]
- Using a rib stitch to start your gloves will help to create a stretchy cuff. If you are not concerned with making the cuff stretchy, then you may knit all of the stitches in the round instead. Just keep in mind that you will end up with a curled, loose cuff if you knit all the stitches.
-
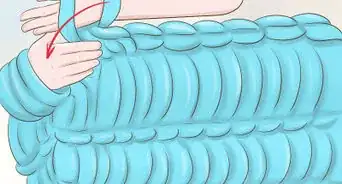
6Work in rounds until the cuff is 2 to 3 inches (5.1 to 7.6 cm). Keep working the cuff in the rib stitch until you get the desired length. About 2 to 3 inches (5.1 to 7.6 cm) is an ideal cuff for most glove sizes, but consult your pattern for exact sizing instructions.
- Even if you decide not to create a ribbed cuff, your gloves will still need a cuff. Continue to work the cuff in the desired stitch until the cuff measures 2 to 3 inches (5.1 to 7.6 cm).
- Some patterns will indicate a number of rounds to work instead of a length. Defer to your pattern’s recommendations.[11]


Knitting the Glove Body
-
1Work in rounds for another 2 to 4 inches (5.1 to 10.2 cm) from the cuff. Next, you will need to begin knitting rounds to get the body of the glove to the required length. Check your pattern’s recommendations for the length your need to reach or how many rounds to work.
- For example, you may need to knit for another 10 rounds, or 3 inches (7.6 cm) to create the body of the glove before you begin working on the thumb.
- For a simple glove body, work all rounds after the cuff in the stockinette stitch. This stitch only requires that you knit all of the stitches in the round.[12]
-
2Slip 6 stitches onto a safety pin or stitch holder. When the glove body is the desired length, you will need to set aside some stitches for the thumb and then keep working the body until you are ready to work the fingers. Take the first 6 stitches in the round you are currently on and slip them onto a safety pin or stitch holder.[13]
- Your pattern may indicate a different amount of stitches to reserve for working the thumb. Make sure to do what it says to do.
-
3Knit until the glove body is the desired length. Keep working the body of the glove in the stockinette stitch, or in the stitch required for your pattern. The pattern may indicate that you need to work for a specific number of rounds or until the piece reaches a certain measurement.[14] Measure the body of the glove as needed.
- For example, you may need to knit for 20 more rounds, or for 3 inches (7.6 cm) past the thumb space.
- Do not knit too tightly across the space you have left for your thumb or you may not be able to fit your thumb through it. Stick your thumb through the hole to check it before and after you knit across the section. This will help you to get a better fit for your gloves.
-
4Transfer all of the stitches to 2 safety pins or stitch holders. You will need to work the remainder of the stitches in tubes to create the fingers, so slip these onto 2 stitch holders or safety pins to secure them. To do this, insert the end of the stitch holder or safety pin through each of the stitches on the knitting needle 1-by-1. As you do this, let each stitch slide off the knitting needle so it is only on the stitch holder or safety pin.[15]
- Try to arrange the stitches so that the stitches that will be on 1 side of the glove are on 1 stitch holder or safety pin, and the other half are on the other one.


Working the Fingers and Thumb
-
1Pick up ¼ of the stitches divided between the 2 stitch holders. Start by picking up the stitches nearest to the working yarn. This will either be the index or pinkie finger of your gloves. To pick up a stitch, insert the right-hand needle through the first stitch, loop the yarn over the needle, and then pull through.[16]
- The working yarn will be right where it should be to knit the first finger, but you will need to anchor the strand to the body of the glove for all subsequent fingers. To do this, tie the end of the working yarn through the stitch closest to the base of your first finger. Then, use this yarn to pick up the stitches for the next finger.
-
2Knit 2 stitches front and back. You will need to knit 2 increases for the first round to add 2 stitches.[17] To knit front and back, knit the first stitch as usual, except do not let the old stitch slide off just yet. Instead, bring the yarn in front of the work and knit into the same stitch again, but insert the right-hand needle going from back to front, like you are purling it.[18]
- For the thumb, you will need to repeat the increase round twice to get the required number of stitches for the round.
-
3Knit the rest of the round. After you finish your increase stitches for the round, knit the rest of the stitches in the round as usual. However, when you get to the thumb, remember that you will need to increase for the next round as well.[19]
-
4Knit all rounds until the first finger is the desired length. After you complete the increase round(s) for the finger that you are working on, continue knitting all of the stitches in the round until the finger you are working on is the length that you want it to be.[20]
- You may measure each of your fingers to get an exact length to work the rounds for each finger, or you can just follow along with what your pattern says.
- For example, if your thumb is 3 inches (7.6 cm) long, your pinkie finger is 3 inches (7.6 cm) long, your ring finger is 3.75 inches (9.5 cm) long, your middle finger is 4 inches (10 cm) long, and your index finger is 3.5 inches (8.9 cm) long, then you may want to knit each finger section to their corresponding lengths.
-
5Bind off the finger and tie off the last stitch. Begin by knitting the first 2 stitches on the left-hand needle. Then, bring first stitch on the right-hand needle up and over the second stitch. This way the first stitch is sliding off the needle and securing the second stitch in the process. Knit the new second stitch on the left-hand needle and then loop what is now the first stitch over the second stitch again.[21]
- Repeat the bind off sequence all the way to the end of the row to secure the end of the finger or thumb you are finishing up.[22]
- Tie off the last stitch to secure it and insert the excess yarn into the fingertip to hide it.
-
6Repeat for the next finger. After you get done with 1 finger, move onto the 1 directly next to it. Keep repeating the same process for each of the fingers until they are all finished. Then, move onto the thumb. After you finish the thumb, your glove is finished![23]
- Repeat the whole process to make a second glove.


Things You’ll Need
- Yarn
- A set of 5 double-pointed needles
- Scissors
- Ruler
- 3 stitch holders or safety pins
References
- ↑ https://www.abc-knitting-patterns.com/1056.html
- ↑ https://www.craftyarncouncil.com/standards/yarn-weight-system
- ↑ https://www.youtube.com/watch?v=L6ODA0nfIIE&feature=youtu.be&t=2m7s
- ↑ https://www.thesprucecrafts.com/knit-cast-on-2116503
- ↑ https://www.youtube.com/watch?v=L6ODA0nfIIE&feature=youtu.be&t=4m7s
- ↑ https://www.craftyarncouncil.com/instructions_kn.php3
- ↑ https://www.youtube.com/watch?v=L6ODA0nfIIE&feature=youtu.be&t=6m1s
- ↑ https://www.craftyarncouncil.com/mar06_purl.html
- ↑ https://www.youtube.com/watch?v=L6ODA0nfIIE&feature=youtu.be&t=6m1s
- ↑ https://www.youtube.com/watch?v=L6ODA0nfIIE&feature=youtu.be&t=6m1s
- ↑ https://www.abc-knitting-patterns.com/1056.html
- ↑ https://www.abc-knitting-patterns.com/1056.html
- ↑ https://www.abc-knitting-patterns.com/1056.html
- ↑ https://www.abc-knitting-patterns.com/1056.html
- ↑ https://www.abc-knitting-patterns.com/1056.html
- ↑ https://www.abc-knitting-patterns.com/1056.html
- ↑ https://www.abc-knitting-patterns.com/1056.html
- ↑ http://newstitchaday.com/knit-front-and-back-increase-kfb/
- ↑ https://www.abc-knitting-patterns.com/1056.html
- ↑ https://www.abc-knitting-patterns.com/1056.html
- ↑ http://newstitchaday.com/knitting-101-the-basic-knit-bind-off-for-beginners/
- ↑ https://www.abc-knitting-patterns.com/1056.html
- ↑ https://www.abc-knitting-patterns.com/1056.html
About This Article

To knit gloves, you’ll need to choose a design and pick some yarn in your preferred texture and color. Get started by using 3 or 4 double-pointed knitting needles to create the cuffs, using alternating knit and purl stitches until the cuffs are 2 or 3 inches long. Next, use stockinette stitch to create the body of the glove, working in rounds until you get the desired length. Finally, create the fingers, starting with the pinky or the index finger. For more tips, including how to bind off the fingers and hide the ends of your yarn, keep reading!