This article was co-authored by Ryaan Tuttle. Ryaan Tuttle is a Home Improvement Specialist and the CEO of Best Handyman, Inc. in Boston, Massachusetts. With over 17 years of experience, he specializes in building home service businesses, focusing on creating scalable and efficient brands. With the help of his global team, the companies have achieved over 10+ million in sales and received recognition through magazine features, and enjoy partnerships with wikiHow and Jobber field service software. Boston Magazine and LocalBest.com have named Best Handyman Boston the Best Handyman in Boston. Ryaan holds Construction Supervisor and Home Improvement Contractor Licenses.
This article has been viewed 86,666 times.
Installing tiles on concrete subfloor doesn't actually require a contractor. As long as you take the time to level the floor, install a membrane, and layout your tile properly, you can lay down a beautiful arrangement of tiles on concrete within a week. This article will walk you through the whole process step-by-step, from prepping the concrete to putting down the tiles.
Steps
Preparing the Concrete
-
1Clean the surface of the concrete with a vacuum. Follow up with a detergent, like tri-sodium phosphate (TSP). Make sure the area is well ventilated when you use this strong chemical cleaner.
-
2Check the levels on the floor to determine if the concrete is level. If it is not level, you will want to purchase self-leveling underlayment to create an even surface. If there are pockmarks and cracks, you will want to use some leveling compound or filler.Advertisement
-
3Roll or brush a latex primer onto the surface of the concrete. Some leveling underlayment products, like LevelQuik, also sell a primer to be used with their self-leveling compound. Wait for it to dry according to package directions.
-
4Mix the self-leveling underlayment in a bucket or purchase it pre-mixed. Pour it in the lowest area of the concrete floor. It will seek its own level.
-
5Watch where the leveling compound stops flowing. Smooth down the edges of the compound against the adjoining concrete with a smooth trowel. Wait for the leveling compound to dry completely.
-
6Purchase an anti-fracture membrane to lay over your leveled concrete. This will help prevent cracking of tiles. You can purchase it in sheets or in liquid form.[1]
- Opt to cut sheets of “Ditra” membrane to fit the area you are tiling. You will need to apply thinset to the concrete and smooth the membrane sheets down with a trowel.
- You can also paint a thick coat of liquid anti-fracture membrane on the concrete with a roller brush.
- The anti-fracture membrane keeps an insulated layer between the concrete and the tile so that it can move with the change of seasons and temperature without cracking the tiles.[2]


Preparing the Layout
-
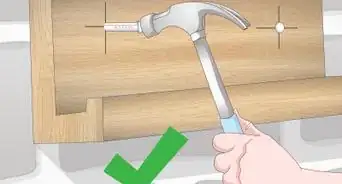
1Snap center lines through the length and width of the room with a chalk line. Use a carpenters square or triangle ruler (try square) to check that the lines are perfectly perpendicular. Alternatively, mark a spots 3' and 4' away from the center point. If the distance between the two is exactly 5', the lines are perpendicular (since a 3-4-5 triangle is a right triangle). If not, adjust the center lines.
-
2Unpack all your tile to check for damage and color mismatches.
-
3Lay out the tile on the surface of the floor. Cover the whole surface in a thorough dry run.
-
4View the edges of the tile. In almost all cases, tile must be cut near the edges to finish the tiling.
-
5Adjust your center lines if the tiles near one edge are less than one-half tiles. Move a center line to one side enough so that you have even tile cuts on all sides.
-
6Cut your tiles near the edge of the room. If you need to make small, intricate cuts use tile nippers. Use a tile cutter if you are cutting vinyl tile.
- Use a wet saw to cut ceramic tile to fit in narrower spaces.
- You can also cut tiles with a 4-inch angle grinder with a masonry blade in it.
-
7Check that your newly cut tile fits back into your layout before you start to lay the tile.
- Leave a 1/4" gap on all edges (by walls, cabinets, fireplace hearths, etc.) to allow for thermal expansion.


Laying Tiles
-
1Remove the tile in the quarter of the room farthest away from the door. This is where you will start the installation. You can remove the tiles quarter by quarter or all at once, as long as you know where they will go.
-
2Mix your thinset mortar. Place the bucket and a one-fourth inch (0.6cm) notched trowel near your empty quarter. You may want to put on knee pads during the installation process.
-
3Spread a three by three foot area with thinset. Smooth it over the entire area with a smooth trowel.
-
4Comb the thinset using your notched trowel. The lines should be horizontal and run the same direction throughout your installation.
-
5Set your first tile against the corner of the center line. Push down lightly to ensure it adheres. Keep a bucket of water and a damp sponge nearby to wipe off tiles if they get thinset on the top.
- Wipe them off immediately to avoid ruining the surface of the tile.
-
6Place one-fourth inch (0.6cm) tile spacers between the tiles, if you want even, thick grout lines. You can also skip using spacers and create a thin grout line at the end of your installation.
-
7Place the ceramic tiles down in your three by three grid. Check that they are level. If a tile is not level, you can “back-butter” it by placing an extra layer of thinset in a corner to make it level.
-
8Move across the floor in a three foot by three foot area, working in one quarter of the room at a time. Take your time to ensure you have an even surface. Use a 4' carpenter's level, if you have one.


Grouting Tiles
-
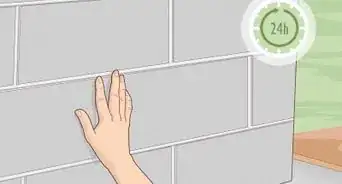
1Allow the thinset to set for at least 24 hours before grouting.
-
2Mix your grout with cool water. Make sure it is lump free before spreading it.
-
3Lift grout out of the bucket with a grout float. Hold the float at a 45-degree angle and run it across the surface of the tile. Repeat until all the grout spaces seem to be filled.
-
4Leave the grout to set for 20 minutes. Return and clean the top of the tile with a damp sponge. Clean it often and ensure it isn't too wet.
-
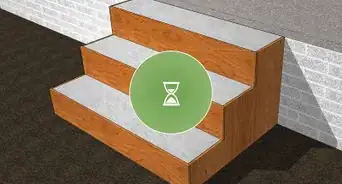
5Allow the grout to set for two hours. Buff the surface of the tile with a dry cheesecloth. Let the grout continue to dry for 72 hours.
-
6Seal the grout. Apply sealant to the grout with a sponge paintbrush. If you want to seal the entire tile to resist water, you can apply some sealants with a large sponge.


Warnings
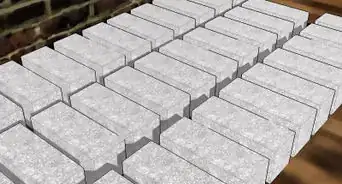
- Never install tiles onto fresh concrete. Allow it to cure for over a month to ensure a dry, strong surface.[3]⧼thumbs_response⧽
Things You'll Need
- Latex primer
- Self-leveling underlayment
- Trowel
- Chalk line
- Paper
- Pencil
- Tile cutter/saw
- Tile nippers
- Thinset
- Tile spacers
- Bucket
- Notched trowel
- Tape measure
- Tile grout
- Sponges
- Grout float
- Paintbrush
- Grout sealer
- Carpenter's square or try square (optional)
- Carpenter's level (optional)


References
About This Article