This article was co-authored by Michael Van den Abbeel. Michael Van den Abbeel is a Professional Hair Stylist and the Owner of Mosaic Hair Studio and Blowout Bar in Orlando, Florida. He has been cutting, styling, and coloring hair for over 17 years. Michael loves showing his clients how to wash and wear their hair easily and effortlessly. Mosaic Hair Studio and Blowout Bar is recognized as a Diamond Top Tier level Wella salon.
There are 7 references cited in this article, which can be found at the bottom of the page.
This article has been viewed 736,891 times.
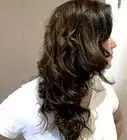
One of the easiest ways to get beach waves is right at the beach. This isn't an option for everyone however, but luckily, you can still create beach waves at home with a simple flat iron. The process is a great alternative to no-heat methods, which can take up to a whole day to set. For each of these styles, you'll need a small, 1 inch (2.5 cm) flat iron with a rounded (beveled) edge that will create smooth waves or curls.
Steps
Creating Rippling, Horizontal Waves
-
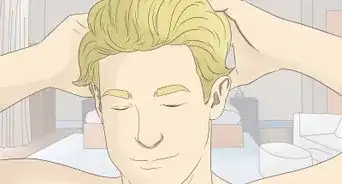
1Apply a heat protectant to dry, brushed hair.[1] Comb your hair first to remove any knots or tangles. Apply a heat protectant and comb through your hair once more to distribute the product.
-
2Pull your hair into a half-up bun, if needed. If you have very thick hair, you might find it easier to curl it if it is divided into 2 layers. To do this, simply gather the upper half of your hair, just like you would for a half-up ponytail. Twist the hair into a loose bun, then secure it with a hair clip.Advertisement
-
3Clamp a flat iron over a 1 to 2 in (2.5 to 5.1 cm) section of hair. Gather a 1 to 2 in (2.5 to 5.1 cm) wide section of hair from next to your face. Clamp a 1 in (2.5 cm) wide flat iron over the section, close to your roots.[2]
-
4Rotate the iron upwards and pull the rest of your hair downward. Hold the iron clamped shut as you rotate it upwards towards your roots. Use your other hand to gather the end of the section, and pull it straight down. Hold the iron there for a few seconds.[3]
-
5Move the iron down, clamp it, and rotate it downward.[4] Unclamp the iron and move it down a few inches/centimeters until you reach the next, un-straightened section of hair. Clamp it over that section and rotate the iron downwards, towards your jaw. Pull the rest of your hair upwards, and hold it like that for a few seconds.[5]
-
6Repeat this process until you reach the end of your hair. Try to keep the motion fluid and rotating back and forth, creating a ripple or wave with your hand. You can also leave the bottom 2 to 3 inches (5.1 to 7.6 cm) untouched for a more natural look.
-
7Repeat the process for the rest of your hair. Continue to work in 1 to 2 in (2.5 to 5.1 cm) sections of hair, from 1 side of your face to the other. If you split your hair into 2 layers, finish the bottom layer first, then do the upper layer. Work 1 section of hair at a time, rippling the iron through each section.[6] .
-
8Let your hair cool before combing it. You can use your fingers or a wide-toothed comb for this. Do not use a hairbrush, or it will smooth out the curls too much and make your hair turn frizzy.
-
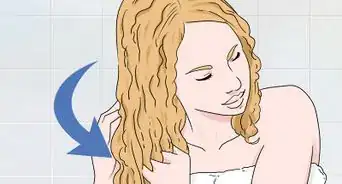
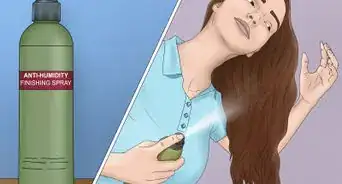
9Add some texture with dry shampoo, from roots to ends. This will also help give you a little extra volume while absorbing the excess oils.[7] If you want a more authentic, beachy look, you can mist some sea salt spray or beach spray as well. This will give you that natural, dirty look your hair gets after a day at the beach.
- Be careful when using sea salt or beach spray, as these products are wet and can flatten your waves.


Creating Corkscrew Curls with a Flat Iron
-
1Apply a heat protectant to clean, dry, combed hair. Wash your hair, if needed, then blow dry it. Brush out any knots or tangles, then apply a good heat protectant. Comb through your hair once more to distribute the product evenly throughout your hair.
-
2Clip the top section of your hair out of the way. Part your hair in half at ear-level, like doing a half-up ponytail. Twist the upper section of your hair into a loose bun and secure it with a clip or hair tie.[8]
-
3Take a 1 in (2.5 cm) section of hair from next to your face. Instead of grabbing a horizontal section that is parallel to the floor, grab a vertical section instead. If you have thin hair, or if you want looser waves, you could try a 2 in (5.1 cm) section instead.
-
4Clamp a flat iron over the section. Make sure that the flat iron is oriented vertically so that it is perpendicular to the floor, not parallel. The hair will end up draped diagonally across the metal plate instead of straight down the middle.
- You can have the handle pointing up or down, whichever is more comfortable for you.
-
5Twist the flat iron away from your face while pulling it down. This should be a single, fluid motion. Twist the iron away from your face by about 180 degrees. While you are twisting it, pull it towards the end of your hair. Your hair should pass over the center of the iron and around one of the plates.[9]
- For a more authentic beachy look, pull the iron only three-quarters of the way down. This will leave the ends of your hair their natural texture.
- This motion is similar to straightening your hair, except that you are twisting the iron instead of holding it straight and parallel to the floor.
-
6Repeat the process for the rest of your hair. Continue grabbing and curling 1 in (2.5 cm) sections of hair. Alternate between twisting the iron towards and away from your face. When you reach the other side of your head, twist the iron away from your face. Finish the bottom layer of hair first, then do the upper layer.[10]
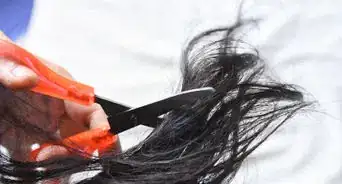
- For a final touch, consider straightening just the ends of your hair. This will help give your beach waves that natural, authentic look.
-
7
-
8Set your style with hairspray. If you want more definition, then apply a styling cream as well.[13] Alternatively, you can mist your hair with dry shampoo to give it texture and soak up excess oil. A quick misting of sea salt spray or beach spray will help give it a more authentic, beachy texture too.


Using a Flat Iron as a Curling Iron
-
1Brush your hair and apply a good heat protectant. Comb through your hair to remove any knots or tangles first. Next, apply a good heat protectant, and comb through it again to ensure that the product coats every strand.[14]
- If your hair is thin, consider misting it with some volumizing spray as well. Let the spray dry before moving on, however.
- This method will give you waves that look similar to the curls created by a curling iron, except that they will be looser and more angular.
-
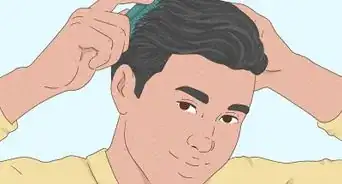
2Smooth out any kinks or frizz. In order for this technique to work, you need to start with a smooth base. If your hair looks frizzy or kinky, take a moment to straighten it with a flat iron. You don't have to get it perfectly straight--you can even focus on just the areas that need attention.[15]
-
3Take a 1 to 2 in (2.5 to 5.1 cm) section of hair. If you have very thick hair, gather the upper half of your hair into a loose bun first, like doing a half-up ponytail. Next, take a 1 to 2 in (2.5 to 5.1 cm) section of hair from next to your face.[16]
-
4Wrap the section around 1 of the prongs on your flat iron. Turn on your flat iron and open it to make a V-shape. Wrap the section of hair around 1 of the prongs of the flat iron, starting at the roots and leaving the ends out. Do not wrap the section around both prongs. You want to be able to open and close the flat iron.[17]
- Avoid overlapping the hair in 1 place; cover the entire plate on the flat iron.
- Make sure that you are wrapping the section away from your face.
-
5Close the flat iron and hold it for a few seconds. This is just like using a curling iron: the first prong on the flat iron is the curling iron's barrel, and the second prong is the clamp. Simply close the flat iron and hold it for a few seconds.[18]
-
6Open the flat iron and pull it out of your hair. Unlike a curling iron, the flat iron will only have curled the hair between the 2 prongs. This will result in a loose, chunky wave.[19]
-
7Repeat the process for the rest of your hair. Work your way from 1 side of your head to the other. Alternate the directions that you wrap your hair in. When you reach the other side of your face, remember to wrap the section away from it as well.
- If you split your hair into 2 layers, do the bottom layer first, then the upper.
-
8


Using Twists or Braids
-
1Brush your hair and apply heat protectant. Comb your hair until it is free of knots and tangles, then apply a good heat protectant. Comb through your hair once more to evenly distribute the product throughout your hair.
- This method will give you waves that are either vertical (twists) or horizontal (braids).
-
2Pull the upper half of your hair into a bun, if desired. If you have very thick hair, it may be easier to curl it in layers. Simply part your hair at about ear level, like creating a half-up ponytail, then pull the upper layer into a loose bun. Secure the bun with a clip or hair tie.
-
3Take a thick chunk of hair from next to your face. Mentally divide your hair into thirds, like starting a braid. Take 1 of the outer sections from next to your face; leave the other 2 sections alone.
- If you have thin hair, part your hair down the middle like doing pigtails. Part the section in half again, and choose 1 of those sections to start with.
- If you plan to braid your hair instead of twisting it, it is better to do 2 sections instead of 3. If you do too many, your hair will look crimped instead.
-
4Twist the chunk away from your face into a tight rope. Twirl the section around your finger until it twists into a rope. Alternatively, you can split the section into 3 strands, then braid them together. Hold the rope or braid tightly at the end.
- Leave the bottom 1 to 2 inches (2.5 to 5.1 cm) of your hair untwisted/unbraided.
-
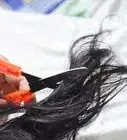
5Clamp a flat iron over the rope and straighten it. Turn your flat iron to a setting suitable for your hair. Clamp it over the rope or braid, close to the roots. Slowly move the flat iron down the length of the rope or braid towards the end. Do this a few times until the rope or braid feels warm.
-
6Clip the rope or braid out of the way. Pull the end of your rope or braid towards your head to make a loop. Secure it to the start of the rope or braid, right at the roots, with a hair clip.
- A duckbill clip will work especially well here because it won't leave creases in your hair.
- Keep the rope or braid intact. Don't let it come untwisted or unbraided.
-
7Repeat the process with the rest of your hair. Work your way from 1 side of your head to the other. If you gathered the upper half of your hair into a bun, finish the lower layer first, then undo the bun and repeat the process with the upper layer.
- If you are twisting your hair into ropes, alternate the directions you twist them in. When you reach the other side of your head, twist the hair away from your face.
-
8Allow your hair to set until it is completely cool. How long this takes depends on your hair and how hot your flat iron was. This can take anywhere from a few minutes to 15 minutes.
- Take advantage of the wait time and continue to get ready for the day, such as putting on jewelry or make up.
-
9Remove the clips and undo the ropes or braids. Starting from the bottommost layer, remove the clips 1 by 1. Use your fingers to undo the ropes or braids, then do the upper layer.
-
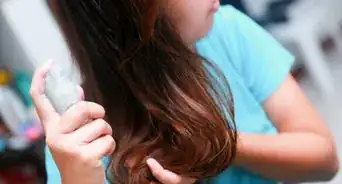
10Mist your hair with dry shampoo and sea salt spray. Apply the dry shampoo to your hair first, then gently comb it through your hair with your fingers. This will help soak up any excess oils and give your hair some texture. Apply some sea salt or beach spray next to give it that final, beachy texture.


Expert Q&A
-
QuestionWhat is the best product for beachy waves?
 Michael Van den AbbeelMichael Van den Abbeel is a Professional Hair Stylist and the Owner of Mosaic Hair Studio and Blowout Bar in Orlando, Florida. He has been cutting, styling, and coloring hair for over 17 years. Michael loves showing his clients how to wash and wear their hair easily and effortlessly. Mosaic Hair Studio and Blowout Bar is recognized as a Diamond Top Tier level Wella salon.
Professional Hair StylistWhile you can use a volumizing spray, it's best to use a sea salt or beach spray made for hair. -
QuestionShould you comb out curls?Michael Van den AbbeelMichael Van den Abbeel is a Professional Hair Stylist and the Owner of Mosaic Hair Studio and Blowout Bar in Orlando, Florida. He has been cutting, styling, and coloring hair for over 17 years. Michael loves showing his clients how to wash and wear their hair easily and effortlessly. Mosaic Hair Studio and Blowout Bar is recognized as a Diamond Top Tier level Wella salon.
Professional Hair StylistJust use your fingers or a wide-tooth comb to comb out your curls and create waves. Don't use a brush because it'll make your hair frizzy. -
QuestionHow can I get my hair straightener to not slip off my hair?
 Community AnswerBe aware of the angle you are holding your iron. If it's too angled, your hair will slip off of/out of it. Also, make sure you are not trying to put too much hair in contact with it at once. Take your time and try smaller sections.
Warnings
- Be careful not to touch the hot, metal plates.⧼thumbs_response⧽
- Remember to turn the iron off once you are done styling your hair.⧼thumbs_response⧽
- Never use a flat iron on wet or damp hair.⧼thumbs_response⧽
Things You'll Need
- Hair brush
- Flat iron
- Heat protectant spray
- Hair clips
- Hairspray, dry shampoo, and/or sea salt spray
- Wide-toothed comb (optional)

References
- ↑ Michael Van den Abbeel. Professional Hair Stylist. Expert Interview. 7 January 2019.
- ↑ http://www.refinery29.com/how-to-style-beach-waves#slide-2
- ↑ http://www.refinery29.com/how-to-style-beach-waves#slide-2
- ↑ Michael Van den Abbeel. Professional Hair Stylist. Expert Interview. 7 January 2019.
- ↑ http://www.refinery29.com/how-to-style-beach-waves#slide-3
- ↑ http://www.refinery29.com/how-to-style-beach-waves#slide-4
- ↑ http://www.refinery29.com/how-to-style-beach-waves#slide-6
- ↑ https://abeautifulmess.com/2014/07/how-to-create-beachy-waves-with-a-flat-iron.html
- ↑ https://abeautifulmess.com/2014/07/how-to-create-beachy-waves-with-a-flat-iron.html
- ↑ https://abeautifulmess.com/2014/07/how-to-create-beachy-waves-with-a-flat-iron.html
- ↑ Michael Van den Abbeel. Professional Hair Stylist. Expert Interview. 7 January 2019.
- ↑ https://abeautifulmess.com/2014/07/how-to-create-beachy-waves-with-a-flat-iron.html
- ↑ https://abeautifulmess.com/2014/07/how-to-create-beachy-waves-with-a-flat-iron.html
- ↑ https://www.brit.co/wavy-hair/
- ↑ https://www.brit.co/wavy-hair/
- ↑ https://www.brit.co/wavy-hair/
- ↑ https://www.brit.co/wavy-hair/
- ↑ https://www.brit.co/wavy-hair/
- ↑ https://www.brit.co/wavy-hair/
- ↑ Michael Van den Abbeel. Professional Hair Stylist. Expert Interview. 7 January 2019.
- ↑ https://www.brit.co/wavy-hair/
About This Article

To make beach waves in your hair with a flat iron, you’ll need to apply a heat protectant first to avoid damage. Then, take a 1-2 inch piece of hair and place it inside your flat iron close to the roots. Twist the iron upwards while pulling the end of your hair downwards. Next, move the iron a few inches down your hair and clamp it again. Rotate the iron downwards as you pull the end of your hair upwards. Repeat this process until you reach the bottom of your section of hair, then continue in the same way to make waves with all of your hair. For tips from our Beauty co-author on how to use a flat iron as a curling iron, read on!