This article was co-authored by wikiHow Staff. Our trained team of editors and researchers validate articles for accuracy and comprehensiveness. wikiHow's Content Management Team carefully monitors the work from our editorial staff to ensure that each article is backed by trusted research and meets our high quality standards.
wikiHow marks an article as reader-approved once it receives enough positive feedback. This article received 15 testimonials and 83% of readers who voted found it helpful, earning it our reader-approved status.
This article has been viewed 260,201 times.
Learn more...
Clay for pottery and other art forms can easily be made from the soil in your own backyard. It's a time consuming, but simple process. All you need are a few containers, some soil, water, and a cloth. This will allow you to separate the clay from the sediment and thicken it.
Steps
Mixing a Sludge
-
1Collect some soil. You will want to collect your soil from beneath the topsoil. The topsoil is usually two to eight inches (five to twenty centimetres) deep and contains a higher concentration of contaminants. Avoiding this top layer of soil will help eliminate organic debris such as living plants, roots, and insects. The more soil you collect, the more clay you can make.
-
2Add soil to a container. The size of the container will depend on how much soil you are using. Fill the container about two-thirds full of soil. Try to avoid using bottlenecked containers, as they may make it harder to pour contents out in later steps.
- To help eliminate debris you could sift the soil before adding it to the container. However, this is not necessary.
Advertisement -
3Mix water into the soil. You can use water straight from your tap. Be sure to thoroughly stir the mixture. You should eliminate all clumps and have an even mixture of water and soil.


Separating Clay from Sediment
-
1Let the mixture sit. The clay will separate from the sediment and be suspended in the water. The ‘clay water’ will float on top of the sediment. Be careful not to shake the container or stir the sediment that now rests at the bottom.[1]
-
2Pour the clay water into another container. Be careful not to pour any sediment into your new container. Once you see the sediment reach the lip of the original container stop pouring. Once you have poured off the clay water, you can discard the sediment.
-
3Repeat this process four to five times. Add water, stir the mixture, let it set, and pour the clay water into another container. Each time you do this, the clay will be purer. Ideally, you will continue the process until you see no sediment at the bottom.


Thickening the Clay
-
1Allow the clay to separate from the water. Since the clay is just suspended in the water and not highly soluble, it will settle at the bottom if left alone. The clay water will need to sit for at least twenty-four hours. The water and clay will form two separate layers. You will be able to tell when this happens because the water will be clear.[2]
- If you still see a layer of sediment below the clay repeat the steps to remove the sediment.
-
2Pour the water off of the clay. Once you see the clay reach the lip of the container, stop pouring. The clay will be soft and saturated with water. If you pour it out, you will have to start over.
-
3Let the clay sit. As the clay settles, even more water will move up and create another top water layer. Pour the clear water off of the clay again. Once the clay reaches the lip of the container, stop pouring.
- You can repeat this process until the water is no longer forming a substantial layer.
-
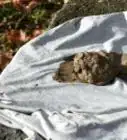
4Pour the clay into a cloth. Lay the cloth over a bowl to help guide the runny clay into the cloth. The cloth must be large enough to encompass all of the clay in your container. The cloth will act as a bag for the clay. Tie the cloth with a piece of string as though you are creating a ball of clay inside the cloth.
- Any cloth will do. You can use an old t-shirt or bedsheet. Be sure to use something that you don’t mind getting dirty.
- You can split the clay into multiple cloths to speed up the hardening process.
-
5Hang the cloth bag. This will allow water to drip from the fabric. As the water leaves the clay, the clay will harden. This process can take two or three days
- Be sure to hang it somewhere where you don’t mind water dripping. You could hang it from a tree or your porch.
- After a couple of days check the consistency of the clay. Different projects require different consistency. If you need it to be harder, let it hang longer.
-
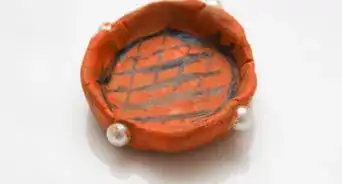
6Finished.


Community Q&A
-
QuestionHow long do you let the sludge sit to separate?
 Community Answer24 hours usually works, unless you see a distinct layer on top of cloudy water.
 -
QuestionHow much soil do I need to make 0.5 pounds of clay?Community AnswerThat will depend on how rich in clay your soil is. Try it with 1 pound of soil and see how much clay you end up with. Adjust accordingly.
-
QuestionHow can I make clay soil?
 Community AnswerYou should follow the instructions in the article that is listed above.
Warnings
- Making clay is messy. Be sure to do it in an area and with materials that you don’t mind getting dirty.⧼thumbs_response⧽

References
About This Article

It’s relatively easy to make clay from indigenous soil in your own backyard. All you'll need are a few containers, soil, water, and a cloth. It’s important to collect soil from at least 8 inches deep so you don't get any debris, like plants, roots, and insects, in your clay. You’ll need to mix the soil with water in a container to get rid of the clumps, then leave it to sit until the water and soil separates. Then, you'll need to pour the clay water out and leave it to separate again. After a few repetitions, the water will stop separating from the soil. At that point, all you'll need to do is pour your clay into a cloth and hang it to dry for 2 to 3 days. For more tips, including how to make colored clay, read on!