wikiHow is a “wiki,” similar to Wikipedia, which means that many of our articles are co-written by multiple authors. To create this article, 46 people, some anonymous, worked to edit and improve it over time.
The wikiHow Video Team also followed the article's instructions and verified that they work.
This article has been viewed 643,017 times.
Learn more...
Paper clay is a cheap, handy sculpting material made from toilet paper, glue, and a few other hardware store supplies. It's used in place of paper mache strips for a smoother, more realistic finish. Paper clay only takes about five minutes to make, and it air-dries into a hard, detailed surface you can paint.
Steps
Making Paper Clay
-
1Gather your supplies. To make paper clay, you'll need toilet paper as well as a few supplies you can find at the hardware store. This recipe results in a smooth, malleable clay you can mold over any type of prepared form. It dries into a hard surface to which you can apply paint or varnish. Here's what you need:[1]
- 1 roll of single ply toilet paper (not the kind with lotion, scent or color added)
- 1 cup premixed joint compound (do not buy it in powdered form; get "regular")
- 3/4 cup PVA glue (white school glue)
- 2 tablespoons mineral oil
- 1/2 cup white flour
- 2 large bowls
- Electric mixer
- Measuring cups
-
2Remove the toilet paper from the roll. It's less messy to slip the entire roll of paper off of the cardboard roll at once, rather than unwinding the paper entirely. Place the toilet paper in one of the bowls.Advertisement
-
3Fill the bowl with water. Pour it over the toilet paper until it's completely saturated. Push the toilet paper down into the water to make sure it all gets wet.
-
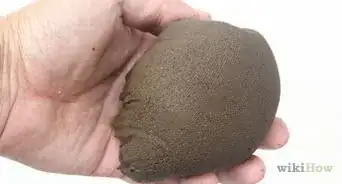
4Squeeze out the toilet paper and place the pulp in a separate bowl. Tear it off in smaller chunks (1 inch or less) so you can squeeze out as much water as possible. Place the pulpy chunks in a separate bowl so you can mix them with the other ingredients. Keep going until you've squeeze out all of the toilet paper.
-
5Measure 1 1/2 cups of toilet paper pulp. One roll of plain toilet paper typically equals a cup and a half of pulp. If your brand of toilet paper makes very small or large rolls, you might end up with less or more pulp than you need. Make more toilet paper pulp or discard the excess as needed, so you have 1 1/2 cups of pulp in the bowl.
-
6Add the remaining ingredients. To the bowl with the pulp, add a cup of premixed joint compound, 3/4 cup white school glue, 2 tablespoons (29.6 ml) mineral oil, and 1/2 cup white flour.
- Do not substitute these ingredients. Different types of glue, oil, flour, and so one will change the consistency of the paper clay and may not produce the results you want.
-
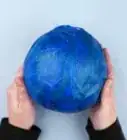
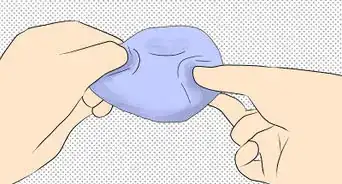
7Mix up the clay until smooth. Use your electric mixer to beat the clay at a high speed. The paper fibers will break down and blend with the joint compound, glue, oil and flour until it takes on a smooth, dough-like consistency.
- If you want a thicker clay, mix in an extra half cup of flour.
- For a thinner consistency, add an extra half cup of glue.

Using Paper Clay
-
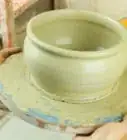
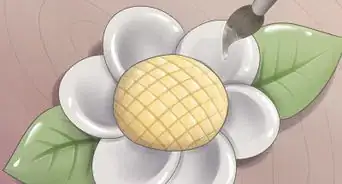
1Prepare a sculpture form. Paper clay is used in place of paper mache strips, which are typically dipped in water and applied to a wire or masking tape sculpture form. Paper clay is used the exact same way, but with a neater, more professional finish. Prepare your sculpture form for its clay application.[2]
-
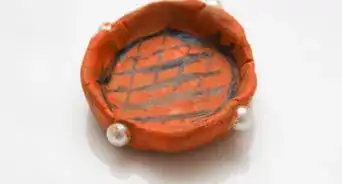
2Spread the clay onto the form using a knife or your fingers. The paper clay will be spreadable, like icing, and you should be able to spread it directly onto the form for a smooth finish. Completely coat the form in clay, just as you would if you were using paper mache strips.
- If you prefer to use thicker clay and sculpt with your fingers, follow the instructions above for adding extra flour to create a thicker consistency. Use your fingers, a spoon, and any other tools you want to coat your sculpture form in paper clay.
- Let the first layer set. It will begin to harden into a tough outer coating upon which you can build using more paper clay.
-
3Add more layers. Apply extra layers of clay in places where you want your sculpture to look thick. Keep building layers, letting them set, and adding more as needed. You can add as many or as few layers as you want to your sculpture form. The more you add, the heavier your sculpture will be.
-
4Create detail with your fingers and other tools. For example, if you're sculpting a face, the paper clay will allow you to add intricate detail around the eyes, nose and mouth. Continue building the sculpture with your fingers and other sculpting tools until you're happy with the result.[3]
-
5Let the clay completely dry before painting. After a day or two it will be as hard as a rock. Don't apply paint or varnish until it's completely dry. Paper clay works well with any type of paint or varnish you wish to use.
-
6Store leftover clay in an airtight container. This will prevent it from drying out between uses. If kept in an airtight container, the clay will keep for several weeks.
Community Q&A
-
QuestionWhich flour can I use to make paper clay?
 Community AnswerAny kind of flour will work.
 -
QuestionCan we use normal paper instead of toilet paper?
 Community AnswerYes you can. However. the timing for each step would take a little longer due to the consistency of the paper.
 -
QuestionCan this be sanded down smooth after it dries?
 Community AnswerYes. It can be sanded, drilled and carved.
Warnings
- Be sure to store the clay in an airtight container to prevent it from drying out.⧼thumbs_response⧽
Things You'll Need
- Toilet paper roll
- 1 cup premixed joint compound (do not buy it in powdered form; get "regular")
- 3/4 cup PVA glue (white school glue)
- 2 tablespoons mineral oil
- 1/2 cup white flour
- 2 large bowls
- Electric mixer
- Measuring cups
References
About This Article
If you want to make paper clay, slip the cardboard out of a whole roll of toilet paper, then place the paper into a large bowl. Fill the bowl with water, making sure the paper gets completely saturated, then tear off chunks of paper and squeeze out the water to create pulp. Place the pulp into a second bowl and add premixed joint compound, white school glue, mineral oil, and white flour. Mix up the clay in an electric mixer until it’s smooth. Store unused clay in in airtight container. If you want to learn more, like how to sculpt with your paper clay, keep reading the article!